Epson Stylus Photo R2000 Series ® Basics
Copyright Notice All rights reserved. No part of this publication may be reproduced, stored in a retrieval system, or transmitted in any form or by any means, electronic, mechanical, photocopying, recording, or otherwise, without the prior written permission of Seiko Epson Corporation. The information contained herein is designed only for use with this Epson product. Epson is not responsible for any use of this information as applied to other equipment.
Contents Introduction . . . . . . . . . . . . . . . . . . . . . . . . . . . . . . . . . . . . . . . . . . . 5 Loading Paper . . . . . . . . . . . . . . . . . . . . . . . . . . . . . . . . . . . . . . . . . 6 Loading Paper in the Sheet Feeder . . . . . . . . . . . . . . . . . . . . . . . . . . . . . . 6 Loading Paper Using the Single Sheet Guide . . . . . . . . . . . . . . . . . . . . . . . 8 Loading Roll Paper . . . . . . . . . . . . . . . . . . . . . . . . . . . . . . . . . . . . . . . .
Problems and Solutions . . . . . . . . . . . . . . . . . . . . . . . . . . . . . . . . . . . . . 46 Where to Get Help . . . . . . . . . . . . . . . . . . . . . . . . . . . . . . . . . . . . . . . . 51 Notices. . . . . . . . . . . . . . . . . . . . . . . . . . . . . . . . . . . . . . . . . . . . . . .
Introduction Your Epson Stylus® Photo R2000 Series printer gives you beautiful archival prints on a wide variety of glossy and matte papers in many sizes. Your outstanding printouts result from these advanced features: ■ Epson UltraChrome Hi-Gloss® 2 ink cartridges, including red and orange inks for improved skin tones and increased vibrancy. ■ Improved gloss optimizer cartridge provides a smooth, uniform glossy coat on glossy papers for an unprecedented look and feel.
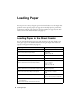
Loading Paper You can print on a variety of paper types in the sheet feeder, or use the single sheet guide for certain specialty papers (see page 8). For multiple photos, panoramics, and banners, load roll paper using the roll paper holders (see page 10). For thick media, use the front manual feed slot (see page 13). Loading Paper in the Sheet Feeder You can load the following paper types and quantities in the sheet feeder.
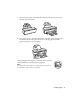
1. Open the paper support and pull up the extensions, then open the output tray and pull out the extensions. 2. Insert paper, glossy or printable side up, short edge first, against the right side and beneath the tab. Then press the button on the edge guide and slide it against the paper (but not too tightly). Always load paper short edge first, even for landscape printing. Load letterhead or pre-printed paper top edge first. Note: The edge guide moves slightly during paper feeding and printing.
Loading Paper Using the Single Sheet Guide You can print professional quality photos on these paper types using the single sheet guide and the rear manual feed slot: ■ Premium Photo Paper Glossy ■ Ultra Premium Photo Paper Luster ■ Epson Velvet Fine Art Paper ■ Epson Matte Scrapbook Photo Paper (See page 15 for available sizes.) 1. Remove any paper from the sheet feeder and close the paper support. 2. Open the output tray and pull out the extensions. 3.
5. Make sure the printer is on so it can load the paper correctly. 6. Insert one sheet of paper, printable side up and against the right side, then slide the edge guide against the sheet, but not too tightly. Note: Load paper short edge first, no matter which way your photo faces. Check the paper package for any additional loading instructions. 7. Guide the paper into the printer until it meets resistance and hold it there until the printer pulls it in slightly.
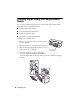
Loading Roll Paper You can load roll paper or canvas media for printing large images, panoramic images, or multiple photos, with or without borders. You can load roll paper in these widths: ■ 8.3-inches wide ■ 13-inches wide (See page 15 for a list of roll paper and canvas media types and sizes.) Tip: It’s a good idea to check the ink status and replace cartridges, if necessary, before loading roll paper (see page 35).
Note: Avoid touching the surface of your paper or canvas media. With canvas media that you have previously loaded, it’s a good idea to cut the edge straight each time you reload it. 6. Move the roll paper edge guide at the back of the printer all the way to the right. 7. Insert the left roll paper holder (marked with a triangle) into the far left slot on the back of the printer (marked with an orange triangle). Then insert the right roll paper holder in the corresponding slot on the right. 8.
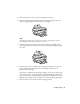
9. Slide the roll paper edge guide against the right side of the paper, but not too tightly. Caution: Do not load roll paper or canvas media into the auto sheet feeder (marked with up orange triangles). 10. Guide the paper into the slot until it meets resistance and hold it there until the printer pulls it in slightly. Once the printer begins feeding the paper, let go of it. Note: When loading canvas media, leave 2 to 3 inches of slack in the roll as it feeds and prints for the best results.
3. If you are finished printing on roll paper or canvas media, press and hold the M roll paper button for 3 seconds to feed the paper backward and out of the printer. If it does not feed all the way out, press the M roll paper button again. 4. Turn the knobs on the roll paper holders backward to roll up the paper, then remove the paper and holders from the printer. 5. Press the I paper button to stop the I paper light from flashing.
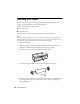
5. Open the front manual feed slot cover and slide the edge guide left. 6. Insert one sheet of thick media into the front manual feed slot, short edge first with the printable side face-up, until the trailing edge is aligned with the arrows. 7. Slide the edge guide to the side of the media, but not too tightly. Note: If the printer doesn’t load the media and the I paper light flashes when printing starts, gently pull out the media and turn off the printer. Then turn on the printer and try again.
Available Epson Papers Epson offers a wide array of high quality papers, making it easy to maximize the impact of your photos, presentations, and creative projects. You can purchase genuine Epson ink and paper at Epson Supplies Central® at www.epson.com/ink3 (U.S. sales) or www.epson.ca (Canadian sales). You can also purchase supplies from an Epson authorized reseller. To find the nearest one, call 800-GO-EPSON (800-463-7766).
Part number Sheet count 4 × 6 inches S041809 S042038 50 100 Letter (8.5 × 11 inches) S041141 S041649 S041271 20 50 100 B (11 × 17 inches) S041156 20 Super B (13 × 19 inches) S041143 20 4 × 6 inches S041982 S042122 40 250 Letter (8.5 × 11 inches) S041331 20 Super B (13 × 19 inches) S041327 20 Letter (8.5 × 11 inches) S041405 S041913 50 250 A4 (8.3 × 11.7 inches) S041602 250 A3 (11.7 × 16.5 inches) S041406 50 Super B (13 × 19 inches) S041407 S041604 50 100 8.3 inches × 32.
Paper name Size Part number Sheet count Epson Premium Presentation Paper Matte Double-sided Letter (8.5 × 11 inches) S041568 50 Epson Presentation Paper Matte Letter (8.5 × 11 inches) S041062 100 Legal (8.5 × 14 inches) S041067 100 B (11 × 17 inches) S041070 100 Super B (13 × 19 inches) S041069 100 Letter (8.
Printing From Start to Finish This section describes basic printing from your Windows® or Macintosh® computer. For detailed instructions, see the online User’s Guide. You can also print label designs directly onto ink jet-printable CDs or DVDs. See page 29 and the online User’s Guide for details. To print photos directly from a PictBridge®-compatible digital camera connected to the R2000 Series, see the online User’s Guide.
3. On the Main tab, select the Media Type setting that matches the paper you loaded (see page 27). 4. For the Color setting, select Color or Grayscale for any type of photographic printing.
5. For the Print Quality setting, select Speed or Quality, or select Quality Options to display a window like this: Use the Speed/Quality slider to set from the following quality levels: ■ LEVEL 1 for fast printing with draft quality. ■ LEVEL 2 for everyday text and image printing. ■ LEVEL 3 for photos and graphics with good print quality and speed. ■ LEVEL 4 for photos and graphics with high print quality and slower speed.
■ Epson Vivid processes colors to create standard hues. ■ Photo Enhance lets you choose from various Scene Correction settings to automatically analyze your photos and, if necessary, adjusts the brightness, contrast, and saturation. ■ ICM automatically adjusts colors based on the printer’s ICC profile and the selected Media Type setting, using the Image Color Matching system. ■ Off (No Color Adjustment) disables color management in the printer driver.
9. If you’re printing borderless photos, select Borderless, if available. To adjust the borderless expansion setting click Expansion. 10. To reduce or enlarge your printout or print double-sided, click the Page Layout tab and select settings as necessary. (Click Help or see your online User’s Guide for details.) 11. Click OK to save your settings. 12. Click OK or Print to start printing. This window appears and shows the progress of your print job.
Printing With Mac OS X Follow the steps below to print from Mac OS® X 10.5 to 10.6. 1. Open a photo or document in a printing program, open the File menu, and select Print. 2. Select your product as the Printer setting. 3. Click the arrow to expand the Print window, if necessary. Select your Epson product Click to expand 4. Select the Paper Size setting for the paper size and source you are using: ■ To print a borderless photo, select a paper size with a Borderless option.
6. Select Print Settings from the pop-up menu. Note: In certain programs, you may need to select Advanced before you can select Printer Settings. For more information about print settings, click the ? button. 7. Select the Media Type setting that matches the paper you loaded (see page 27). Note: The ink type will change depending on the size and type of paper you select. To avoid changing black ink more often than necessary, switch the printer to the type of black ink you usually use (see page 41). 8.
9. Select one of the following as the Color setting: ■ Epson Standard (sRGB) increases the contrast in images. ■ Epson Vivid processes colors to create standard hues. ■ Adobe RGB matches images colors to the Adobe RGB color standard. Use this setting if your source file was captured in Adobe RGB. Note: For color management instructions, see http://www.epson.com/SPR2000Profiles. For more information about print settings, click Help or see your online User’s Guide. 10.
12. To monitor your print job, click the printer icon in the dock. Cancel printing Pause or resume printing Select the print job Note: If you’re printing on roll paper, see page 12 for instructions on removing your printed photos and paper, if necessary.
Selecting the Correct Paper Type Select the correct Media Type setting in your printer software (see page 19 for Windows or page 24 for Mac OS). This adjusts ink coverage for your media.
Media usable with Matte Black ink (see page 41): (continued) For this paper/media Select this setting Epson Hot Press Bright Hot Press Bright Epson Hot Press Natural Hot Press Natural Epson Cold Press Bright Cold Press Bright Epson Cold Press Natural Cold Press Natural Ink jet-printable CD or DVD CD/DVD CD/DVD Premium Surface 28 Printing From Start to Finish
Printing on CDs and DVDs You can use your R2000 Series and the Epson Print CD software that came with it to print label designs directly onto ink jet-printable CDs or DVDs. To prevent errors, you should burn files, music, or video onto your CD or DVD before printing. Follow the steps in these sections: ■ “Loading a CD or DVD” on page 29 ■ “Printing on a CD or DVD” on page 31 ■ “Removing Your Printed CD/DVD” on page 32 Loading a CD or DVD 1. Turn on the printer. 2.
5. Place your disc on the CD/DVD tray with the label side up. 12-cm discs 8-cm discs Note: For small 8-cm discs, place the adapter on the tray and then place the disc in the adapter. 6. Insert the tray into the front manual feed slot. Then slide the edge guide against the left side of the CD/DVD tray. 7. Make sure that the CD/DVD tray is beneath the guide rails, then slide the tray in until the arrows are aligned.
When you send your CD/DVD print job to the printer, it automatically places the disc in the correct print position and ejects it automatically when printing finishes. Caution: Do not turn the R2000 Series on or off with a CD or DVD loaded in it. Always remove the disc first (see page 32). Printing on a CD or DVD When you installed the software for the R2000 Series, you installed the Epson Print CD program for printing label designs directly onto CDs or DVDs.
Note: If you’re using discs whose printable area extends to within 0.16 inch (4 mm) of the edge of the center hole, you may need to adjust the Inner/Outer Diameter setting in the File menu of the Epson Print CD software. See the program’s Help utility for instructions. 3. When you’re ready to print on the disc, open the File menu and select Print. You see one of these windows: Windows Mac OS X 4. Select your Epson printer, if necessary. 5. Click Print.
Maintaining Your Printer Follow the steps in these sections to keep the R2000 Series working at its best: ■ “Checking and Cleaning the Print Head” below ■ “Checking and Aligning the Print Head” on page 34 ■ “Checking the Ink Cartridge Status” on page 35 ■ “Replacing Ink Cartridges” on page 37 ■ “Switching Black Ink Types” on page 41 ■ “Cleaning the Rollers” on page 42 Checking and Cleaning the Print Head You can check and clean the print head nozzles automatically using the Auto Nozzle Check and
3. Click Start and follow the on-screen instructions to allow the printer to print and examine the nozzle check pattern. If necessary, the printer cleans the print head, and may print and check the nozzle check pattern a few times. If nozzles are still clogged, you see a message telling you to clean the print head manually. See the online User’s Guide for instructions.
3. To have the printer check and align the print head automatically, click Automatic, then click OK. Follow the on-screen instructions to print the alignment check patterns and align the print head as necessary. To align the print head manually, click the Manual button and follow the on-screen instructions, or see the online User’s Guide for detailed steps.
To check the ink cartridge status at anytime, do one of the following: Windows: Double-click the icon in the bottom right corner of your screen (the taskbar). You see the screen to the right. Mac OS X: 1. Open the Applications folder. 2. Open the Epson Software folder. 3. Open the EPSON Printer Utility4. 4. Select SP R2000, click OK, and select EPSON StatusMonitor. You see the screen to the right.
Replacing Ink Cartridges You can purchase genuine Epson ink and paper at Epson Supplies Central at www.epson.com/ink3 (U.S. sales) or www.epson.ca (Canadian sales). You can also purchase supplies from an Epson authorized reseller. To find the nearest one, call 800-GO-EPSON (800-463-7766).
Make sure you have a new ink cartridge before you begin. You must install new cartridges immediately after removing the old ones. 1. Remove the CD/DVD tray or thick media and close the front manual feed slot cover before replacing ink. If you have roll paper or canvas media loaded in the printer, remove it to prevent ink marks on the paper (see page 12). 2. Open the printer cover. 3. Press the H ink button to move the print head to the ink replacement position.
5. Squeeze the tab on the cartridge and lift the cartridge straight up to remove it. Dispose of it carefully. Do not take the used cartridge apart or try to refill it. Warning: If ink gets on your hands, wash them thoroughly with soap and water. If ink gets into your eyes, flush them immediately with water. Keep ink cartridges out of the reach of children. 6. Before opening the cartridge package, shake the package four or five times. Note: All cartridges make a clicking sound when you shake them.
9. Insert the new cartridge into the holder and push it down until it clicks into place. 10. Once you replace all the necessary cartridges, close the cartridge cover and push it down until it clicks into place. 11. Close the printer cover. 12. Press the H ink button to begin charging the ink. This takes about 2 1/2 minutes. The P power light flashes as the ink charges. When the P power light stops flashing and the H ink light goes out, ink charging is finished.
Switching Black Ink Types Your printer comes with Matte Black and Photo Black ink cartridges. Although both must be installed for the printer to work, the printer can use only one type of ink at a time. The printer will switch ink automatically, depending on the type of media you load.
The following media use Photo Black ink: ■ Premium Photo Paper Glossy ■ Ultra Premium Photo Paper Glossy ■ Premium Photo Paper Semi-gloss ■ Ultra Premium Photo Paper Luster ■ Exhibition Canvas Satin Cleaning the Rollers If you notice lines or streaks on your printouts, you may need to clean the rollers inside the printer by feeding several sheets of plain paper through it. Note: If paper dust builds up on the rollers, they may lose traction and become unable to feed paper properly.
Solving Problems If you have a problem with your Epson product, check the status of the printer lights to diagnose the cause. You can also check the basic troubleshooting suggestions below or in your online User’s Guide. The User’s Guide provides detailed help and easy access to Epson’s support website, FAQs, and paper and ink purchasing. Checking for Software Updates Periodically, it’s a good idea to check Epson’s support website for free updates to your Epson Stylus Photo R2000 Series software.
Checking the Printer Lights Check the status of the printer lights to solve the most common problems. If an error occurs, follow the instructions in the table below. Network light (green) Network light (orange) Power light Paper light Ink light Light status Problem and solution I paper on Paper may be out or multiple sheets may have fed into the sheet feeder. Load paper, if necessary (see page 6), and press the I paper button. Roll paper or canvas media may be out. See page 10 to load roll paper.
Light status Problem and solution P power on I paper and H ink flashing or flashing alternately An unsupported device is connected to the external USB port. Connect only a PictBridge compatible digital camera to the external USB port (see the online User’s Guide). P power off I paper and H ink flashing alternately Parts inside the R2000 Series are at the end of their service life or an unknown error has occurred. Contact Epson for help (see page 51).
Problems and Solutions Check the solutions below if you’re having trouble using your printer. Printing Problems ■ Make sure your paper is loaded printable side up, short edge first, and all the way to the right (see page 6 and page 8). ■ When using the sheet feeder, don’t load paper above the arrow mark on the left edge guide. Load only one sheet of compatible paper when using the single sheet guide (see page 8).
■ If paper is jammed, try the following, depending on how you’re printing: Sheet feeder or rear manual feed slot: Press the I paper button to eject any jammed sheets, then open the printer cover and remove any paper jammed inside. Press the I paper button again to clear the error, then reload paper. Roll paper slot: Cut off any printed roll paper or canvas media, then remove (see page 12) and reload (see page 10) the paper.
■ Remove sheets from the output tray as they eject. Let your prints dry separately for at least 12 hours before framing or placing in a protective sheet. If you need to stack them, place a sheet of plain paper between each print. ■ If you notice light or dark bands across your printouts or they are too faint, you may need to clean the print head. Run a nozzle check and clean the print head if necessary (see page 33).
■ If your wireless router or access point doesn’t broadcast its network name (SSID), manually enter your wireless network name. If your wireless router or access point has wireless security enabled, you will also need to know what kind of security it is using. The product does not appear in the Add Printer window (Mac OS X) Make sure the printer driver was installed correctly and that your computer’s TCP/IP settings are configured correctly.
■ Make sure your firewall or security software is not set to block port 3629 (TCP/UDP). Contact your firewall manufacturer for assistance. Printing Is Slow or the Print is Cut Off Print a Network Status Sheet by pressing the the network information button and check the signal strength. If it’s poor, try moving the product closer to your wireless router or access point. Avoid placing the product next to a microwave oven, 2.4 GHz cordless phone, or large metal objects such as a filing cabinet.
Where to Get Help Epson Technical Support Internet Support Visit Epson’s support website at epson.com/support/r2000 (U.S.) or epson.ca/ support/r2000 (Canada) and select your product for solutions to common problems. You can download drivers and documentation, get FAQs and troubleshooting advice, or e-mail Epson with your questions.
Notices Important Safety Instructions Before using your R2000 Series, read and follow these safety instructions: ■ Be sure to follow all warnings and instructions marked on this product. ■ Use only the type of power source indicated on the product label. ■ Place this product near a wall outlet where the plug can be easily unplugged. ■ If you won’t be using this product for a long period, unplug the power cord from the electrical outlet.
■ Except as specifically explained in your documentation, do not attempt to service this product yourself. ■ Unplug this product and refer servicing to qualified service personnel under the following conditions: if the power cord or plug is damaged; if liquid has entered this product; if this product has been dropped or the case damaged; if this product does not operate normally or exhibits a distinct change in performance. Adjust only those controls that are covered by the operating instructions.
Wireless Network Safety ■ Do not use this product inside medical facilities or near medical equipment. Radio waves from the product may adversely affect the operation of medical equipment. ■ Keep this product at least 9 inches (22 cm) away from cardiac pacemakers. Radio waves from this product may adversely affect their operation. ■ Do not use this product near automatically controlled devices such as automatic doors or fire alarms. Radio waves from this product may adversely affect these devices.
This warranty does not cover any color change or fading of prints or reimbursement of materials or services required for reprinting. This warranty does not cover damage to the Epson product caused by parts or supplies not manufactured, distributed or certified by Epson. This warranty does not cover ribbons, ink cartridges or third party parts, components, or peripheral devices added to the Epson product after its shipment from Epson, e.g., dealer or user-added boards or components.
Declaration of Conformity According to 47CFR, Part 2 and 15 for: Class B Personal Computers and Peripherals; and/or CPU Boards and Power Supplies used with Class B Personal Computers: We: Located at: Epson America, Inc. MS 3-13 3840 Kilroy Airport Way Long Beach, CA 90806 Telephone: (562) 981-3840 Declare under sole responsibility that the product identified herein, complies with 47CFR Part 2 and 15 of the FCC rules as a Class B digital device.
FCC Compliance Statement For United States Users This equipment has been tested and found to comply with the limits for a Class B digital device, pursuant to Part 15 of the FCC Rules. These limits are designed to provide reasonable protection against harmful interference in a residential installation. This equipment generates, uses, and can radiate radio frequency energy and, if not installed and used in accordance with the instructions, may cause harmful interference to radio or television reception.
Notices
Notices 59
Notices