spr2880_ug.
spr2880_ug.book Page 2 Monday, April 6, 2009 1:10 PM Copyright Notice All rights reserved. No part of this publication may be reproduced, stored in a retrieval system, or transmitted in any form or by any means, electronic, mechanical, photocopying, recording, or otherwise, without the prior written permission of Seiko Epson Corporation. The information contained herein is designed only for use with this Epson product. Epson is not responsible for any use of this information as applied to other equipment.
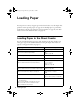
spr2880_ug.book Page 3 Monday, April 6, 2009 1:10 PM Contents Loading Paper . . . . . . . . . . . . . . . . . . . . . . . . . . . . . . . . . . . . . . . . . 6 Loading Paper in the Sheet Feeder . . . . . . . . . . . . . . . . . . . . . . . . . . . . . . 6 Loading Paper Using the Single Sheet Guide . . . . . . . . . . . . . . . . . . . . . . . 8 Loading Roll Paper . . . . . . . . . . . . . . . . . . . . . . . . . . . . . . . . . . . . . . . . 11 Loading Thick Media . . . . . . . . . . . . . . . . . . . . .
spr2880_ug.book Page 4 Monday, April 6, 2009 1:10 PM Solving Problems . . . . . . . . . . . . . . . . . . . . . . . . . . . . . . . . . . . . . 49 Checking for Software Updates . . . . . . . . . . . . . . . . . . . . . . . . . . . . . . . Checking the Printer Lights . . . . . . . . . . . . . . . . . . . . . . . . . . . . . . . . . . Problems and Solutions . . . . . . . . . . . . . . . . . . . . . . . . . . . . . . . . . . . . . Where To Get Help . . . . . . . . . . . . . . . . . . . . . . . . . . . . . . .
spr2880_ug.book Page 5 Monday, April 6, 2009 1:10 PM Introduction Your Epson Stylus® Photo R2880 Series printer gives you exhibition quality prints on a wide variety of glossy and matte papers in many sizes. Your outstanding printouts result from these advanced features: ■ Epson UltraChrome K3™ with Vivid Magenta ink cartridges for unprecedented gray balance, outstanding tonal range, and astounding color. ■ Enhanced media handling including thick, fine art paper, 1.0 to 1.
spr2880_ug.book Page 6 Monday, April 6, 2009 1:10 PM Loading Paper You can print on a variety of paper types in the sheet feeder, or use the single sheet guide for certain specialty papers (see page 8). For multiple photos, panoramics, and banners, load roll paper using the roll paper holders (see page 11). For thick media, use the front manual feed slot (see page 14). Loading Paper in the Sheet Feeder You can load the following paper types and quantities in the sheet feeder.
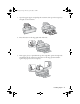
spr2880_ug.book Page 7 Monday, April 6, 2009 1:10 PM 1. Open the paper support and pull up the extensions, then open the output tray and pull out the extensions. 2. Press the button on the edge guide and slide it left. 3. Insert paper, glossy or printable side up, short edge first, against the right side and beneath the tab. Then press the button on the edge guide and slide it against the paper (but not too tightly).
spr2880_ug.book Page 8 Monday, April 6, 2009 1:10 PM Always load paper short edge first, even for landscape printing. Load letterhead or pre-printed paper top edge first. Note: The edge guide may move slightly during paper feeding and printing. Do not adjust the edge guide or open the printer cover during printing.
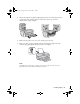
spr2880_ug.book Page 9 Monday, April 6, 2009 1:10 PM 4. Attach the single sheet guide by aligning the notches on its base with the slots on the back of the printer. Then hook the tabs over the top of the slot (marked with orange triangles). 5. Make sure the printer is on so it can load the paper correctly. 6. Insert one sheet of paper, printable side up and against the right side, then slide the edge guide against the sheet, but not too tightly.
spr2880_ug.book Page 10 Monday, April 6, 2009 1:10 PM 7. Guide the paper into the printer until it meets resistance and hold it there until the printer pulls it in slightly. Once the printer begins feeding the paper, let go of it. 8. Open the printer cover and make sure the paper has fed all the way into the printer and is straight. The paper must feed straight so the printer can properly identify the edge.
spr2880_ug.book Page 11 Monday, April 6, 2009 1:10 PM Loading Roll Paper You can load roll paper or canvas media for printing large images, panoramic images, or multiple photos, with or without borders. You can load roll paper in these widths: ■ 8.3-inches wide ■ 13-inches wide (See page 16 for a list of roll paper and canvas media types and sizes.) Tip: It’s a good idea to check the ink status and replace cartridges, if necessary, before loading roll paper (see page 38).
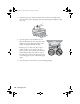
spr2880_ug.book Page 12 Monday, April 6, 2009 1:10 PM Note: Avoid touching the surface of your paper or canvas media. With canvas media that you have previously loaded, it’s a good idea to cut the edge straight each time you reload it. 6. Insert the left roll paper holder (marked with a down orange triangle) into the far left slot on the back of the printer (marked with a right orange triangle). Then insert the right roll paper holder in the corresponding slot on the right. 7.
spr2880_ug.book Page 13 Monday, April 6, 2009 1:10 PM 10. Open the printer cover and look into the printer to make sure the roll paper or canvas media is feeding straight. The paper must feed straight so the printer can properly identify the edge of it. If it is crooked or the front edge is visible, you may receive a paper jam error when you print. To avoid this, press the M roll paper button for three seconds to back the paper out.
spr2880_ug.book Page 14 Monday, April 6, 2009 1:10 PM Loading Thick Media Use the front manual feed slot to load 13 × 19-inch media that is 1.0 to 1.3 mm thick. Note: Make sure there is enough space behind the printer for the media to feed through the printer. 1. Turn on the printer. 2. Remove any roll paper, canvas media, or paper loaded in the sheet feeder or single sheet guide. Then close the paper support. 3. If necessary, remove the single sheet guide (see page 8) or roll paper holders (see page 13).
spr2880_ug.book Page 15 Monday, April 6, 2009 1:10 PM 7. Slide the edge guide to the side of the media, but not too tightly. Note: If the printer doesn’t load the media and the I paper light flashes when printing starts, gently pull out the media and turn off the printer. Then turn on the printer and try again. Caution: Don’t turn off the printer when thick media is loaded or you may damage the printer. To remove the media from the printer without printing, gently pull out the media. 8.
spr2880_ug.book Page 16 Monday, April 6, 2009 1:10 PM Available Epson Papers Epson offers a wide array of high quality papers, making it easy to maximize the impact of your photos, presentations, and creative projects. You can purchase genuine Epson ink and paper at Epson Supplies CentralSM at www.epson.com/ink3 (U.S. sales) or www.epson.ca (Canadian sales). You can also purchase supplies from an Epson authorized reseller. To find the nearest one, call 800-GO-EPSON (800-463-7766).
spr2880_ug.book Page 17 Monday, April 6, 2009 1:10 PM Part number Sheet count 4 × 6 inches S041809 S042038 50 100 Letter (8.5 × 11 inches) S041141 S041649 S041271 20 50 100 B (11 × 17 inches) S041156 20 Super B (13 × 19 inches) S041143 20 4 × 6 inches S041982 S042122 40 250 Letter (8.5 × 11 inches) S041331 20 Super B (13 × 19 inches) S041327 20 Letter (8.5 × 11 inches) S041405 S041913 50 250 A4 (8.3 × 11.7 inches) S041602 250 A3 (11.7 × 16.
spr2880_ug.book Page 18 Monday, April 6, 2009 1:10 PM Paper name Size Part number Sheet count Epson Premium Presentation Paper Matte 8 × 10 inches S041467 50 Letter (8.5 × 11 inches) S041257 S042180 50 100 11 × 14 inches S041468 50 A3 (11.7 × 16.5 inches) S041260 50 Super B (13 × 19 inches) S041263 50 Epson Premium Presentation Paper Matte Double-sided Letter (8.5 × 11 inches) S041568 50 Epson Presentation Paper Matte Letter (8.5 × 11 inches) S041062 100 Legal (8.
spr2880_ug.book Page 19 Monday, April 6, 2009 1:10 PM Printing From Start to Finish This section describes basic printing from your Windows® or Macintosh® computer. For detailed instructions, see the on-screen Reference Guide. You can also print label designs directly onto ink jet-printable CDs or DVDs. See page 31 and the on-screen Reference Guide for details. To print photos directly from a PictBridge®-compatible digital camera connected to the R2880, see the on-screen Reference Guide.
spr2880_ug.book Page 20 Monday, April 6, 2009 1:10 PM 3. On the Main tab, select the Media Type setting that matches the paper you loaded (see page 30). Note: The available media types vary depending on the type of black ink cartridge currently installed (see page 44). 4. For the Color setting, select Color for any type of photographic printing. To print black and white photos using Advanced B&W Photo mode, see your on-screen Reference Guide for instructions.
spr2880_ug.book Page 21 Monday, April 6, 2009 1:10 PM 5. For the Print Quality setting, select Speed, Quality, or Max Quality (available with certain media types only), or select Quality Options to display a window like this: Use the Speed/Quality slider to set from the following quality levels: ■ LEVEL 1 for fast printing with draft quality. ■ LEVEL 2 for everyday text and image printing. ■ LEVEL 3 for photos and graphics with good print quality and speed.
spr2880_ug.book Page 22 Monday, April 6, 2009 1:10 PM 7. Choose the paper Source in which you loaded your paper: ■ Sheet: for sheets of paper loaded in the sheet feeder. ■ Roll Paper: for photos or panoramics up to 27 inches (68.6 cm) long. If desired, click Print page frame to print a cutting guideline around each photo. ■ Roll Paper - Banner: for photos or banners over 27 inches (68.6 cm) long. If desired, click Save Roll Paper to feed small amounts of roll paper between each banner.
spr2880_ug.book Page 23 Monday, April 6, 2009 1:10 PM This window appears and shows the progress of your print job. Check ink cartridge status Cancel printing Pause or resume printing Note: If you’re printing on roll paper or canvas media, see page 13 for instructions on removing your printed photos and paper. Printing With Mac OS X 10.5 1. Open a photo or document in a printing program, open the File menu, and select Print. 2. Select Epson Stylus Photo R2880 as the Printer setting. 3.
spr2880_ug.book Page 24 Monday, April 6, 2009 1:10 PM 4. Select the Paper Size setting for the paper size and source you are using: ■ To print a borderless photo on paper loaded in the sheet feeder, select a paper size with a Sheet Feeder - Borderless option. ■ To print on roll paper or canvas media, create a custom paper size. Select Manage Custom Sizes in the Paper Size pop-up menu. Click the + (plus sign), double-click Untitled and give your paper size a name. For the Width, enter 8.3 for A4- or 12.
spr2880_ug.book Page 25 Monday, April 6, 2009 1:10 PM 6. Select Print Settings from the pop-up menu. Note: In certain programs, you may need to select Advanced before you can select Print Settings. For more information about print settings, click the ? button. 7. Select the Media Type setting that matches the paper you loaded (see page 30). Note: The available media types vary depending on the type of black ink cartridge currently installed (see page 44). 8.
spr2880_ug.book Page 26 Monday, April 6, 2009 1:10 PM 9.
spr2880_ug.book Page 27 Monday, April 6, 2009 1:10 PM Printing With Mac OS X 10.3 to 10.4 1. Open a photo or document in a printing program, open the File menu, and select Page Setup. Select Stylus Photo R2880 Select your Paper Size Select your document or image orientation 2. Select Stylus Photo R2880 as the Format For setting. 3.
spr2880_ug.book Page 28 Monday, April 6, 2009 1:10 PM 7. Select Stylus Photo R2880, choose Print Settings from the pop-up menu, and select the following print settings: Pop-up menu Select your Media Type (see page 30) Select Color or Grayscale output Select Automatic or Advanced mode Note: In certain programs, you may need to select Advanced before you can select Print Settings. For more information about print settings, click the ? button. 8. Select the Media Type setting for your paper (see page 30).
spr2880_ug.book Page 29 Monday, April 6, 2009 1:10 PM 12.
spr2880_ug.book Page 30 Monday, April 6, 2009 1:10 PM Selecting the Correct Paper Type Select the correct Media Type (Windows see page 20, Mac OS X 10.5 see page 25, or Mac OS X 10.3 to 10.4 see page 28) setting in your printer software so the ink coverage can be adjusted for your media.
spr2880_ug.book Page 31 Monday, April 6, 2009 1:10 PM Printing on CDs and DVDs You can use your R2880 and the Epson Print CD software that came with it to print label designs directly onto ink jet-printable CDs or DVDs. Before you load a CD or DVD, be sure to clean the rollers inside the printer, as described below. Also burn files, music, or video onto your CD or DVD before printing on it to prevent errors.
spr2880_ug.book Page 32 Monday, April 6, 2009 1:10 PM Loading a CD or DVD 1. First burn files, music, or video onto your CD/DVD before printing on it to prevent errors. 2. Turn on the printer. 3. Clean the rollers inside the printer (see page 31). 4. Remove any paper loaded in the sheet feeder and remove the single sheet guide, if it is installed. Also close the paper support. 5. Open the output tray, but do not pull out the extensions. 6.
spr2880_ug.book Page 33 Monday, April 6, 2009 1:10 PM Note: For small 8-cm discs, place the adapter on the tray and then place the disc in the adapter. 8. Insert the tray into the front manual feed slot. Then slide the edge guide against the left side of the CD/DVD tray. 9. Make sure that the CD/DVD tray is beneath the guide rails, then slide the tray in until the arrows are aligned.
spr2880_ug.book Page 34 Monday, April 6, 2009 1:10 PM Printing on a CD or DVD When you installed the software for the R2880, you installed the Epson Print CD program for printing label designs directly onto CDs or DVDs. Follow these steps to open the program and print on the disc you loaded in the printer: 1. Do one of the following to start Epson Print CD: Windows: Double-click the EPSON Print CD icon on your desktop.
spr2880_ug.book Page 35 Monday, April 6, 2009 1:10 PM 3. When you’re ready to print on the disc, open the File menu and select Print. You see one of these windows: Windows Mac OS X 4. Select EPSON Stylus Photo R2880 (Windows and Mac OS X 10.5) or Stylus Photo R2880 (Mac OS X 10.3 to 10.4), if necessary. 5. Click Print. Removing Your Printed CD/DVD After your CD or DVD is printed, the tray ejects partially from the R2880. Pull out the tray and remove the disc.
spr2880_ug.
spr2880_ug.book Page 37 Monday, April 6, 2009 1:10 PM 3. Click Start and follow the on-screen instructions to allow the printer to print and examine the nozzle check pattern. If necessary, the printer cleans the print head, and may print and check the nozzle check pattern a few times. If nozzles are still clogged, you see a message telling you to clean the print head manually. See the on-screen Reference Guide for instructions.
spr2880_ug.book Page 38 Monday, April 6, 2009 1:10 PM 3. To have the printer check and align the print head automatically, click Automatic, then click OK. Follow the on-screen instructions to print the alignment check patterns and align the print head as necessary. To align the print head manually, click the Manual button and follow the on-screen instructions, or see the on-screen Reference Guide for detailed steps.
spr2880_ug.book Page 39 Monday, April 6, 2009 1:10 PM To check the ink cartridge status at anytime, do one of the following: Windows: Double-click the icon in the bottom right corner of your screen (the taskbar). You see the screen to the right. Mac OS X: 1. Open the Applications folder. 2. Open the EPSON Printer Utility3. 3. Select SP R2880, click OK, and select EPSON StatusMonitor. You see the screen to the right.
spr2880_ug.book Page 40 Monday, April 6, 2009 1:10 PM Replacing Ink Cartridges You can purchase genuine Epson ink and paper at Epson Supplies Central at www.epson.com/ink3 (U.S. sales) or www.epson.ca (Canadian sales). You can also purchase supplies from an Epson authorized reseller. To find the nearest one, call 800-GO-EPSON (800-463-7766).
spr2880_ug.book Page 41 Monday, April 6, 2009 1:10 PM Make sure you have a new ink cartridge before you begin. You must install new cartridges immediately after removing the old ones. 1. Remove the CD/DVD tray or thick media and close the front manual feed slot cover before replacing ink. If you have roll paper or canvas media loaded in the printer, remove it to prevent ink marks on the paper (see page 13). 2. Open the printer cover. 3.
spr2880_ug.book Page 42 Monday, April 6, 2009 1:10 PM 6. Before opening the cartridge package, shake the package four or five times. Note: All cartridges make a clicking sound when you shake them. Caution: Do not shake the cartridges after opening the packages or ink will leak. 7. Remove the cartridge from the package, but be careful not to touch the green chip on the cartridge. 8. Remove the yellow tape from the bottom of the cartridge.
spr2880_ug.book Page 43 Monday, April 6, 2009 1:10 PM 10. Once you replace all the necessary cartridges, close the cartridge cover and push it down until it clicks into place. 11. Close the printer cover. 12. Press the H ink button to begin charging the ink. This takes about 2 1/2 minutes. The P power light flashes as the ink charges. When the P power light stops flashing and the H ink light goes out, ink charging is finished. Caution: Never turn off the R2880 while ink is charging or you’ll waste ink.
spr2880_ug.book Page 44 Monday, April 6, 2009 1:10 PM Switching Black Ink Cartridge Types Your printer comes with a Matte Black (T0968) and Photo Black (T0961) ink cartridge for printing. Only one can be installed in the printer at one time. Decide which media you will print on. Then, if necessary, switch the cartridge to match the Media Type (see page 45).
spr2880_ug.book Page 45 Monday, April 6, 2009 1:10 PM Switching the Black Ink Cartridge Make sure you have the other black ink cartridge handy before you begin. You must install the other cartridge immediately after removing the installed one from the printer. Caution: If you remove a low or expended ink cartridge, you cannot reinstall and use the cartridge. 1. Remove the CD/DVD tray or thick media and close the front manual feed slot cover before replacing ink.
spr2880_ug.book Page 46 Monday, April 6, 2009 1:10 PM 5. Squeeze the tab on the black ink cartridge and lift the cartridge straight up to remove it. Store this cartridge in a plastic bag for later use. Warning: If ink gets on your hands, wash them thoroughly with soap and water. If ink gets into your eyes, flush them immediately with water. Keep ink cartridges out of the reach of children. 6.
spr2880_ug.book Page 47 Monday, April 6, 2009 1:10 PM 9. Insert the black ink cartridge into the holder and push it down until it clicks into place. 10. Close the cartridge cover and push it down until it clicks into place. 11. Close the printer cover. 12. Press the H ink button to begin charging the ink. This takes about 2 1/2 minutes. The P power light flashes as the ink charges. When the P power light stops flashing and the H ink light goes out, ink charging is finished.
spr2880_ug.book Page 48 Monday, April 6, 2009 1:10 PM Select the Black Ink Cartridge Once you’ve swapped the black ink cartridges, you need to select it in the printer driver before printing. Do one of the following: Windows 1. Right-click the icon in the bottom right corner of your screen (the taskbar). 2. Select Printer Settings. You see the printer settings window: 3. Select the Utility tab in the printer driver, then select Print and Option Information. 4.
spr2880_ug.book Page 49 Monday, April 6, 2009 1:10 PM Solving Problems Check the status of the printer lights to diagnose the cause of most problems (see page 50), or check the solutions beginning on page 51 for more information. Open your on-screen Epson Information Center for detailed help and easy access to Epson’s support website, FAQs, paper and ink purchasing, and Reference Guide.
spr2880_ug.book Page 50 Monday, April 6, 2009 1:10 PM Checking the Printer Lights Check the status of the printer lights to solve the most common problems. Light status Problem and solution I paper on Paper may be out or multiple sheets may have fed into the sheet feeder. Load paper, if necessary (see page 6), and press the I paper button. Roll paper or canvas media may be out. See page 11 to load roll paper. The CD/DVD tray may not be inserted. See page 32 to load a CD or DVD.
spr2880_ug.book Page 51 Monday, April 6, 2009 1:10 PM Light status Problem and solution I paper flashing H ink flashing fast The front manual feed slot cover is open while printing from paper loaded in the sheet feeder. Remove paper loaded to print on thick media or a CD/DVD or close the front manual feed slot cover to print on paper loaded in the sheet feeder (see page 32 to locate the front manual feed slot cover). Press the I paper button to clear the error.
spr2880_ug.book Page 52 Monday, April 6, 2009 1:10 PM Paper Feeding Problems ■ If paper doesn’t feed into the sheet feeder, remove the paper and fan the stack of paper to separate the sheets. Reload paper against the right side and slide the edge guide against it. Also, do not load too many sheets in the sheet feeder at once (see page 6) and make sure the printer cover is closed.
spr2880_ug.book Page 53 Monday, April 6, 2009 1:10 PM ■ If ink smears on your disc, make sure you’re printing on ink jet-printable CDs or DVDs and that the surface of the disc is dry. Handle printed discs carefully and let them dry for 24 hours before inserting them in a drive. If necessary, you can adjust the print quality using Epson Print CD software. See the on-screen Reference Guide for instructions.
spr2880_ug.book Page 54 Monday, April 6, 2009 1:10 PM Where To Get Help Epson Technical Support Internet Support Visit Epson’s support website at epson.com/support and select your product for solutions to common problems. You can download drivers and documentation, get FAQs and troubleshooting advice, or e-mail Epson with your questions.
spr2880_ug.book Page 55 Monday, April 6, 2009 1:10 PM Notices Important Safety Instructions Before using your R2880, read and follow these safety instructions: ■ Be sure to follow all warnings and instructions marked on the R2880. ■ Use only the type of power source indicated on the R2880 label. ■ Place the R2880 near a wall outlet where the plug can be easily unplugged. ■ If you won’t be using the R2880 for a long period, unplug the power cord from the electrical outlet.
spr2880_ug.book Page 56 Monday, April 6, 2009 1:10 PM ■ Except as specifically explained in your documentation, do not attempt to service the R2880 yourself. ■ Unplug the R2880 and refer servicing to qualified service personnel under the following conditions: if the power cord or plug is damaged; if liquid has entered the product; if the product has been dropped or the case damaged; if the product does not operate normally or exhibits a distinct change in performance.
spr2880_ug.book Page 57 Monday, April 6, 2009 1:10 PM Epson America, Inc., Limited Warranty What Is Covered: Epson America, Inc. (“Epson”) warrants to the original retail purchaser that the Epson printer covered by this limited warranty statement, if purchased and operated only in the United States or Canada, will be free from defects in workmanship and materials for a period of one (1) year from the date of original purchase. For warranty service, you must provide proof of the date of original purchase.
spr2880_ug.book Page 58 Monday, April 6, 2009 1:10 PM abuse, improper installation, neglect, improper shipping, damage caused by disasters such as fire, flood, and lightning, improper electrical current, software problems, interaction with non-Epson products, or service other than by an Epson Authorized Servicer. If a claimed defect cannot be identified or reproduced, you will be held responsible for the costs incurred.
spr2880_ug.book Page 59 Monday, April 6, 2009 1:10 PM Declaration of Conformity According to 47CFR, Part 2 and 15 for: Class B Personal Computers and Peripherals; and/or CPU Boards and Power Supplies used with Class B Personal Computers: We: Located at: Epson America, Inc. MS 3-13 3840 Kilroy Airport Way Long Beach, CA 90806 Telephone: (562) 290-5254 Declare under sole responsibility that the product identified herein, complies with 47CFR Part 2 and 15 of the FCC rules as a Class B digital device.
spr2880_ug.book Page 60 Monday, April 6, 2009 1:10 PM FCC Compliance Statement For United States Users This equipment has been tested and found to comply with the limits for a Class B digital device, pursuant to Part 15 of the FCC Rules. These limits are designed to provide reasonable protection against harmful interference in a residential installation.
spr2880_ug.
spr2880_ug.
spr2880_ug.
spr2880_ug.