
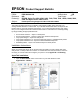
Printing Information

4
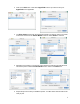
4. Navigate to the location of your PPD file. After selecting the PPD file it should reflect the
name of the printer under the
Printer Model
section. Click on the
Add
button.
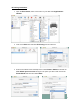
5. The Print Center should now show the Queue that you typed along with the IP address.
6. Repeat the process to add your additional queues. Your Mac OS X Client should now be
ready to print.
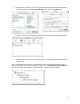
Note: The StylusRIP does not have a separate folder on the CD to select the printer’s PPD. In
order to select the PPD it must be copied from another client’s
Printer Description folder
as
shown below (HDD - System folder - Extensions folder - Printer Description folder).