
Quick Reference Guide
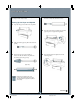

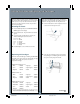

Loading and Using Cut Sheet Paper
Loading and Using Cut Sheet Paper
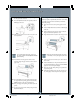
Printing on Posterboard
When you print on posterboard (more than 19 mil thick),
you need to open the lower cover before you feed the
board for printing.
1 Open the lower cover, then pull the paper set lever
out.
2 Press the Paper Source button until the Sheet light
comes on.
3 Feed the board into the paper slot until the bottom
edge rests behind the open lower cover.
4 Align the board with the scale on the roll paper cover.
3
To avoid damaging the printer, never move
the paper set lever while the Operate or Pause
light is flashing.
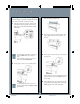
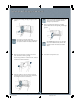
4 Feed the sheet into the paper slot until it meets
resistance. Align the paper with the scale on the roll
paper cover.
5 Press the Pause button. The print head moves and
the paper feeds into printing position automatically.
READY appears on the control panel display.
6 Print your page. After printing, the sheet stays in the
printer.
7 To remove the print, hold it while pressing the lower
Paper Feed button.
Make sure the posterboard is flat (not bowed
or wrinkled), or it may damage the print head.
5 Push the paper set lever all the way in, then close the
lower cover.
6 Press the Pause button. The print head moves and
the posterboard feeds into printing position. READY
appears on the control panel display.
7 Run your print job. After printing, the posterboard
stays in the printer.
8 Hold the posterboard as you pull the paper set lever
out. Then gently remove the print at the paper exit.
1 Make sure roll paper is not loaded for printing, and
the roll paper cover is closed.
2 Press the Paper Source button repeatedly until the
Sheet light comes on.
3 Make sure the paper set lever is all the way in, in the
secured position.
SP10600 QRG 9/16/02, 05:11 PM3