Owner's Manual
Table Of Contents
- Front Matter
- Contents
- Printing with Mac OS X
- Printing with Windows
- Basic Settings
- Selecting Settings on the Main Tab
- Selecting the Media Type setting
- Selecting the Color setting
- Selecting the Print Quality setting
- Selecting the Mode setting
- Selecting the Advanced settings
- Paper Configuration
- Saving settings
- Deleting settings
- Exporting and importing settings
- Selecting the Paper Source setting
- Selecting the Borderless setting
- Selecting the Paper Size setting
- Selecting the Printable Area setting
- Selecting the Roll Paper Option settings
- Selecting the Save Roll Paper setting
- Checking Ink Levels
- Previewing your printout
- Using the Manual function
- Selecting Settings on the Page Layout Tab
- Using the Printer Utilities
- Getting Information Through On-screen Help
- Checking Printer Status and Managing Print Jobs
- Increasing the Print Speed
- Sharing Your Printer
- Updating and Uninstalling the Printer Software
- The Control Panel
- Paper Handling
- Maintenance and Transportation
- Problem Solver
- Troubleshooting
- Printer stops printing unexpectedly
- The printer does not turn on or stay on
- The printer prints nothing
- Printouts are not what you expected
- Print quality could be better
- Color documents print in black ink only
- Printing could be faster
- Roll paper cannot be cut
- Paper feed or paper jam problems occur frequently
- Roll paper does not eject properly
- Clearing paper jams
- Managing Color with Profiles
- Paper Information
- Where To Get Help
- Troubleshooting
- Product Information
- Options and Consumable Products
- Safety Instructions
- Index

94 Printing with Windows
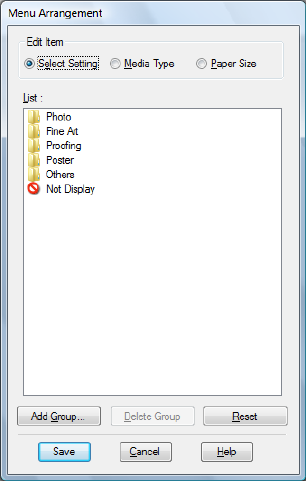
Selecting Menu Arrangement settings
Use this utility to arrange the Select Setting, Media Type, and Paper Size
items. Click Menu Arrangement on the Utility tab. You see a window like this
one.
1. Select the item you want to edit. You can do the following:
❏ Drag and drop the items to rearrange them
❏ Add or delete groups
❏ Move unused items into the Not Display group
2. When you’re finished, click Save.
Starting Epson LFP Remote Panel
Use this utility to optimize your printer.
1. Make sure the printer is turned on.
2. Click EPSON LFP Remote Panel.


