
Product Information Guide


EPSON Stylus Pro 7600 and 9600
11 - EPSON Stylus Pro 7600 and 9600 7/02
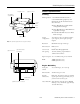
Printing a Nozzle Check Pattern
1. Load a letter-size sheet of paper in the printer. (You can
print the nozzle check on larger sheets or roll paper, but you
will use more paper; you’ll also have to remove any roll
paper before running the cleaning cycle.)
2. Press the SelecType button on the control panel. You see
PRINTER SETUP.
3. Press
d
so you see TEST PRINT, then press
r
. You see
NOZZLE CHECK.
4. Press
r
so you see PRINT, then press Enter. The nozzle
check sheet prints.
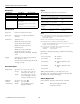
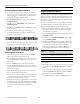
5. Examine the nozzle check pattern. Each staggered
horizontal and straight vertical line should be complete,
with no gaps in the pattern:
If dots are missing from the pattern, as shown below, clean
the print head as described in the next section.
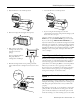
Cleaning the Print Head
1. Make sure no paper is loaded and all of the
H Ink Out
lights on the printer’s control panel are off.
If an
H Ink Out light is flashing or on, you need to replace
the corresponding ink cartridge instead. See page 9 for
instructions.
2. Press the Cleaning button and hold it for at least 3
seconds. The Pause light flashes as the printer cleans its
print head. The cleaning cycle takes about 60 seconds and
does not use any paper.
3. When the Pause light goes off, print the nozzle check
again to confirm that the head is clean.
You may need to run the cleaning cycle several times to get
a complete nozzle check pattern. For effective cleaning,
always run a nozzle check between cycles.
If the lines in the pattern are still missing dots after several
cleaning cycles, turn the printer off and leave it overnight,
then clean the print head again the following morning. If
you still see no improvement, contact EPSON for
assistance.
Aligning the Print Head
If banding appears on your prints, or vertical lines are not
straight, you need to align the print head. Although you can
align the print head using the printer software, it’s best to do
this from the control panel. This aligns the print head for all
modes and resolutions.
If you haven’t already done so, it’s a good idea to run a nozzle
check before aligning the print head (page 11). This ensures
that the print head alignment patterns print correctly.
1. Make sure the printer is turned on. Then load roll paper
that is at least 24 inches wide (you can use the roll paper
that came with your printer).
2. Press the SelecType button on the control panel. You see
PRINTER SETUP.
3. Press
u
so you see HEAD ALIGNMENT, then press
r
.
You see PAPER THKNS.
4. Press
r
so that *STD appears on the display. This is the
correct thickness setting for most EPSON papers. If you’ll
be printing on one of the papers listed below after
completing the alignment, use the
u
and
d
buttons to
select the appropriate thickness setting for that paper.
5. Press Enter.
6. Press the
d
button to select the mode you want to perform
the adjustment in (BI-D BLACK, BI-D ALL, or UNI-D
ALL).
If you’re printing non-photographic images with black ink
only, select BI-D BLACK. Otherwise, perform a UNI-D
ALL adjustment, followed by BI-D ALL.
7. Press the Enter button to print the alignment patterns.
Thickness
setting
Paper type
3N For EPSON Premium Glossy Photo Paper (250) and
Premium Semimatte Photo Paper (250)
0N For film
0.0 to 1.6 mm For non-EPSON media