
Product Information Guide


EPSON Stylus Pro 7600 and 9600
13 - EPSON Stylus Pro 7600 and 9600 7/02
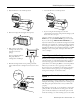
If the printer’s maintenance tank is almost used up, you’ll
need to replace it as well. The printer will tell you if it needs to
be replaced, but you may wish to check it in advance, as
shown below, so you can make sure you have one available, in
case it’s needed.
Selecting the Black Ink Cartridges
Make sure you have all the needed supplies as described above.
Once you remove the ink cartridges from the printer, you
must not turn off the printer until you have finished switching
black ink modes. Follow these steps to start the process and
tell the printer which cartridges you want to install:
1. Make sure the printer is on and READY is displayed on the
control panel.
2. Press the SelecType button. You see PRINTER SETUP.
3. Press
d until you see MAINTENANCE, then press
r. You
see PWR CLEANING.
4. Press
d so you see BK INK CHANGE, then press
r. You
see EXEC.
5. Press Enter. You see SELECT INK SET.
The printer gives you two choices for the new set of black
ink cartridges, depending on which ones are already
installed (press
u
or
d
to see the choices). For example, if
you’re in Photo Black Mode, the printer will let you switch
to either Matte Black Mode (#1 MAT: #2 LBK) or Dual
Matte Black Mode (#1 MAT: #2 MAT).
6. Make sure you know which cartridges you want to install,
then press
u
or
d until the correct set of cartridges is
displayed.
7. Press ENTER.
If you see the message NOT ENOUGH INK, lift the ink
lever and remove any low or empty cartridges. (Check the
Ink Out lights on the control panel to see which cartridges
are low or empty.) Insert the replacement cartridge(s), then
lower the ink lever.
8. The printer displays a message telling you to release the ink
lever and remove the cartridges. Raise the lever and remove
all the cartridges; do not re-insert them until instructed to
do so.
Be sure to set aside any black ink cartridges you won’t be
using, so that you don’t accidentally re-insert them.
Checking the Maintenance Tank
Once you have removed all the ink cartridges, you may see a
message telling you to replace the maintenance tank. If so, pull
out the tank from the side of the printer and replace it with a
new one. If you don’t see this message, continue on to the
next section.
Draining the Ink
Once you have removed all the ink cartridges, you see a
message that the printer is ready for draining. Follow these
steps:
1. Insert the draining cartridge into the slot indicated on the
control panel (#1 or #2 slot). The position is also indicated
by the flashing Ink Out light.
2. Lower the ink lever. The printer begins draining the ink
delivery system.
3. Once the draining is complete, the printer stops making
noise and you see a message telling you to remove the
draining cartridge.
If you are replacing both black ink cartridges, you see a
message prompting you to insert the draining cartridge in
the second slot. Once you do this, the draining process
repeats a second time.
Maintenance
tank indicator
(showing a
new tank)