
Product Information Guide


EPSON Stylus Pro 7600 and 9600
7/02 EPSON Stylus Pro 7600 and 9600 - 14
Charging the Ink
Once draining is complete, make sure you have the correct
black ink cartridges available for the black ink mode you’re
switching to. Then follow these steps:
1. Insert all the ink cartridges into the printer. Be sure to
install the correct black ink cartridges for the black ink
mode you’re switching to.
2. Lower the ink lever. The printer begins charging the ink
delivery system.
3. Once the charging is complete, the printer stops making
noise and displays READY on the control panel.
Continue on to the next section to update your printer driver
software.
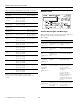
Updating the Macintosh Driver
If you’re printing from a Macintosh, you need to update
the driver so that it knows which black ink mode you’re
using. (In Windows, the driver is updated automatically.)
1. Open the Chooser from the Apple menu.
2. Click the printer icon and port, as shown.
3. Close the Chooser. This completes the black ink
replacement.
Replacing the Cutter Blade
If you notice that your paper isn’t cut cleanly, the cutter blade
may need to be replaced. If you use the blade to cut heavy
stock or non-EPSON media, you may need to replace it more
often. You can check the status of your cutter by printing the
status check sheet (see page 9).
1. Make sure that the printer is on and the front cover is
closed.
2. Press the SelecType button on the control panel. You see
PRINTER SETUP.
3. Press
d until you see MAINTENANCE, then press
r
. You
see PWR CLEANING.
4. Press
d until you see CUTTER REPL, then press
r
. You
see EXEC.
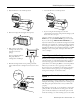
5. Press Enter. The carriage moves to the cutter replacement
position.
6. You see a message on the control panel telling you to open
the front cover. Open the cover to access the carriage.
7. Push down on the side pin, then turn the latch to the right.
Click
here . . .
then here
Close when done