
Product Information Guide


EPSON Stylus Pro 7600 and 9600
7/02 EPSON Stylus Pro 7600 and 9600 - 10
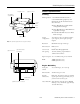
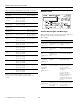
3. Raise the ink lever to the unlocked position.
4. Remove the empty ink cartridge from the printer.
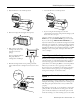
5. Make sure the replacement
cartridge is the correct color,
and remove it from its
package.
If you’re using UltraChrome
Ink, gently shake the
cartridge before installing it.
6. Hold the cartridge with the arrow pointing toward the
printer. Then insert the cartridge into the slot. Don’t force
it in.
7. Lower the ink lever to its locked position.
8. If you’re using 110 ml cartridges, close the ink
compartment cover. If you’re using 220 ml cartridges, you’ll
have to leave the cover open.
Once the cartridges are installed, the printer returns to its
READY state (or says LOAD PAPER if paper isn’t loaded).
If you see the message WRONG INK CARTRIDGE, you
may have loaded an incorrect black ink cartridge for the black
ink mode you’re currently in, or loaded a cartridge containing
the wrong type of ink for your printer (Photographic Dye or
UltraChrome). Remove any cartridges indicated by a red Ink
Out light on the control panel, and replace them with the
correct cartridges.
Paper Type and Banding
Banding can be caused by several problems, such as clogged
print head nozzles or a mis-aligned print head. It can also be
caused by using a paper that is not defined in the EPSON
printer driver or in a third-party RIP. To correct this problem,
make sure you select the correct paper type in the driver.
If your paper type is not defined, use the printer’s SelecType
menu to create a custom paper type. See “Optimizing the
Settings for Your Paper” in the Printer Guide.
Running a Nozzle Check and Cleaning
Cycle
If your printed image is unexpectedly light or faint or dots are
missing from the image, you may need to run a cleaning cycle.
This unclogs the print head nozzles so they can deliver ink
properly.
The cleaning cycle uses ink, so you should run it only if print
quality declines. To determine if a cleaning cycle is needed,
print a nozzle check (below). You should also print a nozzle
check after cleaning to see if the cleaning cycle was successful.