Quick Reference Guide EPSON Stylus Pro 7600/9600 ® EPSON Stylus Pro 7600/9600 ® Printed in USA CPD-14020
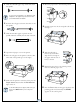
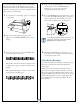
1 Slide the removable paper stop off the left end of the spindle. 7 Move the paper lever to the released position. 8 Feed the paper into the slot and pull it all the way through. 9 Turn the roll back to remove any slack. Then align the bottom edge of the paper with the row of holes, as shown. To use a 3-inch roll paper core, attach the gray adapters to the paper stops at each end. See your Printer Guide for details. 2 Position the roll paper as shown, then slide it onto the spindle.
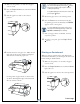
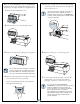
1 Make sure the printer is on and the roll paper cover is closed. 2 Press the Paper Source button until the Sheet light comes on. 3 For heavy paper, you may need to increase the suction strength by pressing the button. This helps hold the paper in place during loading and printing. For lightweight paper, decrease the suction by pressing the button. Push the paper lever back to the released position. 5 Return the paper lever to the locked position. 6 Press the Pause button.
Open the front cover. (The cover has special tabs that act as paper supports when the cover is open.) 7 Return the paper lever to the locked position. Then close the front cover. 5 Feed the posterboard into the paper slot until it meets resistance. 8 Press the Pause button. The board feeds into the printing position automatically and READY appears on the control panel. 9 Run your print job. After it is finished, the posterboard stays in the printer.
If you notice banding or missing colors in your printouts, the print head may need cleaning. First print a nozzle check pattern to find out the condition of the print head. Then run a cleaning cycle, if neccessary, and print another check pattern to test the results. 1 Load a sheet of coated ink jet paper (or roll paper) in the printer. 4 Make sure all the Ink Out lights on the printer’s control panel are off.
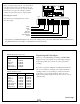
Before you begin a large print job, you should check your ink levels. If one of your cartridges is low, you can replace it before you start. Or you can wait until the ink runs out, replace the cartridge, and then continue the job without any loss of print quality. Checking Ink Levels (full) (almost empty) The easiest way of checking ink levels is from the control panel.
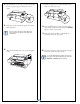
5 When one of the Ink Out lights stays on and INK OUT is displayed on the control panel, the cartridge is empty. To replace the cartridge, first make sure the printer is on. 1 Open the ink compartment cover. 2 Raise the ink lever to the unlocked position. 3 Remove the empty ink cartridge from the printer. Hold the cartridge with the arrow mark pointing toward the printer. Then insert the cartridge into the slot. Don’t force it.
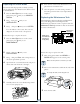
Replacing the Cutter Blade 6 If you notice that the paper isn’t cut cleanly, you may need to replace the cutter blade. You can check its status as described below: Insert the new cutter blade. Hold down its side pin and secure it with the latch. 7 Close the printer cover. The carriage returns to the home position and the cutter replacement is complete. 1 Press the SelecType button on the control panel, then press until you see PRINTER STATUS. 2 Press , then press SERVICE LIFE.
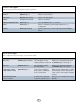
Status messages These messages indicate normal phases of printer operation. Message Light Explanation or response READY Operate light on Printer is ready to print. PRINTING Operate light flashing Printer is receiving data. RESET All lights flash briefly Printer is resetting. PRESS PAUSE BUTTON Pause light on Press the Pause button to continue. WAIT Pause light on Printer is initializing, performing maintenance, or charging ink. PAUSE Pause light flashing Printer is paused.
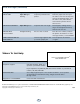
Error messages (continued) Message Light Explanation Response PAPER JAM Paper Out light flashing Paper has jammed in the printer. Raise the paper lever and open the lower cover if necessary. Then remove the jammed paper, close the lower cover, and lower the lever. Turn the printer off and then back on. PAPER NOT STRAIGHT Paper Out light on Paper was fed at an angle. Reload paper, making sure the edges are straight and lined up with the row of holes. SERVICE REQ.
CPD14020R1_Baf_QRG.