Setup and Maintenance
All rights reserved. No part of this publication may be reproduced, stored in a retrieval system, or transmitted in any form or by any means, electronic, mechanical, photocopying, recording, or otherwise, without the prior written permission of Seiko Epson Corporation. The information contained herein is designed only for use with these Epson printers. Epson is not responsible for any use of this information as applied to other printers.
Contents Introduction . . . . . . . . . . . . . . . . . . . . . . . . . . . . . .5 Handling and Product Information . . . . . . . . . . . . . . . . . . . . . . . . . . . . . 5 Setting Up the SpectroProofer . . . . . . . . . . . . . .7 Unpacking and Assembly . . . . . . . . . . . . . . . . . . . . . . . . . . . . . . . . . . . . . 7 Installing the SpectroProofer . . . . . . . . . . . . . . . . . . . . . . . . . . . . . . . . . . 11 Connecting the Cables . . . . . . . . . . . . . . . . . . . . . . . . .
| Contents -4
Introduction The EPSON SpectroProofer® is an optional in-line color measuring system that can be installed on the EPSON Stylus® Pro 7890, 7900, 9890, and 9900 printers. When driven by the latest software RIP front-ends, the SpectroProofer can automate virtually any color management process in your workflow. Note: The SpectroProofer is not supported on the EPSON Stylus Pro 7700 and 9700. Follow the instructions in this guide to install the SpectroProofer in your printer.
| Introduction 6
Setting Up the SpectroProofer Follow the steps in this section to install the SpectroProofer in your printer. Before using the SpectroProofer for the first time, you must also initialize it as described on page 19. Unpacking and Assembly Unpack the SpectroProofer and make sure you have all the parts shown below: Note: The 44" model is shown. These instructions also apply to the 24" model. SpectroProofer main unit Save the original box and packing materials in case you need to ship the equipment.
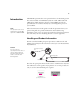
| Setting Up the SpectroProofer 1. Remove any tape and protective material from the outside surface of the SpectroProofer. 2. Remove any tape from the paper presser, shown below. Raise the paper presser and remove its packing material. Paper presser (under packing material) Caution: Check for packing material all around and under the paper presser. Remove the packing material 3. Remove any packing tape from the carriage.
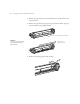
Setting Up the SpectroProofer | 9 4. Remove the packing material from the cables on the carriage. 5. Slide the carriage a little to the left and then remove its plastic retainer. Note: Save the retainer along with other packing materials. 1 Slide left Remove retainer 2 6. Slide the carriage back to the right, then lower the paper presser.
| Setting Up the SpectroProofer 7. Slide the carriage against the paper presser to lock it in place. 8. Insert the spectrophotometer into the carriage so it clicks into place and then insert the two alignment pins. Caution: Make sure the alignment pins are flush with the carriage, otherwise the SpectroProofer may not work properly.
Setting Up the SpectroProofer | 11 9. Connect the cables on the carriage to the spectrophotometer. Warning: Be careful not to dislodge the spectrophotometer from its seated position when installing the cables. Installing the SpectroProofer Before installing the SpectroProofer, make sure the printer has the latest firmware installed. Follow the instructions for upgrading firmware using the LFP remote panel in your User’s Guide or Printer Guide. 1. Turn off the printer and unplug it from the AC outlet. 2.
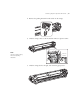
| Setting Up the SpectroProofer 3. Using the included bolts and Allen wrench, install the mounting rails in the two locations shown below. Note: The backing plates provide a uniformly opaque surface under the paper. The white backing plate should normally be used. Use the black backing plate if your paper has a watermark on the reverse side. 4. Select whether you want to use the white or black backing plate(s).
Setting Up the SpectroProofer | 13 For the 44" model, attach the first backing plate on the right side of the printer, then attach the second backing plate to its left. Make sure the plates hook together as shown. Ensure that both plates rest flush against the printer and don’t move when you try to slide them. 5. Insert the calibration tile into the holder. Remove the cover on the back of the holder by rotating it. Drop in the tile with its white surface face-down. Replace the cover.
| Setting Up the SpectroProofer Caution: Make sure the holder is attached correctly, otherwise the spectrophotometer will jam. 6. Attach the tile holder to the printer. Insert the two tabs on the bottom of the holder into the slots on the printer. Then press the holder flush against the printer so its latch clicks into place. (The two tabs on the left side of the holder will rest on top of the backing plate installed in step 4.) 7.
Setting Up the SpectroProofer | 15 Connecting the Cables The 44" SpectroProofer has a secondary USB port that can be used to connect the optional Auto Take-up Reel (available for the EPSON Stylus Pro 9890 and 9900 only). The 24" SpectroProofer does not have this port. 1. Open the cover on the right side of the SpectroProofer. 2. Plug the square end of the SpectroProofer’s USB cable (included) into the square port marked with the printer symbol.
| Setting Up the SpectroProofer 3. Route the cable(s) through the channels and over the hook as shown. Then close the cover. Warning: Make sure the cables are routed properly. Improper routing of the cables can restrict the spectrophotometer's head movement and cause errors. 4. Attach two cable hooks to the right leg of the printer stand. Place the cable(s) in the hooks as shown, and snap the hooks closed.
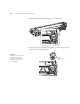
Setting Up the SpectroProofer | 17 5. Plug the SpectroProofer’s USB cable into the option port on the back of the printer. 6. Plug the included power cord into the socket on the left side of the SpectroProofer.
| Setting Up the SpectroProofer 7. Attach the remaining cable hook to the inside left leg of the printer stand. Place the power cord in the hook, and snap the hook closed. 1 2 8. Plug the power cord into a grounded electrical outlet and then plug the printer back into its AC outlet. Make sure the SpectroProofer’s green status light comes on.
Setting Up the SpectroProofer | 19 Initializing the SpectroProofer The SpectroProofer must be aligned before you use it for the first time. You only need to perform this procedure once. You don’t need to repeat the alignment if you remove and re-install the SpectroProofer. Note: The SpectroProofer does not have a power switch. It is on when it is plugged in and receiving power. 1. Confirm that the SpectroProofer is powered on by checking its green status light.
| Setting Up the SpectroProofer 20
Maintenance and Problem Solving Follow the instructions in this chapter to clean the SpectroProofer. Cleaning may be necessary if you notice unusual color measurement results, which may be caused by dust or other contamination. This chapter also tells you how to respond to error messages and how to contact Epson for help. Removing the SpectroProofer If you need to remove the SpectroProofer for cleaning, follow these steps. 1. Turn off the printer and unplug the power cord. 2.
| Maintenance and Problem Solving Note: The 24” model has only one cable. The 44” model may have a second cable connected to the port for the optional take-up reel. 3. Open the cover on the right side of the SpectroProofer and disconnect the cable(s). Warning: The SpectroProofer is heavy. Two persons are required to lift it. 4. Slide the SpectroProofer out of the printer. Caution: Be careful not to scratch the spectrophotometer lens when handling the unit or setting it down. 5.
Maintenance and Problem Solving | 23 6. Unplug the cables from the spectrophotometer, and remove the spectrophotometer from the carriage. Cleaning the SpectroProofer You may need to clean the SpectroProofer if you notice unusual color readings. Check the following parts and clean them if necessary: • backing plates • calibration tile • spectrophotometer lens • paper presser 1.
| Maintenance and Problem Solving Caution: Do not touch the lens directly, or you could scratch its coating. Use only compressed air designed for cleaning optics; other kinds can leave behind a contaminating residue. 2. Use a can of compressed air designed for optical equipment to clean the spectrophotometer lens. 3. Remove the tile holder from the printer. 4. Remove the calibration tile from the holder.
Maintenance and Problem Solving | 25 5. Remove the backing plate(s) from the printer. 6. Use a soft, lint-free cloth to clean any dust or dirt from the surface of the calibration tile and backing plate(s). If necessary, dampen the cloth with water to clean the surface. Then use another cloth to wipe it dry. 7. If you noticed that ink is transferring to the front surface of your paper, you may need to clean the paper presser. Slide the carriage to the right, then raise the paper presser.
| Maintenance and Problem Solving 8. Clean the paper presser using a soft, lint-free cloth dampened with a mild detergent. Then use another cloth to wipe it dry. 9. Lower the paper presser, then slide the carriage against it to lock it in place.
Maintenance and Problem Solving | 27 Error Messages If a problem occurs with the SpectroProofer, you may see a message on the printer’s LCD screen. Check the following list for an explanation and instructions for solving the problem: Message Explanation Response ILS20EP DISCONNECTED The spectrophotometer (ILS20EP/ILS20EPUV) is not connected correctly. Turn the printer off, reinstall the spectrophotometer, and turn the printer back on.
| Maintenance and Problem Solving Message Explanation Response SpectroProofer ERROR The paper presser is not working correctly because: Turn the printer off, then remove the SpectroProofer. Check for any loose or obstructing packing materials. Error No. 13 • The backing plate is not attached correctly. • There is something between the backing plate and the presser. • The environmental conditions are not correct. SpectroProofer ERROR Error No.
Maintenance and Problem Solving | 29 Recertification The ISO Standards Committee recommends that all spectrophotometers be recertified each year. This recertification process is not covered under warranty or maintenance agreement. If maintained properly, your EPSON SpectroProofer is expected to perform within specifications for the rated life of the product.
| Maintenance and Problem Solving 30
Specifications General Temperature Operation: 50 to 95°F (10 to 35°C) Storage (packed): –4 to 140°F (–20 to 60°C); less than 120 hours at 140°F (60°C); less than 1 month at 104°F (40°C) Storage (unpacked): –4 to 104°F (–20 to 40°C); less than 1 month at 104°F (40°C) Humidity Operation: 30 to 80% without condensation Storage (packed): 5 to 85% without condensation Storage (unpacked): 5 to 85% without condensation Quality range Temperature: 68 to 78.
| Specifications Spectrophotometer (continued) Measurement range 0 to 150% R (reflection) Repetition precision Max 0.2 dE cmc (white tile) Max 0.8 dE cmc (black tile) Instrument error Ave 0.5 dE cmc (12BCRA tile ILS20EP standard) Ave 1.0 dE cmc (12BCRA tile ILS20EP standard) Electrical Rated voltage AC 100 to 240 V Input voltage range AC 90 to 264 V DC output 5.5 V 1.0 A (for ILS20EP/ILS20EPUV) Rated frequency range 50 to 60 Hz Input frequency range 49.5 to 60.
Notices Important Safety Instructions Read all of these instructions before using your product. Also be sure to follow all warnings and instructions marked on the product. • Do not block or cover the openings in the product’s cabinet. • Do not insert objects through the slots. Take care not to spill liquid on the product. • Use only the type of power source indicated on the product’s label. • Use only the power cord that comes with the product.
| Notices WARNING The connection of a non-shielded equipment interface cable to this equipment will invalidate the FCC Certification of this device and may cause interference levels which exceed the limits established by the FCC for this equipment. It is the responsibility of the user to obtain and use a shielded equipment interface cable with this device. If this equipment has more than one interface connector, do not leave cables connected to unused interfaces.
Notices | 35 number with sufficient credit to cover the price of the replacement product. You will be billed at the Manufacturer’s Suggested Retail Price for the device if the defective product is not returned to Epson within 10 business days of shipment of the replacement product from Epson. If the unit is returned damaged because you have not properly packed or shipped it, you will be billed for the damage.
| Notices causes beyond its reasonable control.