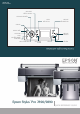
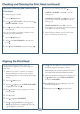
QUICK REFERENCE GUIDE Epson Stylus Pro 7890/9890 ® Control Panel Lights and Buttons Paper light Ink light Black ink change button Paper feed up button Paper release (ePlaten™) light and button Power light and button Menu button Paper cut button OK button Pause/reset light and button Ink cover open button Paper feed down button Left arrow or paper source button Printed in USA CPD-28260
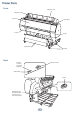
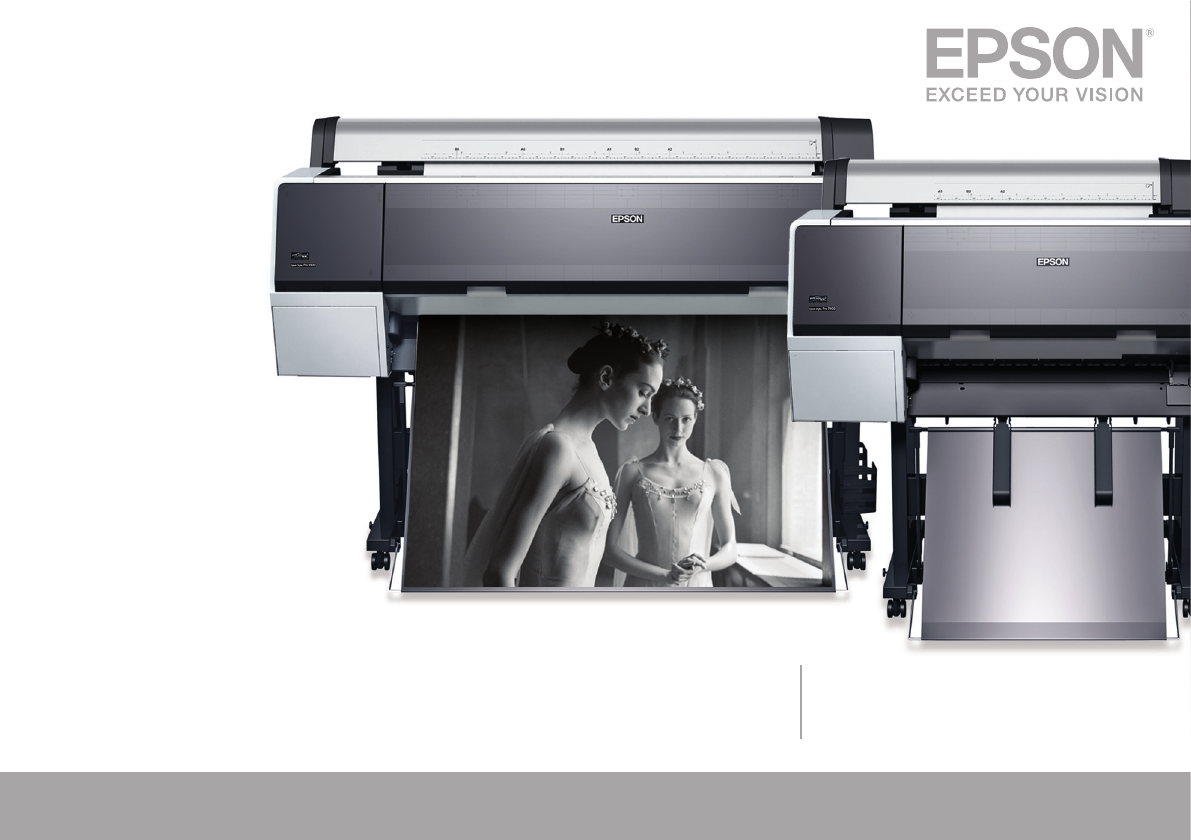
Printer Parts Front Roll paper cover Roll paper holder Front cover Control panel Ink bay Ink bay Paper basket Casters Back Interface connector for optional equipment Network interface USB interface AC inlet Maintenance tank (Pro 9890 includes two tanks, one on each side of printer) 1
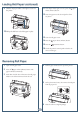
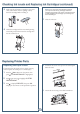
Loading Roll Paper 1 Open the roll paper cover. 2 Push down the lock lever, then move the roll paper holder to the left. 3 Place the roll paper on top of the printer. 4 If necessary, adjust the roll media adapters to fit the core size of the roll paper. Then release the tension lever on both adapters. 2-inch core 3-inch core 2 5 Push the adapters into the paper core at both ends of the roll. Then push down the tension levers to secure them.
Loading Roll Paper (continued) 9 11 If the Paper release light is not on, press the Slide the roll paper holder to the right to secure it in the printer. Paper release (ePlaten) button. 12 Insert the paper into the slot and pull it all the way down. 10 Pull up the lock lever to lock the paper in place. 13 Close the roll paper cover. 14 Press the 15 Press the Paper release (ePlaten) button. Pause/reset button. 16 Check the printer’s control panel and select the correct media type.
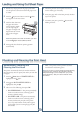
Loading and Using Cut Sheet Paper 1 Remove any roll paper from the paper path. Make sure the printer is turned on and the roll paper cover is closed. 2 Press the Paper source button until the icon appears on the LCD screen. 3 Feed the sheet down into the paper slot until it meets resistance. Make sure the right edge of the paper is straight and aligned with the vertical line on the roll paper cover. 5 Check the printer’s control panel and select the correct media type, if necessary.
Checking and Cleaning the Print Head (continued) Manually Checking and Cleaning the Print Head 1 Make sure paper is loaded. 2 Press the 3 Press until TEST PRINT is selected, then press . NOZZLE CHECK is selected. 4 Menu button. 4 Select one of the following, then press : NORMAL CLEANING—Press OK to start the cleaning cycle. CLEAN EACH COLOR—Press , select the color pair you want to clean, then press OK to start the cleaning cycle.
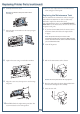
Checking Ink Levels and Replacing Ink Cartridges Before you begin a large print job, you should check your ink levels. If one of your cartridges is low, you can replace it before you start. Or you can wait until the ink runs out, replace the cartridge, and then continue the job. When one of the icons has an X and REPLACE INK CARTRIDGE is displayed, the cartridge is expended. To replace the cartridge, first make sure the printer is on. 1 Press the button to release the ink cover.
Checking Ink Levels and Replacing Ink Cartridges (continued) 5 6 Make sure the replacement cartridge is the correct color, and remove it from its package. Gently shake the cartridge before installing it. Note: If you can’t insert the cartridge smoothly, you may have the wrong cartridge. Check the package and product code. If the Ink light remains on after installing the cartridge, try removing and then reinserting it. 7 Close the ink cover.
Replacing Printer Parts (continued) 6 11 Run the cutter adjustment from the Maintenance Carefully remove the cutter. menu using the control panel. Warning: The blade is sharp. Be careful when removing it. Replacing the Maintenance Tank The Pro 7890 has one maintenance tank (on the right side) and the Pro 9890 has two (one on either side). You need to replace the maintenance tank (part # C12C890191) when you see MAINTENANCE TANK FULL on the LCD screen, the icon has an X, and the printer won’t print.
Control Panel Menus Boldface type indicates the default setting. Press the Menu button to access the menus. See the User’s Guide for details.
Control Panel Menus (continued) PAPER SETUP HEAD ALIGNMENT ROLL PAPER REMAINING Setting appears only when no paper is loaded REMAINING PPR SETUP OFF, ON ROLL PAPER LENGTH From 15 to 300 ft ROLL LENGTH ALERT From 4 to 50 ft PAPER TYPE Media type loaded in the printer CUSTOM PAPER Paper No 1 to 10 PAPER TYPE Photo, Proofing, Fine Art, Matte, Plain, Others PLATEN GAP STANDARD, NARROW, WIDE, WIDER THICKNESS PATTERN PRINT PAPER FEED ADJUST -0.70% to 0.70% DRYING TIME 0.0 sec. to 10.0 sec.
Where To Get Help Epson PreferredSM Unit ID number Service Access Date of purchase Telephone support all (888) 377-6611. Make sure you have your C Unit ID number. Serial number If you experience any difficulty with the toll-free number or your Unit ID number, call (562) 276-1305. Internet o to epson.com/support to download drivers and firmware, access product documentation and G troubleshooting, and get technical advice through e-mail. Support for non-Epson RIP Contact the RIP manufacturer.
QUICK REFERENCE GUIDE Epson Stylus Pro 7890/9890 ® Control Panel Lights and Buttons Paper light Ink light Black ink change button Paper feed up button Paper release (ePlaten™) light and button Power light and button Menu button Paper cut button OK button Pause/reset light and button Ink cover open button Paper feed down button Left arrow or paper source button Printed in USA CPD-28260