
Owner's Manual


Table Of Contents
- Contents
- Product Basics
- Selecting Wireless Network Settings From the Touch Panel
- Loading Paper
- Placing Originals on the Product
- Copying
- Printing From a Computer
- Printing with Windows
- Printing with Mac OS X
- Cancelling Printing Using a Product Button
- Scanning
- Starting a Scan
- Selecting EPSON Scan Settings
- Scanning with Mac OS X 10.6/10.7/10.8 Using Image Capture
- Scanning Special Projects
- Faxing
- Connecting a Telephone or Answering Machine
- Setting Up Fax Features
- Setting Up Fax Features Using the Product Control Panel
- Selecting Your Country or Region
- Selecting the Date and Time
- Entering Fax Header Information
- Entering Numbers and Characters for Faxing
- Selecting Fax Send and Receive Settings
- Selecting Fax Communication Settings
- Printing Fax Reports
- Restoring Default Fax Settings
- Fax Send Options
- Fax Receive Options
- Fax Communications Options
- Fax Report Options
- Restore Default Settings Options
- Setting Up Fax Features Using the Fax Utility - Windows
- Setting Up Fax Features Using the Fax Utility - Mac OS X
- Setting Up Fax Features Using the Product Control Panel
- Setting Up Speed Dial and Group Dial Lists
- Sending Faxes
- Receiving Faxes
- Using Memory Cards With Your Product
- Using an External Device with Your Product
- Printing Personalized Projects
- Replacing Ink Cartridges and Maintenance Boxes
- Adjusting Print Quality
- Cleaning and Transporting Your Product
- Solving Problems
- Checking for Software Updates
- Product Status Messages
- Running a Product Check
- Resetting Control Panel Defaults
- Solving Setup Problems
- Solving Network Problems
- Solving Copying Problems
- Solving Paper Problems
- Solving Problems Printing from a Computer
- Solving Page Layout and Content Problems
- Solving Print Quality Problems
- Solving Scanning Problems
- Solving Scanned Image Quality Problems
- Image Consists of a Few Dots Only
- Line of Dots Appears in All Scanned Images
- Straight Lines in an Image Appear Crooked
- Image is Distorted or Blurry
- Image Colors are Patchy at the Edges
- Image is Too Dark
- Back of Original Image Appears in Scanned Image
- Ripple Patterns Appear in an Image
- Scanned Image Colors Do Not Match Original Colors
- Scan Area is Not Adjustable in Thumbnail Preview
- Scanned Image Edges are Cropped
- Solving Faxing Problems
- Solving Memory Card Problems
- When to Uninstall Your Product Software
- Where to Get Help
- Technical Specifications
- Windows System Requirements
- Mac System Requirements
- Printing Specifications
- Scanning Specifications
- Automatic Document Feeder (ADF) Specifications
- Fax Specifications
- Paper Specifications
- Printable Area Specifications
- Ink Cartridge Specifications
- Dimension Specifications
- Electrical Specifications
- Environmental Specifications
- Interface Specifications
- External USB Device Specifications
- Memory Card Specifications
- Network Interface Specifications
- Safety and Approvals Specifications
- Notices
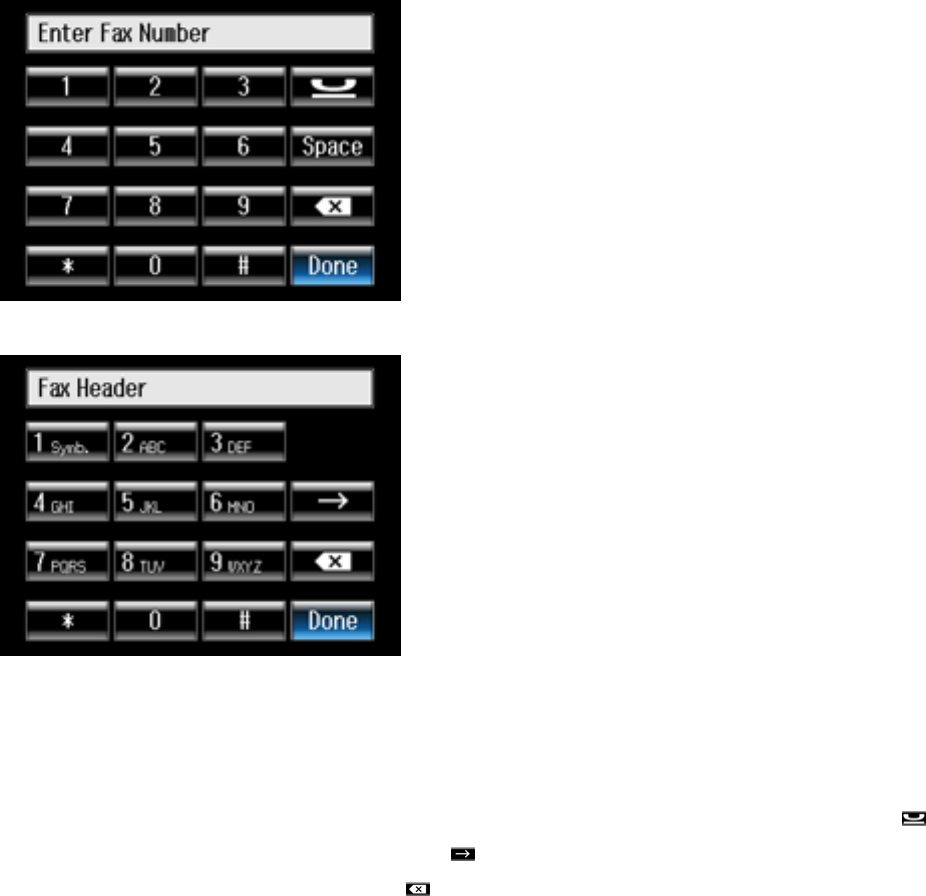
• To enter text or characters, press the keys on the numeric keypad until the desired character or
number appears.
• To enter symbols, press the 1 Symb. key until the desired symbol appears.
• To enter a pause symbol (–) in phone numbers requiring a brief pause during dialing, press .
• To move the cursor to the next space, press .
• To delete the previous character, press .
Parent topic: Setting Up Fax Features Using the Product Control Panel
162