EPSON ® Installation/User’s Guide For Macintosh and IBM Compatible PCs with a SCSI Connection
Table of Contents INSTALLING YOUR ZIP DRIVE MAC Users PowerBook Users PC Users Installation Instructions USING YOUR ZIP DRIVE Getting the Most of Your ZIP Drive 12 Drive Operation/Maintenance 14 ZIP Tools Software 15 SCSI Guidelines 16 Troubleshooting 18
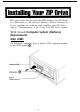
This guide shows how to install the SCSI model of the ZIP Drive on a Macintosh, or a PC that uses Windows, DOS or Windows 95. If you encounter any problems while installing your ZIP Drive, refer to “Troubleshooting” in the “Using Your ZIP Drive” section. SCSI (Small Computer System Interface) Requirements MAC USERS All Macintosh computers have a built-in SCSI connector marked by the SCSI symbol + .
POWERBOOK USERS Many PowerBook users already have a special PowerBook cable that provides a standard Mac SCSI connector. If you do not have one, you will need an HDI-SCSI adapter for the data cable before you can connect the ZIP Drive to a PowerBook. Check with your computer dealer, or call EPSON at 1-800-922-8911 to order a PowerBook adapter. PC USERS You need a SCSI connection to connect the ZIP Drive to your PC.
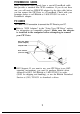
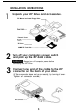
INSTALLATION INSTRUCTIONS 1 Unpack your ZIP Drive and accessories. ZIP Manual and Install Floppy Disks - External Power ZIP Drive 100MB ZIP Tools Disk 2 Turn off your computer’s power switch and pick up the ZIP data cable. 3 Connect one end of the cable to the ZIP connector on the back of your drive. B Always turn off computer power before connecting the ZIP Drive. (If the connector does not go on easily, try turning it over. Tighten all connector screws.
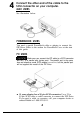
4 Connect the other end of the cable to the SCSI connector on your computer. MAC USERS See illustration below. POWERBOOK USERS You need a special PowerBook cable or adapter to connect the ZIP Drive. Refer to the section for PowerBook Users at the start of this guide. PC USERS km Make sure you connect the ZIP cable to a SCSI connector and NOT to a parallel port (printer port).
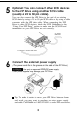
5 Optional: You can connect other SCSI devices to the ZIP Drive using another SCSI cable (usually a 25 to 50 pin cable). You can also connect the ZIP Drive to the end of an existing SCSI chain by using a 25 to 50 pin SCSI cable or by using a cable converter with the ZIP data cable. When connecting the ZIP Drive to other SCSI devices, check the SCSI Guidelines in the “Using Your ZIP Drive” section to make sure the SCSI ID and termination on your ZIP Drive are set correctly.
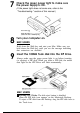
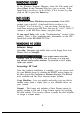
7 Check the green power light to make sure the power supply is OK. (If the power light does not come one, refer to the “Troubleshooting " section of this manual.) Green Power Light Amber Data Light (Flashes when drive is transferring data) 8 9 Turn your computer on. MAC USERS Hold down the Shift key and start your Mac. Make sure you hold down the Shift key until you see the message indicating that extensions are disabled. Insert the 100MB Took disk into the ZIP Drive.
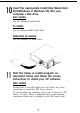
10 Insert the appropriate Install Disk (Macintosh, DOS/Windows or Windows 95) into your computer’s disk drive. MAC USERS Use the Macintosh Install Disk. PC USERS Use the Windows/DOS Install Disk. WINDOWS 95 USERS Use the Windows 95 Install Disk. 4 11 Start the Setup or Install program as described below and follow the screen instructions to install your ZIP software. MAC USERS Double-click on the ZIP Install icon and follow the screen instructions to install the ZIP Tools software.
In the Windows Program Manager, select the File menu and choose Run. In the Command Line box, type a:setup if the Install disk is in drive a: (or b:setup if it is in drive b:), then click on OK or press the Enter key. If you do not have Windows on your system: At the DOS prompt, type a:guest if the Install disk is in drive a: (or b:guest if it is in drive b:), and press Enter.
Protect - Lets you select software protection options for ZIP disks. Lets you secure a disk with a password. Make Nonremovable - Sets up a removable disk to install or run software that requires a fixed disk. Status - Gives you quick access to information about your drive and disks. Eject - Enables you to eject a disk with a mouse click.
Resolving Adapter Conflicts Setup95 will be unable to install Tools 95 software if there is a conflict between SCSI adapters installed in the computer. In this case, you will see a message from Guest95 telling you to reconfigure the adapter settings to resolve the conflict. The following procedure details how. (This procedure is also included in the Guest95 Help file.) 1 Quit from Setup95. 2 Click the Start button on your computer Desktop and point to Settings, then Control Panel.
Congratulations! When the software installation is complete, your ZIP Drive will be ready to use. Use your ZIP Drive just like any other drive on your system. You can store and copy files to and from your ZIP Drive using the same methods you use for your other devices. For additional information on using your new drive and ZIP Tools software, refer to “Using Your ZIP Drive”. MAC USERS Your ZIP Drive will appear as an icon on your Mac Desktop.
Getting the Most out of Your ZIP Drive l A Tremendous Value Your ZIP Drive gives you unlimited, high capacity, high performance storage. It’s like having a hard disk upgrade, mobile storage, and a backup drive all in one affordable and easy solution. With your ZIP Drive you can: Expand your computer storage - 100MB at a time .
R Extend Your t-lard Disk (hard disk upgrade alternative) Are you constantly running out of hard disk space? Your ZIP Drive and disks give you unlimited storage for all your information. By placing files on ZIP disks, you have ready access to them without filling up your hard disk. ZIP Tools software will help you find any files you need, and ZIP Drive’s harddisk-like performance will let you access information quickly.
Drive Operation/Maintenance Use your ZIP Drive just like any other drive on your system. To access the ZIP Drive, insert a disk and select the ZIP Drive letter (Windows/DOS) or the ZIP disk icon (Macintosh). Store and copy files to and from the ZIP Drive using the same methods you use for other drives on your system. Green Power Light / Disk Eject Button* * The disk eject button is disabled during normal operation on the Macintosh.
Disk Eject in Case of Power Loss The ZIP Drive must be powered on for normal disk insertion and removal. If you need to eject a disk during a power failure, disconnect the power supply from the ZIP Drive and push a straightened paper clip into the emergency disk eject hole on the back of the drive (see illustration). Never force a disk into or out of the ZIP Drive.
ZIP Tools Disk The format of the 100MB ZIP Tools disk that came with your drive is set when you install the ZIP software package. When you install the ZIP software on a Macintosh, the ZIP Tools disk becomes a Macintosh disk. When you install the ZIP software on a PC, the ZIP Tools disk becomes a Windows/DOS disk. After the first installation, the ZIP Tools disk can be used to install or reinstall ZIP Tools software on the same system type (Macintosh or Windows/DOS) as the initial installation.
SCSI ID SCSI ID is an address number (0 through 7) that is assigned to each SCSI device. In a SCSI chain, each device in the chain must have a different SCSI ID number. The ZIP Drive is set at the factory to SCSI ID 5. You can change the setting to 6 by moving the SCSI ID switch on the back of the drive to the up position.
Troubleshooting If you encounter a problem while installing or using your ZIP Drive, check this section for help. 1 Green power light does not come on or ZIP disk cannot be inserted. Make sure you are using an EPSON ZIP power supply and that it is connected to the ZIP Drive as shown in the installation instructions. Make sure the power supply is plugged into a working power outlet. 2 Computer does not start up properly after the ZIP Drive is installed.
(f) If your ZIP Drive is connected to a SCSI host adapter, make sure the adapter is correctly installed in the computer. Refer to the documentation that came with the adapter. (g) Reinstall your ZIP Tools software. (h) If the computer still doesn’t recognize the ZIP Drive, refer to the README.TXT file or the electronic Installation Guide included on your Install disk for additional problem solving information. 4 Data transfer problems or erratic drive operation.
United States FCC Information The computer equipment described in this installation guide generates and uses radio frequency (RF) energy. If the equipment is not installed and operated in strict accordance with the manufacturer’s instructions, interference to radio and television reception may result.
2/96 EPSON ® ZIP-489.