EPSON ® Installation/User’s Guide For IBM Compatible PCs with a Parallel Port Connection m02184
Table of Contents INSTALLING YOUR ZIP DRIVE General Notes 1 Installation Instructions 2 USING YOUR ZIP DRIVE Getting the Most of Your ZIP Drive 9 Drive Operation/Maintenance 11 ZIP Disks 13 Troubleshooting 13
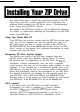
This guide shows how to install the parallel port model of the ZIP Drive using your PC’s printer connection. If you encounter any problems while installing your ZIP Drive, refer to “Troubleshooting” in the “Using Your ZIP Drive” section. This model of the ZIP Drive cannot be used on Macintosh computers. To connect to a Macintosh (including the PowerBook), use the SCSI model of the ZIP Drive.
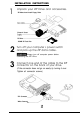
INSTALLATION INSTRUCTIONS 1 Unpack your ZIP Drive and accessories. ZIP Manual and Install Floppy Disks External Power ZIP Drive / 1OOMB ZIP Tools Disk 2 Turn off your computer’s power switch and pick up the ZIP data cable. Always turn off computer power before connecting the ZIP Drive. 3 Connect one end of the cable to the ZIP connector on the back of your drive. (If the connector does not go on easily try turning it over. Tighten all connector screws.
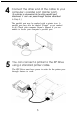
4 Connect the other end of the cable to your computer’s parallel port (printer port). (If a printer is connected to the only parallel port, disconnect it and use pass-through feature described in Step 5.) The parallel port may be marked with a printer icon. A parallel port may also be labeled “Printer” or not marked at all. Check your computer Owner’s Manual if you are unable to locate your computer’s parallel port. 5 You can connect a printer to the ZIP Drive using a standard printer cable.
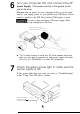
Turn your computer ON, and connect the ZIP power Supply. (The power cord fits in the groove on the side of the drive.) Always turn on power to your computer before or at the same time as you supply power to your parallel port ZIP Drive. Power must be applied to the ZIP Drive before DOS begins to load. Use only an approved Epson, ZIP power supply. Other power supplies may damage your ZIP Drive.
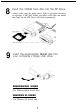
8 Insert the 100MB Took disk into the ZIP Drive. Always make sure the green power light is on before inserting (or ejecting) a ZIP disk. When you insert a ZIP disk, the amber data light on the ZIP Drive will flash momentarily. Disk Eject Button 9 Insert the appropriate Install disk into your computer’s floppy disk drive.
10 Start the Setup or Install program as described below and follow the screen instructions to install your ZIP software. WINDOWS USERS In the Windows Program Manager, select the File menu and choose Run. In the Command Line box, type a: setup if the Install disk is in drive a: (or b: setup if it is in drive b: ), then click on OK or press the Enter key.
Protect - Lets you select software protection options for ZIP disks. Lets you secure a disk with a password. Make Nonremovable - Sets up a removable disk to install or run software that requires a fixed disk. Status - Gives you quick access to information about your drive and disks. Eject - Enables you to eject a disk with a mouse click.
Congratulations! When the software installation is complete, your ZIP Drive will be ready to use. Use your ZIP Drive just like any other drive on your system. Your ZIP Drive will have its own drive letter in the File Manager. You can store and copy files to and from your ZIP Drive using the same methods you use for your other drives. For additional information on using your new drive and ZIP ‘Tools software, refer to the ZIP User’s Guide.
Using Your ZIP Drive Getting the Most out of Your ZIP Drive A Tremendous Value Your ZIP Drive gives you unlimited, high capacity, high performance storage. It’s like having a hard disk upgrade, mobile storage, and a backup drive all in one affordable and easy solution.
lul lul Extend Your Hard Disk (hard disk upgrade alternative) Are you constantly running out of hard disk space? Your ZIP Drive and disks give you unlimited storage for all your information. By placing files on ZIP disks, you have ready access to them without filling up your hard disk. ZIP Tools software will help you find any files you need, and ZIP Drive’s harddisk-like performance will let you access information quickly.
Drive Operation/Maintenance Use your ZIP Drive just like any other drive on your system. To access the ZIP Drive, insert a disk and select the ZIP Drive letter assigned to the ZIP Drive in the File Manager (or at the DOS prompt). Store and copy files to and from the ZIP Drive using the same methods you use for other drives on your system.
computer first, then turn on your printer and immediately connect power to the ZIP Drive. Power must be applied to the ZIP Drive before your operating system begins to load. n Printer Issues: If you encounter problems using a printer connected to the ZIP Drive, refer to the “Troubleshooting” section of this manual, or to the information in Section 8 of the README.TXT file on the install disk for Windows/DOS.
Enhancing ZIP Drive Transfer Speed Your ZIP Tools software package includes a parallel port accelerator that can automatically set up your system to use the fastest transfer mode for the ZIP Drive that is supported by your computer’s parallel port. To use the accelerator, first install your ZIP Drive according to the Installation instructions, then double click on the Parallel Port Accelerator icon that is installed with your Erson- Tools software.
2 Computer does not start up properly after the ZIP Drive is installed. (a) Turn off your computer and disconnect power from the ZIP Drive. Turn on the computer first, then immediately connect the ZIP power (or use a power strip to turn on both at the same time). (b) Disconnect the ZIP Drive from the computer and restart. Refer to the README.TXT file or to MANUAL.EXE on the Install disk for additional problem-solving information.
(b) There may be a problem with the parallel port I/O card in your computer. Refer to the problem-solving information under #6. Turn off your computer and disconnect power from the ZIP Drive. Turn on the computer first, then immediately connect the ZIP power (or use a power strip to turn on both at the same time). 5 6 ZIP transfer speed seems slow.
United States FCC Information The computer equipment described in this installation guide generates and uses radio frequency (RF) energy. If the equipment is not installed and operated in strict accordance with the manufacturer’s instructions, interference to radio and television reception may result.
® 2/96 EPSON ZIP-489.