
User Manual Desktop PC Equity 286 PLUS
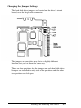
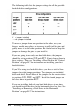

The following table lists the jumper settings for all the possible
hard disk drive configurations.
X
= jumper installed
- = no jumper installed
To move a jumper from one position to the other, use your
fingers, needle-nose pliers, or tweezers to pull it off its pins and
gently move it to the other position. Be careful not to drop the
jumper or damage the pins as you install it.
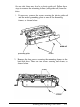
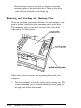
If you are going to use only one hard disk drive, the jumpers
should be set in positions C/D and ACT. If not, change them to
these settings. Then see “Installing a Hard Disk in the Vertical
Position” on page B-7 for instructions on installing your first
hard disk drive.
If you’ll be using two hard disk drives, you have a total of four
jumpers for eight jumper positions. Two jumpers are included
with each drive. Install three of the jumpers on the master drive
in positions
C/D, DSP,
and
ACT.
Install the fourth jumper on
the slave drive in position ACT.
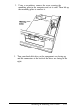
If you are installing both of your hard disk drives at one time,
you should install the drive in the horizontal drive bay first. See
“Installing or Removing a Disk Drive in the Horizontal
Position” on page B-27 for instructions.
B-6
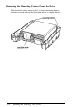
Installing
and
Removing Disk Drives