
User Manual Desktop PC Equity 286 PLUS


9.
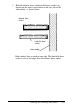
Now locate the hard disk drive ribbon cable. Pull the cable
over toward the socket and fold it so the tab and notch are
aligned. Then connect it in the same manner as the diskette
drive cable.
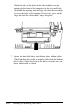
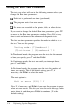
10. To replace the front panel, fit the three ridged tabs on its
bottom edge into the three notches on the lower edge of the
computer, as shown below.
notches
tabs
11. Tilt up the front panel until the clips on the top of the panel
touch the computer. Then push on the top of the panel
until it clicks into place. The diskette drive(s) should be
flush with the front panel.
(If you removed the slot cover, be sure to store it in a safe
place in case you need to replace it later.)
12. Follow the steps on page 5-41 to replace the computer’s
cover. Then see “Post-installation Setup” later in Chapter 5
for instructions on configuring your computer for use with
your new disk drive configuration.
Installing and Removing Disk Drives
B-55