EPSON® @a Printed on recycled paper with at least 10% post-consumer content
A Nofe Concerning Responsible Use of Copyu-gh fedMaferials Like photocopiers, scanners can be misused by improper copying of copyrighted material. Although Section 107 ofthe U.S. Copyright Act of 1976 (Title 17, United States Code), the “fair use” doctrine, permits limited copying in certain circumstances, those circumstances may not be as broad as some people assume.
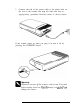
In troduc tion This package contains everything you need for professional quality color scanning: EPSON® ES-1000C’“color scanner, which scans in full color (30 bit) or grayscale monochrome (8 bit) SCSI interface card, which provides a SCSI interface for your IBM@ compatible computer SCSI interface cable Adaptec@EZ-SCSI version 3.
System and Memory Requirements For the scanner hardware and software to work properly, your system must include the following minimum configuration: A 386-based (or higher) IBM@ compatible computer or an IBM PSI 2@ MS-DOS@version 5.0 or higher Microsoft Windows 3.1 or higher, or Windows NT 3.
Installing the SCSI Interface Card Follow the steps below to install the SCSI interface card in your computer. For additional information, see the manuals for your interface card and computer. If you are already using a SCSI adapter in your computer for other SCSI devices, such as an external hard disk, see Chapter I of the ES-1000C User's Guide for information on including the scanner in an existing SCSI daisy-chain.
7. Unpack the interface card. When handling the card, be careful not to touch any of the components on the circuit board or the gold-edged connector. 8. Insert the card into the slot, guiding it straight down. Push the card down firmly (but carefully) to insert it fully. You should feel the card fit into place. 9. Secure the card to the computer with the retaining screw. 10. Replace the cover, reconnect all the cables, and plug the power cord into an electrical outlet.
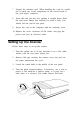
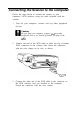
5. Connect one end of the power cable to the power inlet on the rear of the scanner and plug the other end into an appropriately grounded electrical outlet as shown below. If the scanner comes on when you plug it in, turn it off by pressing the OPERATE button. Warning: Whenever you turn off the scanner, wait at least 10 seconds before turning it back on. Rqidly turning it on md offcm damage the scanner.
Connecting the Scanner to the Computer Follow the steps below to connect the scanner to your computer’s SCSI interface using the cable included with the scanner. 1. Turn off your computer, scanner, and any other peripheral devices. Caution: Be sure that your computer, scanner, md any other peripheral devices are turned off before you plug in the ccrble. 2.
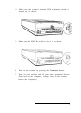
4. Make sure the scanner’s internal SCSI terminator switch is turned on, as shown. 5. Make sure the SCSI ID switch is set to 2, as shown 6. Turn on the scanner by pressing the Operate button. 7. Turn on your monitor and all your other peripheral devices. Then turn on the computer. (Always turn on the scanner before the computer.
Installing the EZ-SCSI Software If you are running Windows NT, you do not need to install EZ-SCSI or the EPSON Scanning Utilities; skip to “Installing Adobe Photoshop.” Follow these steps to install the Adaptec EZ-SCSI software: 1. Start Windows. 2. Insert the Adaptec EZ-SCSI Disk 1 in a diskette drive. 3. From the Program Manager, open the File menu and choose Run. The Run dialog box appears. 4. Type A: SETUP (or B: SETUP if you used drive B) in the Command Line box and choose OK. 5.
10. Remove the last installation diskette from the drive and choose Continue. Installing the EPSON Scanning Utilities The EPSON Scanning Utilities include EPSON Scan! II and EPSON TWAIN. Scan! uses TWAIN to capture images and then saves and exports these images in a variety of file formats. It also calibrates your scanner and output devices to produce images nearly identical to the originals.
10 7. The next screen prompts you for the path name of the Windows directory. If the displayed path is correct, choose OK. (Otherwise enter the correct drive and directory.) The installation program copies the files to your hard disk drive. 8. When the Scanner Setup dialog box opens, click on the arrow in the Interface box. Select SCSI as the interface type. The program supplies the port ID, as shown below. 9. Now do a test scan.
10. Choose Test. If the scanner, SCSI interface, and EPSON Scanning Utilities are set up correctly, the scanner scans the image. After a few moments, the scanned image appears in the Scanner Setup dialog box, as shown below. ID 2 GT-8500 I 11. Choose OK to close the Scanner Setup dialog box. 12. Remove the EPSON Scanning Utilities diskette. 13. Exit and then restart Windows.
Installing Photoshop Follow these steps to install Photoshop : 1. Start Windows, if necessary 2. Insert the Photoshop Installer-Disk 1 in a diskette drive 3. From the Program Manager, open the File menu and choose Run. You see the Run dialog box. 4. Type A: PSSETUP (or B: PSSETUP) in the Command Line box and choose OK. You see the Adobe Photoshop Installer dialog box, as shown below Adobe Photoshop ltm12.
7. Enter your name, organization (optional), and the serial number of the program. You’ll find Photoshop’s serial number inside the front cover of the Photoshop manual. 8. Choose OK. Then follow the instructions as they appear on the screen, choosing OK to continue the installation, as necessary. 9. When you see a message that the installation is complete, choose OK to return to the Program Manager. 10. Remove the final installation diskette from the drive.
3. Highlight Epson Scanners if it is not already highlighted 4. Choose Select to specify the scanner as the acquire device. 5. Select Exit from the File menu to return to the Program Manager. You only need to select the scanner as the acquire device the first time you set up Photoshop and if you change the acquire device.
7. Follow the instructions as they appear on the screen for inserting the other TextBridge diskettes and choose OK. 8. When you see a message telling you that the installation is complete, choose OK. 9. Remove the final installation diskette from the drive. The installation program creates a TextBridge OCRprogram group and icons. Identifying the Scanner to TextBridge Now you need to identify the scanner to TextBridge. Follow these steps: 1.
Scanning Images Now you are ready to start scanning. First, choose an image to scan. The best choice is a color photograph. Printed pictures, such as those in magazines, do not scan as well as photographs because of the dot patterns used in the printing process. When selecting an image or text to scan, respect the rights of the copyright holders. Don’t scan published materials without first checking the copyright status. After you choose an image, follow these steps to scan it: 16 1.
3. Carefully close the document cover so that you do not disturb the position of the photograph on the glass. 4. Choose Acquire in the File menu; then choose TWAIN. You see the EPSON TWAIN dialog box.
5. In the scroll bar next to the Image Type button, select the image type appropriate for your scan. If you are scanning a color photograph, select Color Photo. 6. , at the bottom of the Click on the full-page Preview icon , dialog box. This does a fast preview scan so you can see the scan area. q You see a preview of your image at the right.
7. Select Scan. In a few moments, the scanned image is imported into the Photoshop window. 8. To see the scanned image, select Close to exit EPSON TWAIN and close its dialog box. Putting It Together Once you have scanned images and text, you can put them together in reports, newsletters, brochures, presentations, or a myriad of formats. Several factors affect how closely your scanned image reflects the original, especially when you print the images on paper.
Calibrating Your System Calibration allows you to match your scanner and your output device so you can reproduce color images that are very close to the originals. Because monitors use a different method to display color images than printers use to print them, images look different when displayed and when they are printed. Also, each output device may produce different printed results. For example, an image printed on an electronic color printer looks dramatically different when printed on a printing press.
2. Choose Screen Calibration from the Calibrate menu. You see this screen: Adjust the slider below until the gray areas appear the same. 3. Look at the display from a distance and adjust the slide bar until the separate rows have the same basic color intensity. 4. Choose OK. Enabling screen calibration Now follow these steps to make sure screen calibration is enabled: 1. From the File menu, choose Acquire to start EPSON TWAIN. 2. Select Configuration; you see the Configuration dialog box. 3.
When screen calibration is enabled, TWAIN uses it as it scans images until you change this setting. Note: If you change to a different monitor, you will need to create anew screen calibration projle. Do this by selecting Ca Ii bra tion Profile in the Conjguration dialog box. The new screen calibration projle overrides the old one. Exporting a calibration chart Follow these steps to export a calibration chart from Scan! II to your application: 1.
5. Exit EPSON Scan! II. 6. Start Photoshop by double-clicking on its icon in the Adobe program group. 7. Open the calibration chart file you exported. The chart contains nine blocks of color gradations surrounded by a black border on three sides and some grayscale gradations on top. 8. Save the calibration chart file within Photoshop by selecting Save from the File menu. 9. Print the calibration chart on your color printer. If you have more than one printer, print the calibration chart on each one.
4. In the File Name field, type the file name of the calibration file you want to create, such as COLORl.CAL. Make sure you use the .CAL file extension. 5. In the Description field, type a short description of the printer for which you created this calibration chart, such as Color Printer 1. 6. Choose Continue. You see the EPSON TWAIN screen. 7. If necessary, select Color Photo from the Image Type pull-down menu. 8. Select Calibration Profile from the Destination pull-down menu. 9.
5. Choose Add 6. Choose OK. You see the EPSON TWAIN screen. 7. Now scan your image by choosing the Scan or Auto Scan button. The scanner scans the image using the information in the calibration profile to produce the best possible image for your printer. SelectingtheCorrect Resolution To select the best resolution for scanning an image, you must consider three factors: 0 Type of image you are scanning 0 Final output device type 0 Acceptable file size.
Note that a very high resolution scan may not produce a better-quality printed image because your output device may not recognize the high resolution information stored in the file In other words, there is no point in scanning at a higher resolution then your output device is capable of. To keep file sizes manageable, select the lowest resolution that provides acceptable quality on your output device.