t
EPSON ® ES-1200C Pro Mac Getting Started
A Note Concerning Responsible Use of Copyrighted Materials Like photocopiers, scanners can be misused by improper copying of copyrighted material. Although Section 107 of the U.S. Copyright Act of 1976 (Title 17, United States Code), the “fair use” doctrine, permits limited copying in certain circumstances, those circumstances may not be as broad as some people assume.
lntroduction This package contains everything you need for professional quality color scanning: Ll An EPSON® ES-1200C™ color scanner Ll Adobe™ Photoshop™ a powerful image-editing program Ll Kai’s Power Tools,™ a Photoshop plug-in for editing images Q ScanTastic™ a plug-in for scanning images into Photoshop D A SCSI system cable. This booklet tells you how to set up your scanner, install the software, and scan a picture.
Setting Up the Scanner 1. Take the scanner out of the box. 2 2. Remove the tape securing the scanner cover and pull out the cardboard from the top of the scanner. 3. Place the scanner on a flat, stable surface with its rear panel facing you. 4. Locate the round screw knob in the middle of the rear panel. 5. Turn the screw counterclockwise. If necessary, use a coin. The screw has a built-in spring, so it pops out a little when it is released. You cannot remove the screw.
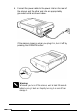
. Connect the power cable to the power inlet on the rear of the scanner and the other end into an appropriately grounded outlet as shown below. If the scanner comes on when you plug it in, turn it off by pressing the OPERATE button. R Warning: Whenever you turn off the scanner, wait at least 20 seconds before turning it back on. Rapidly turning it on and off can damage it.
Connecting the Scanner to Your Macintosh Use this procedure to connect the scanner directly to the SCSI port on your computer using the SCSI cable included with the scanner. This cable has a 25-pin connector on one end and a 50-pin connector on the other. If you are already using the SCSI port on your computer for another SCSI device, such as an external hard disk, you need a SCSI cable with a 50-pin connector on both ends.
Installing Photoshop Now that you have connected the scanner and the Macintosh, you can install your software. 1. Turn off any virus-protection software you are using until you finish installing the software programs. You do this by holding down the Shift key while you restart your Macintosh. 2. Insert the Photoshop Installer Disk 1 in the Macintosh and double-click the Install Adobe Photoshop icon. 3. When the initial screen appears, click OK to continue.
7. Open the Adobe Photoshop folder if it is not already open, and double-click the Adobe Photoshop icon. 8. Enter your name in the text box. If you wish, also type the name of your organization. 9. Type the serial number of the Photoshop program. You can find it on the Photoshop registration card and on one of the installation diskettes. 10. Click OK. 11. Choose Quit from the File menu in the upper left corner of the screen. This closes Photoshop so you can install Kai’s Power Tools and ScanTastic.
Installing ScanTastic 1. Insert the ScanTastic Installation Disk 1 into your Macintosh and double-click the ScanTastic ps Installer icon. 2. When the initial screen appears, click Continue. Read the next screen that opens and choose Continue. 3. If prompted, enter your full name, organization, and serial number (found on the diskette label and registration card). 4. Click Install to begin installation. When the next screen appears, click Yes.
Your First Scan First, choose an image to scan. The best choice is a color photograph. Printed pictures, such as those in magazines, do not scan as well as photographs because of the dot patterns used in the printing process. When selecting an image to scan, respect the rights of the copyright holders. Don’t scan published materials without checking the copyright status. After you choose an image, follow these steps: 1. Turn on your scanner, then the Macintosh. 8 2. Double-click the Adobe Photoshop icon.
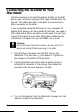
5. From the File menu in Photoshop, choose Acquire. Then choose ScanTastic. (Your menu may look slightly different than shown below.) The first time you run ScanTastic, you may be prompted for your name, organization, and serial number. Enter this information and click OK. You then see the following screen: Space : 1.
6. Click the Prescan button. A preview of your image appears on the screen. Use your mouse to click and drag a rectangle to select the area you want to scan. 1 1 0 0 1 0 0 W: lb9.89.‘1 “: r To change your selected area, move the pointer to the edge of the selection rectangle and click and drag the edge of the rectangle to a new location. When you have defined the portion of the image on the screen that you want to scan, click the Scan button in the ScanTastic screen.
If you want, you can now edit the picture using any of the Photoshop features or the Kai’s Power Tools (KPT filters. Some KPT filters are in the KPT submenu of the Photoshop Filter menu. I Sharpen Stylize Video Other ) b b b KPT Gradients on Paths 2.0... KPT Texture Etiplorer 2.0... KPT 30 Stereo Noise 2.0 KPT Fade Contrast 2.0 KPT PiHelbreeze 2.0 KPT PiHelstorm 2.0 KPT Pixelwind 2.0 KPT Seamless Welder 2.0 KPT Selection Info 2.
Once the image is modified, you can save the image or print it. You can put it in a report, a newsletter, a brochure, or a bush If the colors don’t look right, you may need to calibrate your system. See Chapter 2 in your Photoshop manual. Now that you know the basics, you’re ready to begin your own scanning projects. If you need more information, see your scanner, Photoshop, Kai’s Power Tools, and ScanTastic manuals.
If your image is going to appear only on your screen and will not be printed, click Manual in the ScanTastic screen and set the resolution for 72, as shown below. This resolution gives you a high-quality screen image and a small file size. If you will be outputting a scanned image, you need to choose a different resolution based on the image type and final output device. See your ES-1200C Scanner User’s Guide for more information on resolution. i# Manual 0 Enhance Space : 294.
Epson America, Inc.