EPSON ® ES-1200C Pro PC Getting Started @ Tl& mumal is printed on 50% recycled paper, 10% post-consumer content.
All rights reserved. No part of this publication may be reproduced, stored in a retrieval system, or transmitted in any form or by any means, electronic, mechanical, photocopying, recording, or otherwise, without the prior written permission of Seiko Epson Corporation. No patent liability is assumed with respect to the use of the information contained herein. Neither is any liability assumed for damages resulting from the use of the information contained herein.
Introduction This package contains all the hardware and software you need for professional quality color scanning. Here are the contents of your scanner package, described in the order you’ll need to install each item: ci SCSI interface card that provides a SCSI interface for your computer ci EPSON®ES-1200C™ color scanner that scans in full color (24 bit) or grayscale monochrome (8 bit) cl SCSI interface cable tl Adaptec® EZ-SCSI version 3.
System and Memory Requirements For the scanner hardware and software to work properly, your system must have at least the following configuration: ci A 386-based or higher PC or an IBM® PS/2® machine cl MS-DOS® 5.0 or higher cl Microsoft® Windows 3.1 or higher, or Windows NT ci High-density, 3%inch diskette drive Li Hard disk drive with at least 25MB available for the scanner applications and 35Mb available for scanned images P 4MB RAM and 8MB to 16MB of permanent virtual memory.
Installing the Interface Card Use this procedure to install a SCSI interface card. For more detailed installation instructions, see the manual that came with your card. 1. Turn off the computer and any peripheral devices. 2. Disconnect the computer’s power cable from the electrical outlet and from the back panel. Also, disconnect any cables that are connected to the computer, including the keyboard cable. 3. Remove the cover from your computer. If you need detailed instructions, see your computer manual.
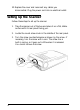
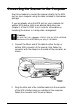
10. Replace the cover and reconnect any cables you disconnected. Plug the power cord into an electrical outlet. Setting Up the Scanner Follow these steps to set up the scanner: 1. Take the scanner out of the box and place it on a flat, stable surface with its rear panel facing you. 2. Locate the round screw knob in the middle of the rear panel. 3. 4 Turn the screw counterclockwise as shown by the arrow. If necessary, turn the screw with a coin.
4. Firmly connect the power cable to the power inlet on the rear of the scanner and the other end into an appropriately grounded outlet as shown below. If the scanner comes on when you plug it in, turn it off by pressing the OPERATE button. Warning: Whenever you turn off the scanner, wait at least 10 seconds before turning it back on. Rapidly turning it on and off can damage the scanner.
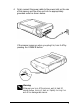
Connecting the Scanner to the Computer Use this procedure to connect the scanner directly to the SCSI port on your computer using the cable included in the scanner package. If you are already using the SCSI port on your computer for another SCSI device, such as an external hard drive, see Chapter 1 of the ES-1200C User’s Guide for information on including the scanner in a daisy-chain arrangement.
3. Switch on the internal SCSI terminator, as shown. 4. Set the SCSI ID switch to 2, as shown. 5. Turn on the scanner, then the computer. (Always turn on the scanner before the computer.
Installing EZ-SCSI Software If you are running Windows NT, you do not need to install EZ-SCSI software. Skip to the “Installing Adobe Photoshop” procedure. Follow these steps to install the Adaptec EZ-SCSI software: 1. Start Windows. 2. Insert the Adaptec EZ-SCSI Disk 1 in a diskette drive. 3. From the Program Manager, open the File menu and choose Run. The Run dialog box appears. 4. Type A:SETUP (or B:SETUP if you inserted the disk in drive B) and choose OK.
10. Remove the final installation disk from the drive and choose Continue. The installation program creates an Adaptec SCSI program group containing Adaptec icons. Installing the EPSON Scanning Utilities The EPSON Scanner Utility program includes EPSON Scan! II and EPSON TWAIN. Scan! uses TWAIN to capture images and then saves and exports these images in a variety of file formats. It also calibrates your scanner and output devices to produce images nearly identical to the originals.
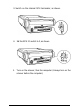
10 6. The next screen prompts you for the path name of the Windows directory. If the displayed path is where your Windows program resides, choose OK. 7. When the Scanner Setup dialog box opens, select SCSI as the interface type. The program supplies the port ID, as shown below. 8. Now do a test scan. Raise the document cover on the scanner and place an image face down on the glass surface. Then carefully close the cover.
9. Choose the Test button. If the scanner and EPSON Scanner Utility software are set up correctly, the scanner scans the image; after a few moments, the scanned image appears in the Scanner Setup dialog box, as shown below. Interface SCSI f 10. Choose OK to close the Scanner Setup dialog box. 11. Remove the EPSON Scanning Utilities disk. 12. Exit, then restart Windows. lnstalling Adobe Photoshop Installing Photoshop is a three-step process. You first install the Adobe Type Manager’” (ATM) program.
Installing the ATM program Follow these steps to install Adobe Type Manager: 1. Start Windows. 2. Insert the ATM program disk into a diskette drive. 3. From the Program Manager, open the File menu and choose Run. The Run dialog box appears. 4. Type A:INSTALL (or B:INSTALL) in the Command Line text box and choose OK. The ATM Installer dialog box appears. 5. Choose Install to accept the default directories for the Type 1 font outline and font metric files.
4. Type A:SETUP.EXE (or B:SETUP.EXE) in the Command Line text box and choose OK. The Adobe Photoshop Installer dialog box appears, as shown below. 51951: WJiJK 2841; 5441: 1500 K Space Required: 8412K Space Availabb: 833881: 5. Leave the Installation Options selected. If you are concerned about disk space, consult the Photoshop User Guide. 6. Choose Install. The registration screen appears. 7. Enter your name, organization (optional), and the serial number of the program.
Selecting the Acquire Device Before you can scan an image from Photoshop, you need to select the scanner as the acquire device. Follow these steps: 1. From the Program Manager, open Photoshop by double-clicking on its icon in the Adobe program group. 2. Choose Acquire in the File menu and then Select TWAIN Source. You see the following dialog box: 3. Choose Epson Scanners if it is not already highlighted. 4. Choose Select. This specifies the scanner as the acquire device. 5.
lnstalling Kai’s Power Tools Before you install Kai’s Power Tools, make sure that you have installed Adobe Photoshop. Then follow these steps: 1. Insert Disk 1 of Kai’s Power Tools into a diskette drive. 2. From the Program Manager, open the File menu and choose Run. The Run dialog box appears. 3. Type A:SETUP (or B:SETUP) in the Command Line text box and choose OK. 4. The Installer dialog box appears, prompting you for a directory pathname. Type C:\PHOTOSHP\PLUGINS in the Install To text box.
7. Remove the final installation disk from the drive. You can access Kai’s Power Tools filters from Adobe Photoshop by choosing KPT filters or KPT Extensions from the Filters menu in the Photoshop Menu Bar. For more information on Photoshop or the installation options, consult the Kai’s Power Tools for Windows Explorer‘s Guide. Scanning lmages You are now ready to start scanning. First, choose an image to scan. The best choice is a color photograph.
3. Carefully close the document cover so that you do not disturb the position of the photograph on the glass. Choose Acquire in the File menu; then choose TWAIN. This opens the EPSON TWAIN dialog box.
5. In the scroll bar next to the Image Type button, select the image type appropriate for your scan. If you are scanning a color photograph, select Color Photo. 6. Click on the full-page Preview icon, , at the bottom of the dialog box. This does a fast preview scan so you can see the scan area. You see a preview of your image at the right. To define the area you want to scan, position the mouse at a corner of the area; then hold the mouse button down as you drag it to the opposite corner of the area.
When you have defined the portion of the image you want to scan, choose the Scan button. In a few moments, the scanned image is imported into the Photoshop window. To see the scanned image, close the EPSON TWAIN dialog box. Once you have your images and text, you can put them together in reports, newsletters, brochures, or business presentations. Several factors can affect how closely your scanned image reflects the original, especially when you print the results on paper.
Calibrating Your System Calibration allows you to match your scanner and your output device so that you can reproduce images that are very close to the original. Monitors use a different technology than printers, so images look different on the monitor than when they are printed. Also, each output device may produce different results. A proof printed on an electronic color printer will look different from the same image printed on a printing press.
2. Choose Screen Calibration from the Calibrate menu. You see the screen shown below: I I Adjust the slider below until the gray areas appear the same. III &, & 3. II Look at the display from a distance and adjust the slide bar until the separate rows have the same basic color intensity. 4. Choose OK. Enabling screen calibration Now follow these steps to make sure the screen calibration is enabled: 1. From the File menu, choose Acquire to start EPSON TWAIN. 2.
Note: If you change your display monitor, you will need to create a new screen calibration profile. Do this by selecting Calibration Profile in the Configuration dialog box. The new screen calibration profile overrides the old one. Exporting a calibration chart Follow these steps to export a calibration chart from Scan! to your application: 1. From EPSON Scan! II, choose Export Calibration Chart from the Calibrate menu.
7. Open the file for the calibration chart file you exported. The chart contains nine blocks of color gradations surrounded by a black border on three sides and a gray border with some grayscale gradations on top. 8. Save the calibration chart file within Photoshop by selecting Save from the File menu. 9. Print the calibration chart on your color printer. If you have more than one printer, print the calibration chart on each printer.
5. In the File Name field, type the filename of the calibration file you want to create. Make sure you assign a CAL extension to this file. 6. In the Description field, type a short description of the printer you use to print the calibration chart. 7. Choose Continue. You see the EPSON TWAIN Acquire screen. 8. Select Color Photo from the Image Type pull-down menu. 9. Select Calibration Profile from the Destination pull-down menu. 10. Choose the Auto Scan icon.
The scanner scans the image using information from the calibration profile to produce the best possible image for your printer. Selecting the Right Resolution Selecting the best resolution for scanning your image hinges on two factors: the final output device you plan to print the image on, and the acceptable file size. Generally, the higher the resolution, the larger the file.
Copyrighted Materials Like photocopiers, scanners can be misused by improper copying of copyrighted material. Although Section 107 of the U.S. Copyright Act of 1976 (Title 17, United States Code), the “fair use” doctrine, permits limited copying in certain circumstances, those circumstances may not be as broad as some people assume. Unless you have the advice of a knowledgeable attorney, be responsible and respectful by not scanning published material without the permission of the copyright holder.
Epson America, Inc.