front Page 1 Monday, September 16, 1996 11:06 AM Printed on recycled paper with at least 10% post-consumer content
front Page 2 Monday, September 16, 1996 11:06 AM A Note Concerning Responsible Use of Copyrighted Materials Like photocopiers, scanners can be misused by improper copying of copyrighted material. Although Section 107 of the U.S. Copyright Act of 1976 (Title 17, United States Code), the “fair use” doctrine, permits limited copying in certain circumstances, those circumstances may not be as broad as some people assume.
soft2 Page 1 Friday, September 20, 1996 1:35 PM Introduction This package contains everything you need for professional quality color scanning. Note: Different combinations of software and equipment are packaged with the EPSON® Expression™ 636. Some of the items listed may not have been included with your scanner.
soft2 Page 2 Friday, September 20, 1996 1:35 PM ❏ Adobe® Photoshop™ or Adobe Photoshop LE, a powerful image-editing program that lets you merge and edit color images, retouch photographs, or create new artwork ❏ Kai’s Power Tools,™ a Photoshop plug-in for editing images and creating special effects ❏ Xerox® Imaging Systems TextBridge,™ an optical character recognition (OCR) program that converts hard copy into formatted text ❏ NewSoft Presto! PageManager™ LE, an OCR and document management program ❏ Claris
soft2 Page 3 Friday, September 20, 1996 1:35 PM ❏ A 486-based (or higher) IBM compatible computer or an IBM PS/2® ❏ CD-ROM drive (some software is provided on CD-ROM; if you need diskettes, contact the software manufacturer) ❏ An Adaptec® SCSI adapter or a bidirectional parallel interface (either the standard bidirectional parallel interface or a PS/2 standard printer port) Note: ❏ EPSON supports some Adaptec-compatible SCSI adapters.
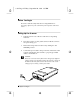
soft2 Page 4 Friday, September 20, 1996 1:35 PM Before You Begin Be sure to read the safety instructions and guidelines for choosing a place for your scanner in your Expression 636 User’s Guide. Setting Up the Scanner 1. Take the scanner out of the box and remove all packing materials. 2. Place the scanner on a flat, stable surface with the scanner’s rear panel facing you. 3. Release the transportation lock lever by sliding it to the UNLOCK position. 4.
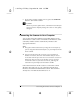
soft2 Page 5 Friday, September 20, 1996 1:35 PM 5. If any of the scanner’s lights come on, press the OPERATE button to turn off the scanner. c Caution: Whenever you turn off the scanner, wait at least 10 seconds before turning it back on. Rapidly turning the scanner on and off may damage it. Connecting the Scanner to Your Computer Your scanner has both a bidirectional parallel interface and a SCSI interface.
soft2 Page 6 Friday, September 20, 1996 1:35 PM c Caution: Make sure that the scanner, the computer, and any other SCSI devices are turned off and unplugged from the power source. 1. Install the SCSI board in your computer, if necessary. Follow the instructions that came with your SCSI board. 2. Connect the 50-pin end of the cable to either the top or bottom SCSI connector of the scanner; then squeeze the wire clips together until they lock in place on both sides. 3.
soft2 Page 7 Friday, September 20, 1996 1:35 PM Note: ❏ Different combinations of software are packaged with the EPSON Expression 636. Some of the software listed may not have been included with your scanner. ❏ Some software is available for Windows 95 only. For the software that comes on diskettes, it is a good idea to make backup copies before you install it. Remember to register your software with the manufacturer.
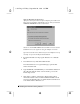
soft2 Page 8 Friday, September 20, 1996 1:35 PM Note for Windows 95 SCSI users: After you connect your scanner to your computer, you see the screen below when you install or start Windows 95, or when you select the Add New Hardware in the Control Panel. Choose Do not install a driver and click OK. You do not need to install EZ-SCSI, even if you are using an Adaptec SCSI card. If you do not see this screen, make sure your SCSI adapter is set up correctly. See your SCSI adapter documentation. 2.
soft2 Page 9 Friday, September 20, 1996 1:35 PM 6. Click OK to accept the default pathname, or enter a new path and click OK. 7. The next dialog box displays the path in which the installer software will install the EPSON TWAIN program. The default path is C:\WINDOWS. Click OK to accept the default pathname, or enter a new path and click OK. 8. The installer software copies the Scanning Utilities to your hard disk drive and prompts you for diskette 2 when necessary. 9.
soft2 Page 10 Friday, September 20, 1996 1:35 PM Note: If you selected SCSI from the Interface menu and no SCSI ID number appears, make sure no other SCSI device has the same ID number as the scanner. 11. Click OK to close the EPSON Scanner Setup dialog box. 12. Remove the EPSON Scan! II program diskette from the drive. 13. If you are using Windows 3.1, exit Windows and then restart it. The installer creates an EPSON Scanner program group or folder in Windows.
soft2 Page 11 Friday, September 20, 1996 1:35 PM 3. In the dialog box, type D:\PHOTOSHP\DISK1\SETUP, where D is your CD-ROM drive letter, and click OK. By default, the Installer does a Typical installation and installs the entire program. If you are low on disk space, you may want to do a Compact or Custom installation to specify that only certain software components be installed. 4. Follow the instructions on screen to complete the installation. 5. Remove your CD-ROM.
soft2 Page 12 Friday, September 20, 1996 1:35 PM Installing NewSoft Presto! PageManager PageManager is a scanning utility that helps you store and organize your scanned documents. Follow these steps to install PageManager: 1. Insert PageManger Disk 1 in a diskette drive. 2. From Windows 95, click Start and then Run. From the Windows 3.1 Program Manager, open the File menu and select Run. 3. Type A:\SETUP (or B:\SETUP if you used drive B) in the Command Line box and click OK. 4.
soft2 Page 13 Friday, September 20, 1996 1:35 PM 5. Insert Disk 1 in a diskette drive when prompted. 6. Click Next. The Installer program finds the setup file (SETUP.EXE). 7. Click Finish. 8. Follow the instructions on screen to complete the installation. 9. Remove your diskette. Installing TextBridge TextBridge is an OCR and document management program. 1. Insert the TextBridge CD-ROM into your CD-ROM drive. 2. From Windows 95, click Start and then Run. From the Windows 3.
soft2 Page 14 Friday, September 20, 1996 1:35 PM 7. When you see a message telling you that the installation is complete, click OK. 8. Remove your CD-ROM. Things to Keep in Mind Several factors affect how closely your scanned image reflects the original, especially when you print the images on paper. Calibration Calibration allows you to match your scanner and your output device so you can reproduce color images that are very close to the originals.
soft2 Page 15 Friday, September 20, 1996 1:35 PM You’ll select different resolutions for scanning line drawings and halftones from the ones you select for scanning photographs. The final output device is the device on which you plan to ultimately print the image. This may be a printer connected to your computer or a commercial printing press. In addition, the file size of the scanned image may determine the resolution you select.
soft2 Page 16 Friday, September 20, 1996 1:35 PM When selecting an image or text to scan, respect the rights of the copyright holders. Don’t scan published materials without first checking the copyright status. Before you can scan an image, you need to select the scanner as the acquire device. You only need to do this the first time you set up your application or if you change the acquire device.
soft2 Page 17 Friday, September 20, 1996 1:35 PM To change the selected image area, move the pointer to the edge of the selected area; then hold down the mouse button and drag the edge of the rectangle to a new location. 11. Select Scan (or Acquire in some applications). In a few moments, the scanned image is imported into your application. 12. If you want, you can now edit the picture using the features of your application.
soft2 Page 18 Friday, September 20, 1996 1:35 PM Type of Support Kai’s Power Tools NewSoft Presto! PageManager Xerox Textbridge Pro Telephone (805) 566-6206 (510) 661-4319 (800) 248-6550 Fax (510) 252-0536 Fax Back BBS (510) 252-0271 CompuServe GO KPTSupport America Online KPT World Wide Web www.metatools.com E-mail KPTsupport@aol.com FTP site 18 Where to Get Help Go TextBridge www.tophat.com www.xerox.