Epson MovieMate™ 25 ® User’s Guide
All rights reserved. No part of this publication may be reproduced, stored in a retrieval system, or transmitted in any form or by any means, electronic, mechanical, photocopying, recording, or otherwise, without the prior written permission of Seiko Epson Corporation. The information contained herein is designed only for use with this Epson product. Epson is not responsible for any use of this information as applied to other products.
Contents 4 4 4 4 5 5 5 6 7 8 8 8 9 Quick Start 11 11 11 12 12 13 14 14 15 15 15 16 16 16 17 17 17 17 Advanced Operations 18 18 19 20 21 24 24 26 27 29 30 31 32 39 39 40 40 41 42 Fine-Tuning Your MovieMate Settings Menu....................................................................... Using the settings menu .................................................. Settings menu options ..................................................... Language codes ....................................................
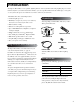
Introduction Your Epson® MovieMate™ 25 is a portable, lightweight home cinema system that delivers high-quality, big-screen entertainment anywhere you want. In less than two minutes, you can set up MovieMate and watch a DVD, play a video game, or view your favorite photos on an 80-inch screen in the comfort of your own home. MovieMate offers these outstanding features: • An 80-inch pull-up screen • Flexibility to set up in any room (or even outdoors), from 6.
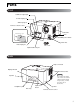
Parts Front Subwoofer output port S-Video input port Audio input port Remote control receiver Air intake vents Press here to open Main power switch Lens Power inlet Video input port Lens cover Optical audio-out port Back Lamp cover latch Display window Air exhaust vents Speaker Do not block the exhaust vents, and do not touch the exhaust vent immediately after projecting, or while projecting, since it becomes hot.
MovieMate Controls Focus ring Horizontal lens shift dial Zoom ring Vertical lens shift dial Status display indicator Lamp cover Skip buttons Image On indicator Image Off indicator Source button Power button 6 Stop button Play/Pause button Volume adjustment buttons Break button Image On/Off button
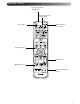
Remote control Remote control lightemitting area Function/numerics toggle switch Power button DVD Tray Open/ Close button Playback buttons Audio buttons DVD video butons Projector adjustment buttons 7
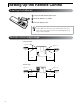
Setting Up the Remote Control Inserting the batteries 1 Push in the tab and lift up the cover. 2 Insert the batteries as shown. 3 Close the battery cover. If the remote control response slows down or stops working, change the batteries. Make sure you have two spare AA-size batteries ready to use when required. Avoid using the remote control under bright fluorescent lamps or in direct sunlight. Remote control usage range Horizontal range Approx. 30° Approx. 30° Approx. 30° Approx.
Using this guide Must be observed to avoid damage or malfunction. Contains important information and helpful hints. Some MovieMate functions are available only for certain types of discs. These icons indicate the applicable types of discs. Getting More Information Need additional help? Take advantage of Epson’s automated support services 24 hours a day at http://support.epson.com. Use this site to download FAQs or product information and e-mail your questions to Epson support.
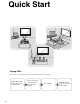
Quick Start Playing DVDs You can enjoy your DVDs on the big screen by following these four easy steps. Position MovieMate in front of the screen or a blank wall. 10 Connect the power cable and turn on the main power switch. Insert a DVD. Adjust the picture position, size, and audio volume.
Setting Up MovieMate Projection distance and image size 1 Place MovieMate in a position to project the best size image onto the screen. 2 Position MovieMate so that it is parallel to the screen. The further you place MovieMate away from the Screen screen, the larger the projected image becomes. You can project on a wall if you want an image larger than the size of the screen. Quick Start For detailed projection distance values, see page 60.
Disc Playback Inserting and playing a disc 1 Press to open the disc tray. A beep sounds and the power comes on. You can also press on the remote control. 2 Place the disc in the disc tray with the label facing up. 3 Press to close the disc tray. For all discs except , the projection lamp comes on automatically, and projection begins. It takes a few seconds for the lamp to warm up and project at full brightness. To play , press to start audio play- back. The projection lamp does not turn on.
Adjusting the picture and sound Adjust the image and sound as follows: Adjusting the size of the projected image (Zoom ring) Setting the focus (Focus ring) To decrease the size, turn towards [T]. To increase the size, turn towards [W]. Adjusting the volume Using the control panel Using the remote control Adjusting the image position (lens shift) * The image cannot be shifted beyond the horizontal and vertical limits.
Turning off the power 1 2 Remove the disc from the disc tray. Press . If the lamp was on, the lamp turns off and the Image Off light flashes orange (during cooldown). “Now Cooling” appears in the display window above the DVD tray. The confirmation buzzer beeps twice to indicate that cool-down has completed. 3 Turn off the main power switch. If you only press to turn off the power, MovieMate continues using electricity. 4 Replace the lens cover.
Basic Operations During Playback From here on, operations are explained primarily using the buttons on the remote control. If the same button is available on the MovieMate control panel, you can also use it. Make sure the switch is set to the [Function] position Pausing playback during playback. • On the control panel, press • To resume playback, press • Press Quick Start Press . . to toggle between play/pause. Note the following points when pausing during a slideshow.
Make sure the switch is set to the [Function] position Replaying a scene Press during playback. MovieMate replays the previous 10 seconds. • Depending on the type of disc, this operation may not be possible. • You cannot return to the previous chapter. Skipping Press or Press during playback. once to return to the start of the chapter or track being played. After this, playback returns to the start of the previous chapter/track each time you press (Except for ).
Playing in slow motion 1 2 Selecting picture quality (Color Mode) Press at the point where you want to begin slow motion playback. The image pauses. Press . • There are 5 levels of playback speed that change each time you press 1 . The currently selected color mode name is displayed on the screen. . For slow motion review, press Press . Quick Start • You can select a color mode that corresponds with the brightness and other conditions of your room.
Advanced Operations Controlling Playback Changing the brightness of the display window (Dimmer) Make sure the switch is set to the [Function] position. Press . When you press the brightness of the display window and the indi- cators on the main unit change as shown below. DIMMER AUTO is the default setting. The brightness increases. The brightness decreases. Darkens during playback and brightens when paused or stopped.
Using DVD menus Some have one or both of the following types of menus. Top menu: When multiple titles (video and audio) have been recorded, the top menu lets you select them. Menu: You can use menus to select chapters and playback settings such as angle, audio, and subtitles. 1 Press 2 Press or during playback or when stopped. to select the item you want to see. You can also select the title number or chapter number directly using the numeric buttons.
Using PBC (playback control) When you insert a Video CD with PBC (playback control) enabled, a menu screen is displayed. You can select the scene or information you wish to see from this menu. 1 Insert a Video CD that includes PBC. The following type of menu is displayed. 2 Select the item you want to see using the numeric buttons. For instructions on using the numeric buttons, see page 19. The selected contents are played.
Playing MP3/WMA and JPEG files Make sure you set the switch to the [Function] position. 1 When playing a disc that contains both MP3/WMA files and JPEG files, you see the following kind of group/track (file) name list. 2 Press 3 Press to move the pointer to the track (file) name list. Press to return the pointer to the group name list. Press to select the track. You can also make the same selection using 5 Press When you press Advanced Operations 4 to select the group. or .
To play MP3/WMA audio (Image Off) Once menu selection is complete and the audio begins, press . MovieMate beeps and the projection lamp turns off so you can enjoy just the music being played. Press to turn the lamp back on. Once the lamp has been turned off and when the Image Off indicator is flashing orange, the lamp does not come back on even if you press Make sure you set the switch to the [Function] position. . Wait until the Image Off indicator goes out.
Notes on playback • Depending on the recording and the characteristics of the disc it is possible that the disc may not be readable, or that reading the disc may take some time. • The time it takes to read a disc differs depending on the number of groups or tracks (files) recorded on the disc. • The order of the group/track (file) name list display and the order displayed on a PC screen may be different.
Selecting the chapter or track number During playback, select the chapter or track number you wish to play by pressing the numeric buttons. For details on using the numeric buttons, see page 19. • Can be used when stopped or when playing back with PBC off. • Can also be used when stopped. • Depending on the disc, certain operations may not be possible. Playing from a designated time (time search) Make sure the switch is set to the [Function] position.
Entering the time To play a disc from 0 hours, 23 minutes, and 45 seconds, for example, Set the Function/Numerics toggle switch to the [123] position. Press the numeric buttons in the order of → → → → . If you make a mistake, press enter the correct number. and delete the incorrect number, then re- Once you have finished entering the time, return the function/numerics toggle switch back to the [Function] position. 5 Press . 6 Press once to cancel the menu bar.
Looping playback of a favorite scene (A-B repeat playback) Make sure the switch is set to the [Function] position. You can set the playback range (start point to end point) from the menu bar during playback. 1 Press twice during playback. The following menu bar is projected. • Where possible, this function can be used during playback. • Cannot be used when playing back using the PBC function. 2 Press 3 Press 4 Press until the pointer reaches . . then select .
• You cannot specify a range which includes multiple titles or tracks. • “A-B repeat” cannot be performed at the following times. - During program play - During random play - During repeat play - During PBC • The status bar is not displayed when playing back cinemascope (letterbox) . Although functions can be set in this state, when it is necessary to display the status bar, press to normal. Press to return the aspect ratio to return to the former aspect ratio.
Canceling repeat play • Press repeatedly until “ ” is displayed on the screen. • Turn off the power switch on the main unit. • You cannot use the “Title repeat” function with some DVDs. • To cancel repeat, press . • Display the menu bar and move the pointer to play. For details, see page 33.
Playing in the order of your choice (program play) Make sure the switch is set to the [Function] position. You can set titles, chapters, and tracks to play in the order of your preference. 1 Press when stopped. Each time you press , the display window on the main unit changes as follows. Press repeatedly until “PRGM” is displayed. Program play Random play (see page 30) Normal display Set the order according to the following screen explanations.
Playing back at random (random play) Set to the [Function] position before performing operations You can choose to play titles or chapters/tracks at random. The playback order always changes when using random play. 1 Press when stopped. Whenever you press the display window changes in the following way. Keep pressing until “RANDOM” is displayed. Program play (see page 29) Random play Normal display 2 Press Normal playback .
Changing the audio language When a disc has been recorded with multiple audio signals or languages, you can switch to the audio signal or language of your preference. 1 Press during playback. The current audio settings are displayed. 2 While the audio settings are displayed, press edly and select the desired setting. Press to change the setting. Wait a few seconds, or press Advanced Operations 3 repeat- . • You can also use the menu bar to change the setting. See page 33.
Changing the subtitle display You can choose whether or not to display subtitles for discs that have been recorded with subtitles. When a disc has been recorded with multiple language subtitles, you can switch to the available language of your preference. 1 Press during playback. The current subtitle settings are displayed. 2 While the subtitle settings are displayed, press repeatedly to select subtitles on or subtitles off. Press to select the subtitle language.
Using the menu bar Make sure the switch is set to the [Function] position. 1 Press twice during playback. The following status bar and menu bar are projected. 2 Press use. 3 Press • Press until the pointer reaches the item you wish to . once to cancel the menu bar. Advanced Operations • When playback is stopped, some functions may not work. • The status bar is not displayed when playing back cinemascope (letterbox) .
Selecting Auto-standby and Sleep timer settings Make sure the switch is set to the [Function] position Auto standby: When playback has finished or has been stopped, or an operation has not been performed for about 3 minutes, the power switches off automatically. Sleep timer: Once the set time has elapsed, the power switches off automatically. This prevents unneccesary power being consumed if you fall asleep while watching a movie. You cannot use auto standby and sleep timer at the same time. Press .
Changing from Progressive to Interlaced mode Make sure the switch is set to the [Function] position. For the best image quality, MovieMate uses the Progressive video display mode. You can change to the Interlaced mode if necessary. When there is no disc loaded in the disc tray (or when a video is stopped), press . Whenever you press the display window display changes in the fol- lowing way. All scan lines are displayed in one video field. This achieves a far superior image than interlacing.
Using External Video Equipment Connecting to other video equipment You can connect your MovieMate to devices that have a video output port, such as: - VCRs - Game consoles - Video cameras Connection cables may be included with your video device, or you may purchase them from an electronics store. External connection cables are not included with MovieMate.
Using the S-Video connection White Connect with the ▲ facing downwards Red RCA audio cable Output To Audio out port L Audio To Audio input port R S-Video To S-Video out port To S-Video input port S-Video cable Projecting images from external video equipment Remove the lens cover if it is in place. 2 Turn on the MovieMate power switch, then press 3 Press Advanced Operations 1 . . “VIDEO” appears in the display window and MovieMate switches to external video mode.
Using External Audio Equipment Listening with headphones • When listening with headphones, make sure the volume is not too high. You can damage your hearing when listening to sounds at high volume over an extended period of time. • Don’t set the volume too high from the outset. A sudden loud sound may cause damage to your headphones or your hearing. As a precaution, lower the volume before you switch the power off then raise it gradually after you switch it back on. Connect your headphones as shown below.
Connecting to audio equipment with an optical digital input You can connect to AV amplifiers and equipment capable of making digital recordings when they are equipped with a digital audio input port. You will need an optical digital audio cable, which may be included with your equipment or can be purchased from an electronics dealer. When connecting the cable, remove the protective cap, align the shape, and insert firmly. Apply the cap when not in use to prevent dust from entering the port.
Selecting the Sound Mode Make sure the switch is set to the [Function] position. You can obtain enhanced audio from the speakers by activating the JVC original sound system function. Press . Each time you press lows. Press , the display window display changes as fol- repeatedly until the desired mode is displayed. Select the mode that produces the best sound for the disc you are playing.
Adjusting the audio playback level Make sure the switch is set to the [Function] position. The default audio setting plays DVDs at a higher volume than other discs. You can adjust this default setting if necessary. Press during playback. Each time you press , the display window changes as follows. As you listen to the audio being played, press repeatedly until the setting you want is displayed. Standard Middle High (default setting) Advanced Operations • The setting is only effective when is played.
Adjusting the audio input level of external audio equipment Make sure the switch is set to the [Function] position. You can adjust the audio input level of equipment connected to the Audio port. 1 Press 2 Press and hold and switch to the external video mode. for approximately 2 seconds. Each time you press and hold , the display window changes as follows. For normal use (default setting) Use this setting when the input level from external equipment is too low and the audio is difficult to hear.
Fine-Tuning Your MovieMate Settings Menu You can adjust the MovieMate settings to suit your viewing environment. Using the settings menu The Settings menu allows you to change the language, audio and video options, and more. This section describes how to use the menu. 1 When a video is stopped, or when there is no disc loaded in the disc tray, press . The following settings menu is displayed. 2 Press to move the pointer to the icons at the top right and select the menu group.
5 Press to select the item, then press To return to the previous menu level, press . . Settings menu options Boldface indicates the default. Language settings menu Item Settings Menu Language For “AA” and other language codes, see the “Language Code List” Select the language for the DVD video menu. on page 46. These settings become available when settings have been recorded Audio Language on the disc itself.
Audio settings menu Item Settings Digital Audio Output Select the output signal according to the equipment connected to the Optical AudioOut port. For detailed signal information, see page 46. PCM only: Use when connected to equipment that is only compliant with Linear PCM (Pulse Coded Modulation). DOLBY DIGITAL/PCM: Use when connected to a Dolby Digital Decoder or when connected to equipment with this function.
Language codes Code AA Language Code Afar GD Language Code Scots Gaelic MK Language Code Macedonian SN Language Shona AB Abkhazian GL Galician ML Malayalam SO Somali AF Afrikaans GN Guarani MN Mongolian SQ Albanian AM Ameharic GU Gujarati MO Moldavian SR Serbian AR Arabic HA Hausa MR Marathi SS Siswati AS Assamese HI Hindi MS Malay (MAY) ST Sesotho AY Aymara HR Croatian MT Maltese SU Sundanese AZ Azerbaijani HU Hungarian MY Burmese SV Swed
Country (area) code list AD AE AF AG AI AL AM AN AO AQ AR AS AT AU AW AZ BA BB BD BE BF BG BH BI BJ BM BN BO BR BS BT BV BW BY BZ CA CC CF CG CH CI CK CL CM CN CO CR CU CV CX CY CZ DE DJ DK DM DO DZ EC EE EG EH ER ES Andorra United Arab Emirates Afghanistan Antigua and Barbuda Anguilla Albania Armenia Netherlands Antilles Angola Antarctica Argentina American Samoa Austria Australia Aruba Azerbaijan Bosnia and Herzegovina Barbados Bangladesh Belgium Burkina Faso Bulgaria Bahrain Burundi Benin Bermuda Brunei
Picture Quality Menu You can adjust the brightness, contrast, and other values of the projected image. Using the Picture Quality menu 1 Press during projection. The following menu is displayed. 2 Press repeatedly until the item that you want to change is displayed. The menu item changes as follows whenever is pressed. Brightness → Contrast → Color Saturation → Tint → Sharpness → Keystone → Exit Picture Quality menu 3 Press 4 Press to make your adjustments. .
Picture Quality menu settings Setting Item Setting Contents Brightness Adjusts the image brightness. Contrast Adjusts the difference between light and shadow in the image. Color Saturation Adjusts the color saturation for the image. Tint Only displayed when an NTSC signal is being input. Adjusts the image tint. Sharpness Adjusts the image sharpness. Keystone If the screen is not positioned vertically, the projected image is distorted in the shape of a keystone.
Video Information Menu You can view status information and select “Video Signal,” “High Altitude Mode,” and “Lamp-Hours Reset.” Using the video Information menu 1 Press during projection. The following Information is displayed. 2 Press repeatedly until the item that you want to confirm or change is displayed.
Video Information menu settings Setting Item Setting Contents Information Displays the current status. Lamp Hours: Accumulated usage time of the lamp. 0H is displayed for 0-10 hours. Displayed in units of 1 hour for 10 hours and above. The display changes to yellow text when it is time to change the lamp. Source: Displays whether standard DVD images are being projected, or images from external video equipment are being projected. Video Signal: Displays the format of the video signal being input.
Troubleshooting and Maintenance Solving problems Reading the indicator lights You can check MovieMate’s status using the indicators on the top panel. Check the following table and follow the steps to remedy the problem. If all indicators are switched off, make sure the power cable is connected correctly and the main power switch is turned on.
When Error flashes green / orange alternately : flashing green/orange alternately : lit :flashing : off Internal error Red Turn the main power switch off then on. If the indicator status does not change once has been pressed and the power switched on . . . Red Disconnect the power cable from the electrical outlet and contact Epson as described on page 56. Fan related error/Sensor error Red High temperature error (overheating) The lamp turns off automatically and projection stops.
When the Orange or : lit : flashing : off Standing by MovieMate is ready to be used. Warming up (about 20 seconds) In warm-up mode, pressing or has no effect. Do not turn off the power or unplug the cable during warm-up, as this may reduce the lifespan of the lamp. Orange Green Green Green Green Green Green Green Normal indicators are off Orange Projection in Progress Cooling down (about 9 seconds) The operation of all remote control and MovieMate buttons is suspended during cool-down.
The remote control does not Is the Function/Numerics toggle switch in the [1 2 3] (numerical input) work position? No sound can be heard or the sound is faint. Depending on the disc, certain operations are prohibited. - Are the batteries dead, or have the batteries been inserted correctly? page 8 Has the volume been adjusted to the minimum setting? page 13 Is mute mode active? Press The audio distorts page 19 .
Where to get help Epson provides technical assistance 24 hours a day at http://support.epson.com. Here you can access troubleshooting information, download product documentation, and receive technical advice through e-mail. To use the Epson PrivateLine Support service, call (800) 637-7661 and enter the PIN on the Epson PrivateLine Support card that came with your MovieMate. This is the fastest way of speaking to a live representative, and it’s free.
Maintenance Cleaning Cleaning the air filter You need to clean the air filter when dust builds up or you see the message “The projector is overheating. Make sure nothing is blocking the air vents, and clean or replace the air filter.” Use a small vacuum cleaner designed for computers or other office equipment, as shown. If you don’t have one, gently clean the filter using a very soft brush, such as an artist’s paintbrush.
Specifications and Notices Projection Distance and Screen Size Refer to the following tables and place MovieMate in a position which allows the best possible projection for your screen size or the projected image size you want. Projection Distance (feet) 16:9 Screen Size (inches) Minimum Maximum (Zoom Adjustment Wide) - (Zoom Adjustment Tele) 30 26 x 15 2.4 - 3.7 40 35 x 20 3.2 - 4.9 60 51 x 28 4.9 - 7.4 80 71 x 39 6.6 - 9.9 100 87 x 47 8.2 - 12.4 120 106 x 59 9.9 - 14.
Specifications / Compliant Resolutions Product name Dimensions Panel size Display method Resolution Focus adjustment Zoom adjustment Lens shift Epson MovieMate 25 13.4 in. wide x 7.1 in. high x 12.2 in. deep (excluding feet) 0.55-inch wide Polysilicon TFT active matrix 409,920 pixels (854 (W) x 489 (H) dots) x 3 Manual Manual (approx. 1:1.5) Manual (vertical maximum approximately 50%, horizontal maximum approximately 25%) Lamp (light source) UHE lamp, 135 W, Model No. ELPLP33 100-240 VAC 50/60 Hz 2.6 - 1.
Composite Video/S-Video Signal Resolution TV (NTSC) TV (PAL, SECAM) Aspect Mode Normal Wide 640 × 480 640 × 480 (4:3) 854 × 480 (16:9) 768 × 576 640 × 480 (4:3) 854 × 480 (16:9) Safety Safety EMC USA USA UL60950 Third Edition UL60065 Seventh Edition Canada CSA C22.2 No.60950 CSA C22.2 No.
Safety Instructions Important information This symbol is intended to alert the user to the presence of important operating Read the following important information about your and maintenance (servicing) instructions MovieMate. in the literature accompanying the unit. Important safety information Important safety instructions Warning: Follow these safety instructions when setting up and To reduce the risk of fire or electric shock, do not expose this apparatus to rain or moisture.
exposed to rain or moisture, does not operate nor- The power cable supplied with the projector is mally, or has been dropped. intended to comply with power supply requirements • Do not expose this unit to water or place objects containing liquids on this unit. • Do not place the source of a naked flame, such as a lit candle, on this unit. • Connect this unit to an earthed electrical outlet. • Ensure there is at least 8 inches between the exhaust vent and any walls, etc.
Particular care should be taken when the projector is eyes or mouth, or if any other ill effects are mounted on the ceiling, as small pieces of glass may noticed, immediately seek medical advice. fall down when the lamp cover is removed. Be very careful not to allow such pieces of glass to get into the eyes or mouth. • Consult your local, state, or federal regulations regarding proper disposal of the lamp and do not place in the trash.
Use and Storage Take note of the following advice in order to prevent malfunction and damage. Notes on handling and storage Lamp • Use and store this unit within the operating tem- This product includes a lamp component that contains perature range and storage temperature range mercury. Please consult your state and local regulations as specified in this manual. regarding disposal or recycling. Do not put in the trash. • Do not install the unit in a place prone to vibration or shock.
When moving this unit Copyright • Make sure the lens cover is securely in place. • This unit is equipped with Macrovision copy pro- • Remove any discs and close the disc tray. tection.The intellectual property rights to the • Hold the projector as shown in the following patent of this copy protection technology are illustration. owned by the Macrovision Company of America, Be careful not to damage the mesh covering the and others. When employing this technology, a speakers.
About Discs • Depending on how a DVD-R, DVD-RW, CD-R, Readable disc types or CD-RW has been recorded, or if a disc is The following discs can be played. DVD video dirty, smeared, scratched, or warped, some Audio CD discs may not be readable, or playback may take some time. • Only the audio of the following discs can be reproduced. Video CD/SVCD (Super Video CD) •MIX-MODE CD •CD-G •CD-EXTRA •CD TEXT PBC (Playback control) equipped Video CD (version 2.0 compliant).
DECLARATION of CONFORMITY According to 47CFR, Part 2 and 15 Class B Personal Computers and Peripherals; and/or CPU Boards and Power Supplies used with Class B Personal Computers We: EPSON AMERICA, INC. Located at: 3840 Kilroy Airport Way MS: 3-13 Long Beach, CA 90806 Tel: 562-290-5254 Declare under sole responsibility that the product identified herein, complies with 47CFR Part 2 and 15 of the FCC rules as a Class B digital device.
Glossary JPEG A file format used for saving image files. Most photographs taken with digital cameras are saved in the JPEG format. MP3 The abbreviated form of “MPEG1 Audio Layer-3,” a standard for audio compression. It enables the size of the data to be greatly reduced, while maintaining a high sound quality. NTSC The abbreviated form of the “National Television Standards Committee”, and given to one of the analog color television wave transmission systems.
Epson America, Inc. Limited Warranty Basic Two-Year Warranty and 90-Day Lamp Warranty What Is Covered: Epson America, Inc. (“Epson”) What This Warranty Does Not Cover: This warranty warrants to the original end user customer that the covers only normal use of the product in the United Epson product enclosed with this limited warranty States and Canada. 24-hour-per-day use of this product statement, if purchased and used in the United States or causes unusual strain and is not considered normal use.
FROM THE USE OR INABILITY TO USE THE EPSON PRODUCT, WHETHER RESULTING FROM BREACH OF WARRANTY OR ANY OTHER LEGAL THEORY. IF THE REMEDY ABOVE FAILS, EPSON’S ENTIRE LIABILITYSHALL BE LIMITED TO A REFUND OF THE PRICE PAID FOR THE EPSON PRODUCT COVERED BY THIS LIMITED WARRANTY. In Canada, warranties include both warranties and conditions.
Index A F A.
Menu bar, 33 MovieMate advanced operations, 18 to 42 basic operations, 10 to 17 cleaning, 57 distance from screen, 11 handling and storage, 66 maintenance, 57 to 59 moving, 67 specifications, 60 to 62 troubleshooting, 52 to 55 turning off, 14 turning on, 11 MP3 files, 21 to 23 Muting, 17 O On-screen Guide, 45 On-screen language, 44 Open/close button, 5 Optical audio-out port, 5 Other settings menu, 45 Overheating, 53 P Parental Lock, 45 Parts, 5 Pausing, 15 PBC (playback control), 20 Picture Quality menu,
Epson MovieMate 25