Epson® SureColor® F6070 Setup Guide
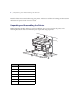
| Unpacking and Assembling the Printer Read all of these instructions before using your printer. Also be sure to follow all warnings and instructions marked on the printer and in the User’s Guide. Unpacking and Assembling the Printer Before beginning assembly, make sure you have sufficient space to set up and use the printer. The following illustration shows the minimum space required for using the printer: Callout Distance 1 150 mm (5.9 in.) 2 1278 mm (50.3 in.) 3 1413 mm (55.6 in.
Unpacking and Assembling the Printer | 3 When choosing a place for the printer, leave adequate room for easy access and ventilation. Avoid locations subject to direct sunlight, excessive heat, humidity, or dust. Be sure the printer is placed on a flat, stable location that can support 198 lb (90 kg). Caution: Six people are required to unpack and install the printer. You need a large floor space to assemble the printer and stand, so be sure to prepare a large, clear area before unpacking them.
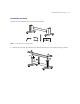
| Unpacking and Assembling the Printer Stand Horizontal strut Legs Hex wrench The items below can be found in the “Ink Supply System Cover 2” box.
Assembling the Stand | 5 Assembling the Stand Unpack the stand and make sure you have all of these items: . Note: You will also need a hex screwdriver. 1. Remove the tape from the horizontal strut. Slide the horizontal strut into both of the legs as shown.
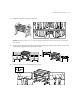
| Assembling the Stand 2. Use the long end of the hex wrench to tighten the pre-placed screws on each side of the horizontal strut. 3. Remove the four screws as shown.
Assembling the Stand | 7 4. Remove the plastic piece as shown. 5. Fasten the mounting piece to the bracket using two B screws. 6. Slide the mounting piece into the groove, as shown.
| Installing the Printer 7. Insert the plastic piece and tighten the screws. Installing the Printer You need six people to install the printer; four people to carry it and two people to position it on the stand. 1. Lock the casters.
Installing the Printer | 9 2. Using four people, lift the printer as shown. Caution: When lifting the printer, only hold the highlighted areas, otherwise the printer may not operate or print normally. 3. Lift the printer onto the stand. Line up the marks on the bottom of the printer with the arrows on the top of the stand legs before setting the printer down. 4. Attach the printer to the stand using three A screws.
| Setting the Language 5. Contact a service engineer to attach the Epson Genuine Ink Supply System, Ink Supply System Cover 2, and to adjust the printer. Caution: Do not turn the printer on until the service engineer’s work is complete. 6. Plug the power cord into the printer. 7. Plug the power cord into a properly grounded electrical outlet. Caution: Use only the type of power source indicated on the printer’s label. Setting the Language 1. Turn on the printer, if necessary. 2.
Loading Roll Paper | 11 Loading Roll Paper 1. Confirm that the adapter holder lock lever is raised. 2. Place the roll paper on top of the printer. 3. If necessary, adjust the Roll paper adapters to fit the core size of the roll paper.
| Loading Roll Paper 4. Raise the adapter lock lever to release the lock on each of the two roll paper adapters. 5. Press the adapters in until they are fully inserted in the roll, with no gaps. 6. Lower the adapter lock levers to lock the adapters in place.
Loading Roll Paper | 13 7. Slide the roll paper all the way to the right. Following the adapter guide, slide the roll slowly back. 8. Press the ( button on the control panel. Confirm that Roll Paper is selected and then press the OK button.
| Loading Roll Paper 9. Insert the roll paper in the paper slot and pull it through. Make sure that the paper is free of slack and that the end is not folded. 10. Lower the roll lock lever. 11. Following the instructions on the control panel, press the OK button. The paper will be fed into the printer. 12. After loading the media, you will be prompted to choose the Paper Type and Roll Paper Remaining options. Choose the options as required, following the instructions on the control panel.
Installing the Software | 15 Installing the Software You can use USB and/or Ethernet network connections. For USB connection, make sure your system has the appropriate port and that you have a standard, shielded cable, 10 feet (3 m) or less. Note: Do not connect the printer until a software installation screen prompts you to. To connect to a network hub, or directly to your computer’s network interface, you need a standard RJ-45 CAT-6 network cable. USB Installation 1.
| Network Installation 3. Follow the on-screen instructions to complete the installation. Network Installation 1. Make sure your printer is powered on. 2. Insert an Ethernet cable to the Ethernet port on your printer and on your networking device. 3. Insert the CD into your computer. 4.
Network Installation | 17 EPSON and SureColor are registered trademarks, and EPSON Exceed Your Vision is a registered logomark of Seiko Epson Corporation. General Notice: Other product names used herein are for identification purposes only and may be trademarks of their respective owners. Epson disclaims any and all rights in those marks. This information is subject to change without notice. © 2013 Epson America Inc.