
Product Information Guide


EPSON FX-880/FX-1180
11/98 EPSON FX-880/FX-1180
- 11
Adjusting the Top-of-Form Position
If your printing begins too high or low on the page, you can
use the micro adjust feature to adjust the top-of-form position
as described below.
Caution:
Never use the knob to adjust the top-of-form position;
this may damage the printer or cause it to lose the top-
of-form position.
Note:
❏ Your top-of-form position setting remains in effect until you
change it, even if you turn off the printer.
❏ The top margin setting made in some application software
overrides the top-of-form position setting you make with the
micro adjust feature. If necessary, adjust the top-of-form position
using your software.
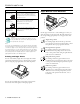
1. Make sure the printer is turned on and paper is loaded.
2. If you are using a push tractor, press the
Load/Eject button
to advance the paper to the current top-of-form position. If
necessary, lift up the printer cover so you can see the paper
position.
3. Hold down the
Pause button for about three seconds. The
Pause light starts flashing and the printer enters the micro
adjust mode.
4. Press the
Load/Eject
U and LF/FF
D buttons to move the
top-of-form position up or down on the page.
Note:
❏ The printer has a minimum and a maximum top-of-form
position. If you try to adjust it beyond these limits, the printer
beeps and stops moving the paper.
❏ When the paper reaches the default top-of-form position, the
printer also beeps and stops moving the paper briefly. You
can use the default setting as a reference point when
adjusting the top-of-form position.
5. Press the Pause button to exit micro adjust mode.
Advancing the Paper to the Tear-off Edge
If you use the front or rear push tractor, you can use the tear-
off feature to advance your continuous paper to the printer’s
tear-off edge when you finish printing. You can then easily
tear off the printed document.
As described below, you can use the tear-off feature in two
ways: manually by pressing the printer’s
Tear Off/Bin button,
or automatically by turning on the auto tear-off mode. The
Tear Off/Bin light flashes when the paper is in the tear-off
position.
Caution:
Never use the tear-off feature to feed continuous
paper with labels backward; they may come off the
backing sheet and jam the printer.
Never reverse feed continuous paper loaded on the
pull tractor using the Tear Off/Bin button; the paper
may come off the pull tractor and jam the printer.
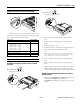
Using the Tear Off/Bin Button
After the printer finishes printing your document, press the
Tear Off/Bin button to advance the paper to the tear-off edge.
Note:
If the Tear Off/Bin light is flashing, the paper is in the tear-off position.
If you press the Tear Off/Bin button, the printer feeds your paper to
the next top-of-form position.
Advancing Paper to the Tear-off Position
Automatically
To automatically advance your printed documents to the tear-
off position, you need to turn on the auto tear-off mode and
select the appropriate page length for continuous paper in the
default-setting mode. For instructions, see “Using the
Default-Setting Mode” on page 13.
When auto tear-off is on, the printer automatically advances
the paper to the tear-off position whenever it receives a full
page of data or a form feed command followed by no more
data.
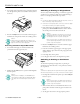
Adjusting the Tear-off Position
If your paper’s perforation is not aligned with the tear-off
edge, you can use the micro adjust feature to move the
perforation to the tear-off position. Follow the steps below.
Caution:
Never use the knob to adjust the tear-off position; this
may damage the printer or cause it to lose the tear-off
position.