
Product Information Guide
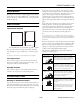


EPSON FX-880/FX-1180
12 -
EPSON FX-880/FX-1180
11/98
Note:
Your tear-off position setting remains in effect until you change it,
even if you turn off the printer.
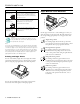
1. Make sure the Tear Off/Bin light is flashing (the paper is at
the current tear-off position). You may need to press the
Tear Off/Bin button.
2. Hold down the
Pause button for about three seconds. The
Pause light begins flashing and the printer enters the micro
adjust mode.
3. Press the
Load/Eject
U and LF/FF
D buttons to feed the
paper backward or forward until the paper perforation is
aligned with the tear-off edge of the printer cover.
Note:
The printer has a minimum and a maximum tear-off position. If
you try to adjust the tear-off position beyond these limits, the
printer beeps and stops moving the paper.
4. Press the Pause button to turn off micro adjust mode.
Then tear off the printed pages.
When you resume printing, the printer automatically feeds the
paper back to the top-of-form position and begins printing.
Replacing the Ribbon Cartridge
Warning:
You need to move the print head by hand to install or
replace the ribbon cartridge. If you just used the
printer, the print head may be hot; let it cool before
you replace the ribbon cartridge.
Caution:
Make sure the printer is off and unplugged from the
electrical outlet. Moving the print head while the
printer is on may damage the printer.
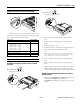
1. Remove the printer cover.
2. Press up the tabs on the paper tension unit, then lift the
front of the unit and pull it up and out of the printer.
3. Make sure that the print head is not hot; then slide the print
head to the middle of the printer by hand.
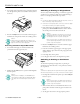
4. Grasp the used ribbon cartridge by its handle and pull it up
and out of the printer.
5. Turn the ribbon-tightening knob of the new ribbon
cartridge in the direction of the arrow to remove any slack
in the ribbon.
tear-off edge
paper tension unit
ribbon cartridge handle
print head