
Product Information Guide


EPSON FX-880/FX-1180
11/98 EPSON FX-880/FX-1180
- 13
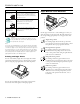
6. Hold the ribbon cartridge by its handle and push it firmly
down into position; then press down both ends of the
cartridge to fit the plastic hooks into the slots.
7. Use a pointed object, such as a ball point pen, to guide the
ribbon between the print head and ribbon guide while you
turn the ribbon-tightening knob to help feed the ribbon
into place.
8. Slide the print head from side to side to make sure it moves
smoothly.
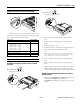
9. Install the paper tension unit by placing it on the printer’s
mounting pegs and lowering it into place. Press down both
ends of the unit until it clicks into place.
10. Replace the printer cover.
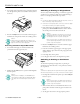
Clearing Paper Jams
1. Press the Operate button to turn off the printer.
2. Remove the printer cover.
3. If continuous paper is jammed in the printer, tear off the
fresh supply at the perforation nearest the paper entry slot.
4. Turn the knob on the left side of the printer away from you
to eject the paper in the printer.
Caution:
Always turn off the printer before you use the knob;
otherwise the printer may be damaged or the top-of-
form or tear-off position may be lost.
5. Remove any remaining pieces of paper. If the paper is stuck
where the printer ejects it, gently pull the paper out of the
printer.
6. Replace the printer cover and press the
Operate button to
turn on the printer. Make sure the
Paper Out light is not
flashing and the
Pause light is off.
Using the Default-Setting Mode
The default settings control many printer functions. While
you can often set these functions through your software or
printer driver, you may sometimes need to change a default
setting from the printer’s control panel using the default-
setting mode.
The following tables summarize the default-setting mode
settings and options. The factory settings are bold.