
User`s guide


Place your original(s) on the document table. See one of these sections for instructions.
Documents or photos: Placing Documents or Photos
Film or slides: Placing Film or Slides
Start Epson Scan. See Starting Epson Scan for instructions.
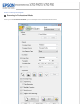
Select Professional Mode in the Mode list. See Changing the Scan Mode for instructions.
Click the arrow to open the Document Type list and select Reflective (for scanning documents or photos) or
Film (for scanning film or slides).
If you selected Reflective (for scanning documents or photos) as the Document Type setting, click the arrow in
the Auto Exposure Type list and select Photo or Document.
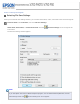
If you selected Film (for scanning film or slides) as the Document Type, click the arrow in the Film Type list and
select Positive Film, Color Negative Film, or B&W Negative Film.
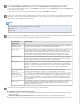
Click the arrow to open the Image Type list and select the detailed image type you are scanning.
Image Type setting Type of image you are scanning
48-bit Color Color photos that you may want to modify in a 48-bit image-editing program
24-bit Color Color photos
Color Smoothing Color graphics, such as a chart or graph
16-bit Grayscale Black-and-white photos with many shades of gray
8-bit Grayscale Black-and-white photos with just a few shades of gray
Black & White Documents with black text and/or line art
Note:
If you select 8-bit Grayscale or Black & White, you can also select an Image Option setting, as
described below.
Image Option Setting Description
None No Image Option setting is applied.
Dropout: Red Drops out red from the scan.
Dropout: Green Drops out green from the scan.
Dropout: Blue Drops out blue from the scan.
Color Enhance: Red Enhances red in the scan.
Color Enhance: Green Enhances green in the scan.
Color Enhance: Blue Enhances blue in the scan.