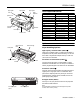
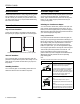
EPSON LQ-2080 edge guides paper guide cover User Replaceable Parts paper guide paper separator User Replaceable Part printer cover front paper guide (closed) paper release lever control panel bottom cover knob Parts Price List Name Part Number Bottom cover Bottom cover Connector cover Upper connector cover 1039404 1037223 Connector cover screws (2) C.B.
EPSON LQ-2080 Optional Interface Cards You can install an optional interface card to supplement your printer’s built-in parallel interface and provide added network compatibility. The EPSON interface cards in the table below are compatible with your printer. (Not all interfaces are available in all countries.
EPSON LQ-2080 Built-in fonts Bitmap fonts EPSON Draft 10, 12, 15 cpi EPSON Roman 10, 12, 15 cpi, proportional EPSON Sans Serif 10, 12, 15 cpi, proportional EPSON Courier 10, 12, 15 cpi EPSON Prestige 10, 12 cpi EPSON Script 10 cpi EPSON OCR-B 10 cpi EPSON Orator 10 cpi EPSON Orator-S 10 cpi EPSON Script C proportional Electrical Input voltage range Reliability Total print volume 19 million lines (except print head) MTBF 10,000 POH (25% duty) 1.
EPSON LQ-2080 Thickness Weight Continuous paper (standard and multipart): front, rear, and bottom entry 0.0025 to 0.0055 inch (0.065 to 0.14 mm) 2 14 to 24 lb (52 to 90 g/m ) Single-sheet multipart forms: front, top, and cut-sheet feeder entry Width Length Front and top 3.9 to 16.5 inches (100 to 420 mm) High-capacity cut-sheet feeder 3.9 to 11.7 inches (100 to 297 mm) Front 5.8 to 16.5 inches (148 to 420 mm) Top 3.9 to 16.5 inches (100 to 420 mm) High-capacity cut-sheet feeder 3.9 to 11.
EPSON LQ-2080 Paper Alignment Printable Area Front entry Single sheets, envelopes, and postcards Printing starts at the arrow mark. The unprintable area is to the left of the arrow mark. A B A printable area B printable area B A A A The minimum top and bottom margins are 0.17 inch (4.2 mm). B The minimum left and right margins are 0.12 inch (3 mm). The maximum width is 16.0 inches (406 mm). The maximum printable width is 13.6 inches (345 mm). For paper wider than 13.
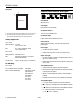
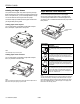
EPSON LQ-2080 Roll paper Control Panel Buttons and Lights A B B Font button printable area Selects the font. Font lights Indicate which font is selected. A Condensed button A The minimum top and bottom margins are 0.17 inch (4.2 mm). Turns on the condensed mode. B The minimum left and right margins are 0.12 inch (3 mm). The maximum printable width is 8.0 inches (203 mm). Condensed light Lights up when the condensed mode is on.
EPSON LQ-2080 LF/FF button ❏ ❏ State of panel lights Feeds paper line by line. n Paper Out n Pause Ejects a single sheet or advances continuous paper to the next top-of-form position when held down. Beep pattern ••• Loads a single sheet of paper. ❏ Ejects a single sheet of paper if a sheet is loaded. ❏ Loads continuous paper from the standby position. ❏ Feeds continuous paper backward to the standby position. ••• ••• Paper is jammed in the printer. Clear the paper jam.
EPSON LQ-2080 Status Monitor Available Paper Paths The EPSON Status Monitor 2 utility comes with your printer but is available only for use with Microsoft ® Windows® 95 and 98. It allows you to monitor your printer’s status, alerts you when printer errors occur, and provides troubleshooting instructions when needed. Your printer provides a variety of paper paths for printing on continuous and single-sheet paper.
EPSON LQ-2080 Using a pull tractor (optional) Using the push and pull tractors in combination If you often print on thick or heavy continuous paper, such as multipart forms or continuous paper with labels, use a tractor in the pull position. The pull tractor provides the best paper jam prevention, and allows you to load continuous paper from the front, rear, or bottom of the printer. However, you cannot use the tear-off feature with the pull tractor.
EPSON LQ-2080 Printing on Single Sheets Paper Release Lever Positions Your printer has two paper entry slots for printing on single sheets: top and front. When continuous paper is loaded on the front or rear push tractor, you can load single sheets in the top or front slot without removing the continuous paper. You can load paper in the printer from various paper sources, such as the front push tractor or the paper guide. You set the paper release lever to indicate the paper source you want to use.
EPSON LQ-2080 Paper Thickness Lever Positions Paper Handling Setting the paper thickness lever allows the printer to accommodate various thicknesses of paper. The paper thickness lever is located under the printer cover. You can select one of nine positions identified by the scale next to the lever. Loading Multipart Forms You can use carbonless multipart forms of up to five parts (four copies plus the original).
EPSON LQ-2080 Using the Front Push Tractor (optional) You load labels the same way you load ordinary continuous paper, except you must set the paper thickness lever to 2 before printing. To use the front push tractor, you need to purchase the optional tractor unit (C80032*), and install it in the front push position. For more information on when to use the front push tractor, see “Available Paper Paths” on page 8.
EPSON LQ-2080 Loading paper onto the front push tractor 4. Slide the left sprocket to the left margin of your paper using the arrow mark inside the printer. (Printing starts at the arrow mark.) Then pull the lever forward to lock it in place. To load paper onto the front push tractor, follow these steps: 1. Open the front paper guide by pulling the tab at the center of the guide. Then remove the guide by grasping both sides and pulling it straight out of the printer.
EPSON LQ-2080 Removing the printed document from the front push tractor 8. Attach the front paper guide by sliding it along the mounting slots as shown below, and close the front paper guide. To remove the printed document, follow these steps: 1. Make sure the Tear/Off Bin lights are flashing. (This indicates that your paper is at the current tear-off position.) You may need to press the Tear Off/Bin button to advance the paper to the tear-off position. 2.
EPSON LQ-2080 Removing the front push tractor Using the Rear Push Tractor To remove the tractor from the front push position, follow these steps: To use the rear push tractor, load continuous paper in the rear slot. For information on when to use the rear push tractor, see “Available Paper Paths” on page 8. 1. Remove any paper from the tractor as described in the previous section. Loading paper onto the rear push tractor 2. Turn off the printer.
EPSON LQ-2080 8. Slide the right sprocket to remove any slack in the paper; then lock it in place by pushing the sprocket lock back. 4. Release the left and right sprockets by pulling the sprocket lock levers forward. c 9. Attach the paper guide and slide the edge guides ( ) to the middle of the paper guides. Then close the paper guide cover ( ). d front of the printer 5. Slide the left sprocket to the left margin of the paper using the scale on the printer. (Printing starts at the arrow mark.
EPSON LQ-2080 Removing the printed document from the rear push tractor Using the Tractor in the Pull Position Using the tractor in the pull position is ideal for printing on thick and heavy continuous paper, such as multipart forms or continuous paper with labels. However, you cannot use the tear-off feature with the pull tractor. To remove the printed document, follow these steps: 1. Make sure the Tear Off/Bin lights are flashing. (This indicates your paper is at the current tear-off position.
EPSON LQ-2080 4. Release the left and right sprockets by pulling the sprocket lock levers forward. 3. Lower the tractor into the printer mounting slots and press down both ends of the tractor to make sure that it is firmly seated. 5. Slide the left sprocket to the left margin of the paper using the scale on the paper guide. (Printing starts at the arrow mark.) Then push the lever back to lock it in place. You are now ready to load continuous paper onto the pull tractor as described in the next section.
EPSON LQ-2080 12. Turn on the printer. Remove any slack in the paper and adjust the top-of-form position by pressing the LF/FF button or using the micro adjust feature. (To use the micro adjust feature, see “Adjusting the Top-of-Form Position” on page 22.) The printer will start printing at the current position without advancing the paper. 8. Insert the paper into the front, bottom, or rear paper slot as described below until it emerges between the platen and the ribbon guide.
EPSON LQ-2080 Removing paper from the pull tractor 4. Turn on the printer. Press the Load/Eject button to advance the paper to the top-of-form position. Then press the LF/FF button until the perforation between the first and second page is even with the top of the printer ribbon. 1. After you finish printing, tear off the of paper at the perforation nearest the paper entry slot.
EPSON LQ-2080 Removing the pull tractor Switching Between Printing on Continuous Paper and Printing on Single Sheets To remove the tractor from the pull position, follow these steps: With the push tractor installed, you can easily switch back and forth between printing on continuous paper and printing on single sheets without having to remove or reload paper. 1. Remove any paper loaded on the pull tractor. 2. Turn off the printer.
EPSON LQ-2080 To adjust the top-of-form position for continuous paper loaded on the pull tractor, see the following example: Adjusting the Top-of-Form Position The top-of-form position is where the printer will start printing on the page. If your printing appears too high or low, follow the steps below to use the micro adjust feature to adjust the top-of-form position. First mark a point 0.26 inch (6.
EPSON LQ-2080 Using the Tear Off/Bin button 4. Press the LF/FF D button to feed the paper backward, or press the Load/Eject U button to feed the paper forward until the paper perforation is aligned with the tear-off edge. After the printer finishes printing your document, check that the Tear Off/Bin lights are not flashing. Then press the Tear Off/Bin button. The Tear Off/Bin lights start flashing and the printer advances the paper to the tear-off edge.
EPSON LQ-2080 5. After you remove the new ribbon cartridge from the package, remove the separator from the middle of the ribbon cartridge and discard the separator. Then turn the ribbon-tightening knob in the direction of the arrow to remove any slack in the ribbon. Installing the Ribbon Cartridge Warning: If you just used the printer, the print head may be hot; let it cool before you replace the ribbon cartridge. separator Caution: Make sure the printer is off and unplugged from the electrical outlet.
EPSON LQ-2080 9. To remove any slack in the ribbon, turn the ribbontightening knob in the direction of the arrow shown in step 8. Then slide the print head from side to side to make sure it moves smoothly. Your Printer’s Default Settings The printer’s default settings control many printer functions. While you can often set these functions through your software or printer driver, you may sometimes need to change a default setting from the printer’s control panel using the defaultsetting mode.
EPSON LQ-2080 Changing Default Settings Aligning Vertical Lines in Your Printout Follow the steps below to enter the default-setting mode and change the printer’s default settings. If you notice that the vertical lines in your printout are not properly aligned, you can use the printer’s bidirectional adjustment mode to correct this problem.
EPSON LQ-2080 Printing a Self Test Printing a Hex Dump Running the printer’s self test helps you determine whether the printer or the computer is the cause of a printing problem. You can print the self test using either single sheets or continuous paper. If you are an experienced user or a programmer, you can print a hexadecimal dump to isolate communication problems between the printer and your software program.
EPSON LQ-2080 Cleaning the Printer Transporting the Printer To keep your printer operating at its best, you should clean it thoroughly several times a year. Follow these steps: If you need to transport your printer some distance, carefully repack it using the original box and packing materials, as described below. 1. Make sure the printer is turned off. Then remove any paper loaded in the printer. Warning: You will need to move the print head by hand to remove the ribbon cartridge.