User’s Guide English Read this document carefully to use this product safely and correctly. If your product is faulty, please read the included warranty card and consult the store you purchased it from. If you require further assistance contact your local EPSON customer support centre. Please also find below the URL for the support centre: http://www.epson.co.
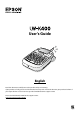
LW-K400 User’s Guide Part Names and Functions JJ Display 23 You can check settings on the display. Indicators show whether or not settings are enabled. 1 21 2 3 4 5 6 20 19 18 17 16 15 2 3 4 5 1 22 11 7 14 8 13 9 10 12 11 1. Power, + : To "Print density" menu. 2. Font 3. Font size 4. Frame 5. Style 6. Setting 7. Character keys 8. Shift 9. Caps Lock + : Capitalises the entered characters. 10. Accent 11. Space 12. Shift 13. Select/Enter 14. Punctuation: A choice of marks.
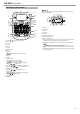
LW-K400 User’s Guide Before use 1. Preparing the power supply This product operates on batteries or with the dedicated AC adapter. Using on batteries c 2. Installing a tape cartridge 1. Remove the slack of the ink ribbon. Prepare six AA alkaline batteries. 1. Remove the cover on the rear. 2. Remove the cover on the rear. 2. Insert the batteries. 3. Set the tape cartridge. Press it firmly until it snaps into place.
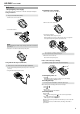
LW-K400 User’s Guide Editing characters 6. Printing labels 1. Press . The length of the label to print and the number of prints appear, and printing starts. 2. When the tape stops, press the "Cut Button" to cut the tape. c Do not press the "Cut Button" before printing is complete. Printing multiple copies (end cut) 1. Press . 2. Highlight "Copies" using the cursor keys, then press . 3. Enter the number of copies using the cursor keys or numeric keys. 4. Press to start printing. 5.
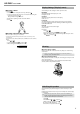
LW-K400 User’s Guide Useful functions JJ Creating labels with serial numbers (Sequence This section explains various functions that will help you create labels. number) JJ Changing the font size 1. Press + . 2. Enter a number/alphabet for the first label, and press . The number/alphabet increases by one whenever printing is done. JJ Creating pieces of text You can create multiple pieces of text continuously. Up to 50 pieces can be created at a time.
LW-K400 User’s Guide Creating a label with a special form JJ Adding a frame c 1. Press . 2. Select an item with , and press . Entering the frame No. to select does the same. To create labels with a special form, a message confirming that the text will be deleted may appear when is pressed. Press to delete the current text and to show the special form. MEMO To exit the following special form mode, press "Exit" and press .
LW-K400 User’s Guide Display Settings ("Display" menu) JJ Creating a ribbon 1. Press . 2. Select "8.Ribbon" using the cursor keys, then press . 3. Select a value using the cursor keys or enter the value using the numeric keys, then press . Range of ribbon length: 20-40 cm 4. Enter text for printing on both ends of the ribbon. 5. Press . The following are the settings to make operation easier. Backlight Turns the backlight of the display on or off.
LW-K400 User’s Guide Troubleshooting JJ Messages JJ Problems Insert Tape No tape cartridge is installed. Turn the power off and install a tape cartridge correctly. Check tape! A tape cartridge which cannot be used in this product has been set. Check the tape cartridge. Check tape cartridge A tape cartridge which cannot be used in this product has been set. Check the tape cartridge.
LW-K400 User’s Guide Specifications JJ Body Dimensions Approx. 110 (W) x 170 (D) x 56 (H) (mm) Weight Approx. 400g (excluding batteries, tape cartridge) JJ Usage conditions Operating temperature Storage temperature 10 to 35 degrees C -10 to 55 degrees C JJ Power supply AC adapter Type APT0615Z2-1 Manufacturer Seiko Epson Corp. Input AC100-240V, 0.3A, 50-60Hz (dedicated adapter, power cable only) Output DC6.5V, 1.