
Operation Manual


2
LW-K400 User’s Guide
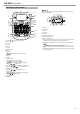
Part Names and Functions
1
2
3
4
5
6
7
8
9
11
12
13
14
15
16
17
18
19
20
21
22
23
10
1. Power, + : To "Print density" menu.
2. Font
3. Font size
4. Frame
5. Style
6. Setting
7. Character keys
8. Shift
9. Caps Lock
+ : Capitalises the entered characters.
10. Accent
11. Space
12. Shift
13. Select/Enter
14. Punctuation: A choice of marks.
+ : The other choice of marks.
sAdding a punctuation mark to the label
15. Delete,
+ : Deletes text.
16. Symbol,
+ : To "Sequence number" menu.
17. Special label,
+ : To "Bar code" menu.
18. Print copies
19. Preview,
+ : The "Display" menu.
20. Cursor keys
+ , + : To the previous or next text.
21. Print,
+ : Feeds the tape.
22. Cut Button
23. Display
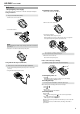
J Display
You can check settings on the display. Indicators show whether or not
settings are enabled.
1
2
3
4
5
67
8
9
10
11
1. Font size
2. Font width
3. Frame
4. Font style
5. Vertical
6. Battery level (as a guide)
7. Accent mark options
8. Upper case/lower case
9. Cursor: Indicates the position where the operation is performed. This
is the place where you enter text or delete symbols, etc.
10. Head mark: Indicates what line it is in. Appears when multiple lines
exist.
MEMO
: If this appears, you cannot print anything.
11. Text number mark: Indicates the number of the current text counted
from the beginning.