
Unit installation

With this numbering system any combination of the seven pins
adds up to a number between 128 and 255, and no numbers are dupli-
cated.
Now that you know the principles of dot graphics, here are two
simple exercises and a more complex example that shows you how to
design your own graphics.
One-Line Graphics Program
Your first graphics exercise is a program that prints a single pattern
of dots 40 times. Type it in first, and then read the explanation that
follows.
NEW
10 OPEN4,4
20 PRINT#4,CHR$(8);
30
FOR X=1 TO
40
40
PRINT#4,CHR$(213);
50 NEXT X:PRINT#4
60 CLOSE4
Line 10 opens a file, as usual. Then line
20
sends the graphics com-
mand to the printer. Notice that this line ends in a semicolon. The
semicolon keeps the graphics command on the same print line as the
pin numbers that you will send in line 40. The graphics command
stays on for only one print line. Therefore, you must be careful not to
put it on a separate print line from the pin numbers, and you must
send it several times if you are printing several lines of graphics.
Lines 30 and 50 set up a loop so that the pin number is sent 40 times.
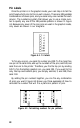
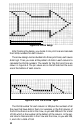
Line 40 contains the pin number (213) that is sent to the printer 40
times. In Figure
4-2
you can see the pattern that this number produces.
Again be sure that you have typed in the semicolon in this line so that
all
40
repetitions of the pin number will be on the same print line. Line
60
closes the file, as usual.
Now that you know how the program works, run it to see the result
below. Although it does not look as interesting as the examples at the
beginning of this chapter, the program does allow you to see exactly
how the graphics mode works.
29