MovieMate25UG.
MovieMate25UG.book Page 2 Wednesday, January 25, 2006 11:37 AM Copyright Notice All rights reserved. No part of this publication may be reproduced, stored in a retrieval system, or transmitted in any form or by any means, electronic, mechanical, photocopying, recording, or otherwise, without the prior written permission of Seiko Epson Corporation. The information contained herein is designed only for use with this Epson product.
MovieMate25UG.
MovieMate25UG.
MovieMate25UG.
MovieMate25UG.
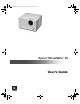
MovieMate25UG.book Page 7 Wednesday, January 25, 2006 11:37 AM Welcome! Your Epson® MovieMate™ 25 is a portable, lightweight home cinema system that delivers high-quality, big-screen entertainment anywhere you want. In less than two minutes, you can set up MovieMate and watch a DVD, play a video game, or view your favorite photos. MovieMate offers these outstanding features: ■ Flexibility to set up in any room (or even outdoors), from 2.
MovieMate25UG.
MovieMate25UG.
MovieMate25UG.book Page 10 Wednesday, January 25, 2006 11:37 AM Optional Accessories Epson provides the following optional accessories for the projector: Product Part number Replacement lamp (ELPLP33) V13H010L33 Replacement air filter (ELPAF09) V13H134A09 You can purchase these accessories from an authorized Epson reseller. To find the nearest reseller, call 800-GO-EPSON (800-463-7766). In the U.S., you can also purchase online at www.epsonstore.com. In Canada, you can also purchase at www.epson.
MovieMate25UG.book Page 11 Wednesday, January 25, 2006 11:37 AM Playing Movies Follow the instructions in this section to choose a location, play a movie, and control playback. Choosing a Location You can use your MovieMate just about anywhere—in the living room, bedroom, or even outside. You can use it with the subwoofer and screen, or simply project on a wall and use the built-in audio system without the subwoofer.
MovieMate25UG.book Page 12 Wednesday, January 25, 2006 11:37 AM The further you place MovieMate from the screen, the larger the image will be. If you want an image that fills the screen, place MovieMate about 6 1/2 feet away from it. The following table lists the distances required for various image sizes (measured diagonally). Note that the zoom adjustment also affects image size. Wide screen aspect ratio (16:9) Image size Projection distance 30 in. (26 × 15 in.) 2.4 to 3.7 feet 40 in. (35 × 20 in.
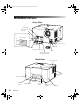
MovieMate25UG.book Page 13 Wednesday, January 25, 2006 11:37 AM Setting Up MovieMate 1. If your MovieMate came with a screen, set it up following the instructions included in the screen box. Make sure you read all the instructions to avoid damaging the screen. 2. Put the batteries in the remote control. 3. Connect the subwoofer as shown below. See the instructions included with the subwoofer for more information.
MovieMate25UG.book Page 14 Wednesday, January 25, 2006 11:37 AM 4. Plug in MovieMate and the subwoofer. Note: For best results, make sure the subwoofer faces toward you and away from the screen. 5. Turn on the power switches on MovieMate and the subwoofer.
MovieMate25UG.book Page 15 Wednesday, January 25, 2006 11:37 AM Starting Your Movie 1. Press the button to open the DVD tray. 2. Insert your DVD and close the tray. If the movie doesn’t start automatically, you may Power button or the Image On/Off button. have to press the 3. Adjust the volume if necessary.
MovieMate25UG.book Page 16 Wednesday, January 25, 2006 11:37 AM Adjusting the Picture Once you see your picture, you may need to make certain adjustments. 1. If the image is too low, too high, or off to the side, use the horizontal and vertical lens shift dials to adjust its position. Note: The lens shift feature cannot move the image both horizontally and vertically by the full amount.
MovieMate25UG.book Page 17 Wednesday, January 25, 2006 11:37 AM Adjusting the Sound To adjust the volume, use the knob on the subwoofer and the volume buttons on MovieMate’s control panel. You can also use the volume buttons on the remote control. If you need to adjust the bass, use the Crossover knob on the back of the subwoofer. Turning Off MovieMate 1. To stop playing a DVD or CD, press control panel. 2. Press Open/Close to open the tray. 3. Remove the disc and press 4.
MovieMate25UG.book Page 18 Wednesday, January 25, 2006 11:37 AM 6. If you’re using the subwoofer, turn it off and disconnect it from MovieMate. 7. Unplug MovieMate and the subwoofer. 8. Before you put MovieMate away, attach the lens cover. Controlling Playback You can use the buttons on the remote control or the MovieMate control panel to pause, fast-forward, or replay sections of your video. You can also select items on a DVD menu by using the remote control.
MovieMate25UG.book Page 19 Wednesday, January 25, 2006 11:37 AM Searching (Fast Forward or Reverse) ■ To move forward or backward through a video, press on the remote control. You can also press or or on the control panel. Each time you press the button, the search (or “shuttle”) speed increases. ■ To return to normal play, press . Playing in Slow Motion You can play a video frame by frame or in slow motion (“jog control.”) 1. Press on the remote control. 2.
MovieMate25UG.book Page 20 Wednesday, January 25, 2006 11:37 AM Using DVD Menus Many DVDs display a top menu at startup and also include submenus that let you select chapters and settings. ■ To display a menu, press ■ To select items on a menu, press if necessary. or . , , , or . Then press You can also use the numeric buttons to select a title or chapter by number. ■ If you want to use the numeric buttons, you need to set the toggle switch on the remote control to the -123 position.
MovieMate25UG.book Page 21 Wednesday, January 25, 2006 11:37 AM Adjusting the Color Mode You can select a color mode to optimize picture quality based on the lighting conditions in the room. 1. Press . The currently selected color mode is displayed on the screen. 2. Press repeatedly until the desired color mode appears. After a few seconds, the color mode name disappears and the picture quality changes. You can select from the following color modes: ■ Dynamic: Use in brightly lit rooms.
MovieMate25UG.
MovieMate25UG.book Page 23 Wednesday, January 25, 2006 11:37 AM Doing More with MovieMate Follow the instructions in this section to play music and photos on MovieMate, use advanced playback controls, adjust various MovieMate features, and connect external audio and video equipment. Playing Music and Displaying Photos You can play audio CDs and CDs with MP3 or WMA files. You can also view JPEG photos on CDs.
MovieMate25UG.book Page 24 Wednesday, January 25, 2006 11:37 AM Playing MP3/WMA Music and JPEG Photo Files You can play MP3 or WMA music files and JPEG photo files on CDs or DVDs. See page 53 for information on the types of discs that are supported. When you insert a disc that contains MP3, WMA, and/or JPEG files, you see a menu like the following: 1. Press 2. Press Press to select the group. to move the pointer to the track (file name) list. to return the pointer to the group name list. 3.
MovieMate25UG.book Page 25 Wednesday, January 25, 2006 11:37 AM Using Advanced Playback Controls MovieMate 25 provides advanced features for looping videos or music tracks and selecting titles, chapters, or tracks. On DVDs that include subtitles, multiple languages, or multiple camera angles, you can use remote control for easy access to these features. Repeating a Chapter, Title, or Track You can select a chapter or title on a DVD to repeat continuously (or loop). You can also loop a track on a music CD.
MovieMate25UG.book Page 26 Wednesday, January 25, 2006 11:37 AM Changing the Play Sequence (Program Play) You can create your own program for playing tracks on a music CD or chapters and titles on a DVD. 1. When the CD or DVD is stopped, press in the display window. until you see PRGM 2. Set the toggle switch on the remote control to the -123 position. 3. Use the numeric buttons to set the program order. 4. Press to begin playing your programmed sequence. 5.
MovieMate25UG.book Page 27 Wednesday, January 25, 2006 11:37 AM Selecting Language, Subtitles, and Camera Angles Some DVDs allow you to display subtitles or select from several languages or camera angles. If these features are available, you can use the buttons on the remote control to select them. 1. Press the appropriate button on the remote control: ■ To change the language of the video, press ■ To display subtitles, press subtitle languages. ■ To change camera angles, press . .
MovieMate25UG.book Page 28 Wednesday, January 25, 2006 11:37 AM 6. Set the toggle switch on the remote control back to the Func.- position. To cancel the on-screen menu, press location you specified. .
MovieMate25UG.book Page 29 Wednesday, January 25, 2006 11:37 AM Customizing MovieMate You can limit children’s access, improve the sound, adjust the picture, and customize other features of MovieMate. Many of these settings are available through the Setup menus, which you can accesss by pressing the Setup button on the remote control (when a DVD is not playing). Setting Parental Controls You can set parental controls to prevent children from viewing inappropriate video material. 1.
MovieMate25UG.book Page 30 Wednesday, January 25, 2006 11:37 AM Locking the Tray You can lock the tray to prevent children from playing with it. ■ To lock the tray, press and hold the button on the MovieMate control panel, then press . LOCKED appears briefly in the display window above the tray. ■ To unlock the tray, press window. and again. UNLOCKED appears briefly in the display Saving Power You can select several settings that turn off the power automatically when MovieMate is not playing a disc.
MovieMate25UG.book Page 31 Wednesday, January 25, 2006 11:37 AM 3. Press to select the language you want, then press code definitions, see page 55. To return to the previous menu level, press to save it. For a list of language . Adjusting the Resume and On-Screen Guide Settings 1. When a DVD is not playing, press the 2. Press 3. Press to highlight button on the remote control. and display the OTHERS Setup menu. to highlight RESUME or On SCREEN GUIDE, then press to display the ON/OFF selection box.
MovieMate25UG.book Page 32 Wednesday, January 25, 2006 11:37 AM The default audio setting plays DVDs at a higher volume than other discs. You can adjust this setting if necessary. ■ To adjust the DVD level, press . Continue pressing the button to select the level you prefer: DVD LEVEL 1, DVD LEVEL 2, or DVD LEVEL 3 (the highest volume and default setting). ■ To adjust the settings in the Audio Setup menu, follow these steps: 1. Press the 2. Press button on the remote control.
MovieMate25UG.book Page 33 Wednesday, January 25, 2006 11:37 AM Adjusting Picture Settings The Picture Setup menu lets you select settings for your video source, screensaver, and MP3/WMA/JPEG files. 1. Press the 2. Press button on the remote control. to highlight 3. Press and display the PICTURE Setup menu. to highlight the setting you want, then press 4. Press to select the option you want, then press the following: to display the options. to save it.
MovieMate25UG.book Page 34 Wednesday, January 25, 2006 11:37 AM You can adjust the following items for various viewing conditions and individual videos: ■ Brightness ■ Contrast ■ Color Saturation ■ Tint (only works on NTSC signals) ■ Sharpness ■ Keystone: Corrects the distorted image shape caused by tilting MovieMate up or down, as shown. 3. Press or to increase or decrease the setting. The settings are saved, even after you turn MovieMate off.
MovieMate25UG.book Page 35 Wednesday, January 25, 2006 11:37 AM Changing the Display Window Brightness The status display window above the tray is normally dimmer when a DVD is playing and brighter when it is paused or stopped. You can change this setting as follows: ■ To change the display window setting, press from the following settings: . Continue pressing the button to select ■ DIMMER OFF: The window remains bright, even when a DVD is playing.
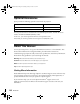
MovieMate25UG.book Page 36 Wednesday, January 25, 2006 11:37 AM Caution: Before connecting, make sure all equipment is turned off. 1. Connect the external equipment as shown, using either the yellow composite video port or the S-Video port. Composite Video Connection White Red Output L Yellow Audio R Video Main power switch S-Video Connection White Output Red L Audio R S-Video Main power switch 2. Connect the power cords and plug in all the equipment. 3. Turn on MovieMate’s main power switch. 4.
MovieMate25UG.book Page 37 Wednesday, January 25, 2006 11:37 AM Note: After you disconnect your external equipment, make sure you close MovieMate’s port compartment cover. Adjusting the Audio from External Devices You can use all of MovieMate’s audio controls, as described on pages 31 and 32. You can also adjust the volume input level by pressing and holding the button for approximately 2 seconds. LEVEL 1 appears on MovieMate’s display window.
MovieMate25UG.
MovieMate25UG.book Page 39 Wednesday, January 25, 2006 11:37 AM Caring for MovieMate MovieMate 25 needs little maintenance. All you need to do on a regular basis is keep the lens clean. You also need to clean the air filter periodically to prevent overheating. Warning: Before you clean any part of MovieMate, turn it off and unplug the power cord. Never open any part of MovieMate, except as described in this User’s Guide. Dangerous electrical voltages in the projector can injure you severely.
MovieMate25UG.book Page 40 Wednesday, January 25, 2006 11:37 AM Cleaning and Replacing the Air Filter Clean the air filters when dust builds up or when you see the following message: The projector is overheating. Make sure nothing is blocking the air vents, and clean or replace the air filter. If the air filters are not cleaned periodically, they can become clogged with dust, preventing proper ventilation. This can cause overheating and damage MovieMate. 1.
MovieMate25UG.book Page 41 Wednesday, January 25, 2006 11:37 AM 5. Replace the cover. Replacing the Lamp The life span of the lamp is about 3000 hours if the color mode is consistently set to Theatre Black, and 2000 hours if any other color mode is used. For instructions on changing the color mode, see page 21. You can check how long the lamp has been used, as described on page 34. If the number shown is close to the limit, make sure you have a spare lamp handy.
MovieMate25UG.book Page 42 Wednesday, January 25, 2006 11:37 AM 3. Insert a small screwdriver into the lamp cover release slot, pushing it in gently to release the lamp cover. . 4. Loosen the two silver screws holding the lamp in place. (You can’t remove these screws.) 5. Grasp the lamp as shown and pull it straight out. Note: The lamp in this product contains mercury. Please consult your state and local regulations regarding disposal or recycling. Do not put in the trash. 6.
MovieMate25UG.book Page 43 Wednesday, January 25, 2006 11:37 AM 7. To replace the lamp cover, insert the tabs and then snap the cover into place. (MovieMate won’t work if the lamp cover is loose.) After replacing the lamp, you need to reset the lamp timer, as described in the next section. Resetting the Lamp Timer 1. Press the button on the remote control. You see the following on the screen: 2. To reset the lamp timer, continue pressing the 3. Press 4.
MovieMate25UG.book Page 44 Wednesday, January 25, 2006 11:37 AM Storing MovieMate Follow these guidelines when storing MovieMate: ■ Make sure the temperature and humidity of the storage area are within the recommended range for the projector: 14 to 140 °F (–10 to 60 °C) and 10 to 90% relative humidity without condensation. ■ Attach the lens cover. ■ Remove the batteries from the remote control. ■ Package MovieMate in its original packaging or equivalent (as described in the following section).
MovieMate25UG.book Page 45 Wednesday, January 25, 2006 11:37 AM Problem Solving This section explains how to interpret MovieMate’s status lights, solve problems, and contact technical support. What To Do When the Lights Flash The lights on top of MovieMate indicate its status and let you know when a problem occurs. If all lights are off, make sure the power cable is connected correctly and the main power switch is turned on. The Image Off light is orange. MovieMate is in sleep mode.
MovieMate25UG.book Page 46 Wednesday, January 25, 2006 11:37 AM The warning light is flashing orange. High-speed cooling is in process. If MovieMate gets too hot again, projection stops automatically. Make sure MovieMate is at least 8 inches away from the wall. Clean or replace the air filters if necessary (see page 40). If you are using MovieMate at an altitude above 4,900 feet (1500 meters), turn on High Altitude Mode (see page 34). The warning light is flashing orange.
MovieMate25UG.book Page 47 Wednesday, January 25, 2006 11:37 AM Solving MovieMate Operation Problems MovieMate doesn’t turn on. ■ Make sure the main power switch is turned on. ■ If the Image On light is flashing green, MovieMate is warming up. Wait for the picture to appear. ■ If the Image Off light is flashing orange, MovieMate is cooling down. Wait until the Power button to turn on MovieMate.
MovieMate25UG.book Page 48 Wednesday, January 25, 2006 11:37 AM ■ Check the See page 41. ■ If you’re using external video equipment, check the solutions on page 51. warning light. If it is flashing orange or red, you need to replace the lamp. The DVD skips. ■ Make sure MovieMate is not tilted. Tilting it up more than 5 degrees may cause skipping or disc scratches. Use the vertical lens shift dial to adjust the image position. ■ Make sure there are no fingerprints on the DVD.
MovieMate25UG.book Page 49 Wednesday, January 25, 2006 11:37 AM ■ If you’re using the Keystone adjustment, be aware that it lessens image quality. You may wish to decrease the projection angle to reduce the amount of keystone correction needed, or use the lens shift dials to position the image. See page 16. ■ If you’re using external video equipment, check the solutions on page 51. The picture looks too light or too dark.
MovieMate25UG.book Page 50 Wednesday, January 25, 2006 11:37 AM There is no sound, or the sound is not loud enough. ■ Try pressing the + Volume button on MovieMate or remote control and turning the volume knob on the subwoofer. ■ Press the button on the remote control to make sure the sound hasn’t been turned off temporarily. ■ Press ■ If you’re using external video equipment, make sure you connect the red and white audio jacks to MovieMate’s audio ports (see page 36).
MovieMate25UG.book Page 51 Wednesday, January 25, 2006 11:37 AM Problems with External Video Equipment No picture appears on the screen. ■ Make sure the equipment is turned on. ■ Press the Power button on MovieMate or on the remote control. ■ Press the or Play button on the external equipment. ■ Make sure you don’t have cables connected to both the S-video and Video ports. You can only use one connection at a time (see pages 35 and 36). You see the message No Signal.
MovieMate25UG.book Page 52 Wednesday, January 25, 2006 11:37 AM Where To Get Help Epson provides technical assistance 24 hours a day at http://support.epson.com. Here you can access troubleshooting information, download product documentation, and receive technical advice through e-mail. To use the Epson PrivateLine Support service, call (800) 637-7661 and enter the PIN on the Epson PrivateLine Support card that came with MovieMate.
MovieMate25UG.book Page 53 Wednesday, January 25, 2006 11:37 AM Specifications and Notices This section includes specifications, safety instructions, and other important information about your MovieMate. MovieMate Specifications General Type of display Poly-silicon TFT active matrix Size of LCD panels 0.55 inch (14 mm) wide Lens F=1.7 to 2.1, f=13.7 to 20.
MovieMate25UG.book Page 54 Wednesday, January 25, 2006 11:37 AM Remote Control Range Approx. 23 feet (7 m) Battery AA × 2 Projection Lamp Type 135 W UHE (Ultra High Efficiency) Part number ELPLP33, V13H010L33 Lamp life Approx. 2000 hours (all color modes except Theatre Black) Approx. 3000 hours (Theatre Black mode) Note: Lamp life results vary depending on environmental conditions and usage. Turn the projector off when not in use.
MovieMate25UG.
MovieMate25UG.book Page 56 Wednesday, January 25, 2006 11:37 AM PixelworksTM DNXTM ICs are used in this projector. Compatible Video Formats MovieMate supports analog TV (NTSC, PAL, SECAM) with composite video or S-Video connection. Images are automatically resized, if necessary, to display in the projector’s native resolution.
MovieMate25UG.book Page 57 Wednesday, January 25, 2006 11:37 AM Important Safety Information Follow these safety instructions when setting up and using MovieMate: ■ Except as specifically explained in this User’s Guide, do not attempt to service this product yourself. Refer all servicing to qualified service personnel. ■ Never open any cover on the projector, except the lamp and filter covers. Dangerous electrical voltages inside the projector can severely injure you.
MovieMate25UG.book Page 58 Wednesday, January 25, 2006 11:37 AM 58 ■ If you use the projector in a country other than where you purchased it, use the correct power cord for that country. ■ Place the projector near a wall outlet where the plug can be easily unplugged. ■ Don’t place the projector where the cord can be walked on. This may result in fraying or damage to the plug. ■ Don’t insert the plug into an outlet with dust present, and insert the plug firmly into the outlet.
MovieMate25UG.book Page 59 Wednesday, January 25, 2006 11:37 AM ■ Make sure there is at least 4 inches of space between the intake ventilation slots and the wall or other object. ■ Do not use the projector with the lens cover on; otherwise, the cover could melt and cause injury. ■ Do not turn the volume too high, especially when using headphones. Listening to high volume sounds over an extended period can damage your hearing. Sudden high volume can also damage the speakers.
MovieMate25UG.book Page 60 Wednesday, January 25, 2006 11:37 AM Declaration of Conformity According to 47CFR, Part 2 and 15 for Class B Personal Computers and Peripherals; and/or CPU Boards and Power Supplies used with Class B Personal Computers: We: Located at: Epson America, Inc.
MovieMate25UG.book Page 61 Wednesday, January 25, 2006 11:37 AM exchange of the product or of a part, the item replaced becomes Epson property. The exchanged product or part may be new or previously repaired to the Epson standard of quality, or, at Epson’s option, may be another model of like kind and quality.
MovieMate25UG.
MovieMate25UG.
MovieMate25UG.
MovieMate25UG.
MovieMate25UG.
MovieMate25UG.
MovieMate25UG.