P6000-7000Basics.
P6000-7000Basics.book Page 2 We dnesday, April 23, 2008 2:25 PM Copyright Notice All rights reserved. No part of this publication may be reproduced, stored in a retrieval system, or transmitted, in any form or by any means, electronic, mechanical, photocopying, recording, or otherwise, without the prior written permission of Seiko Epson Corporation. The information contained herein is designed only for use with this Epson product.
P6000-7000Basics.
P6000-7000Basics.
P6000-7000Basics.book Page 5 We dnesday, April 23, 2008 2:25 PM Introduction Your Epson P-6000/P-7000 Multimedia Storage Viewer™ lets you enjoy photos, videos, and music wherever you go.
P6000-7000Basics.
P6000-7000Basics.book Page 7 We dnesday, April 23, 2008 2:25 PM Getting Started Follow the instructions in this section to set up your P-6000/P-7000.
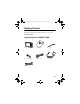
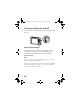
P6000-7000Basics.book Page 8 We dnesday, April 23, 2008 2:25 PM Installing the Battery 1 Open the battery cover. 2 Insert the battery. 3 Close the battery cover. Battery release lever Note: If you need to remove the battery, open the battery cover, and slide the battery release lever to the left.
P6000-7000Basics.book Page 9 We dnesday, April 23, 2008 2:25 PM Charging the Battery Plug the AC adapter into the viewer. Connect the power cord to the adapter and plug it into an electrical outlet. Charge light The Charge light turns on. It takes about 3.5 hours to charge the battery when the viewer is not in use. Caution: Do not use the viewer without the battery installed. Turn off the viewer before disconnecting the adapter.
P6000-7000Basics.book Page 10 We dnesday, April 23, 2008 2:25 PM Turning the Viewer On and Off To turn on the viewer, slide the power switch down and release it. Turning Off the Viewer To turn off the viewer, make sure the memory card access light is off (see page 18), then slide the power switch down and hold it until you see the message Shutting Down. Note: If the viewer is in sleep mode, press any button to wake it. Then turn it off as described above.
P6000-7000Basics.book Page 11 We dnesday, April 23, 2008 2:25 PM Setting the Language, Date, and Time When you turn on the viewer the first time, you see the Language setting screen: 1 Press OK to select English. You see a message about setting the date. 2 Press OK.
P6000-7000Basics.book Page 12 We dnesday, April 23, 2008 2:25 PM 3 Press right or left on the 4-way ring to highlight a setting to change. 4-way ring 4 Press up or down to change the setting. 5 When you’re done changing the date and time, highlight Complete and press OK. You see the Home screen: Note: If you remove the battery, the date and time settings will be erased after about one day. The next time you turn on the viewer, the Date and Time screen will be displayed.
P6000-7000Basics.book Page 13 We dnesday, April 23, 2008 2:25 PM Installing Your Software and User’s Guide To transfer files between your computer and viewer, convert video and audio files, and create music playlists, you need to install the Epson Link2 software. To use the viewer to display images from Adobe Photoshop applications to maintain color accuracy when editing your images, you need to install the USB Monitor Plug-In.
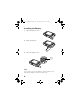
P6000-7000Basics.book Page 14 We dnesday, April 23, 2008 2:25 PM 3 Use the included USB cable to connect the viewer to your computer. Larger end Smaller end 4 Make sure the viewer is on the Home screen, then press the button to connect to your computer. The viewer LCD screen turns off and your computer recognizes the viewer as a removable drive.
P6000-7000Basics.book Page 15 We dnesday, April 23, 2008 2:25 PM 6 Double-click the installation software located in the root of the drive: ◗ Windows: P_6000_WIN_SOFTWARE or P_7000_WIN_SOFTWARE In Windows Vista®, if you see the User Account Control screen during installation, click Allow. ◗ Macintosh: P_6000_MAC_SOFTWARE.DMG or P_7000_MAC_SOFTWARE.DMG Double-click the Mac OS X icon to continue the installation.
P6000-7000Basics.book Page 16 We dnesday, April 23, 2008 2:25 PM Note: To view the User’s Guide, double-click its icon on your desktop. You need to have Adobe Reader® or Acrobat® installed on your system to view the guide. You can download Adobe Reader at www.adobe.com. Do not remove the software from the viewer after installing it on your computer, in case you need to reinstall it.
P6000-7000Basics.book Page 17 We dnesday, April 23, 2008 2:25 PM Using Memory Cards Follow the instructions in this section to insert a memory card and copy files to your P-6000/P-7000. Inserting and Removing Memory Cards The P-6000/P-7000 supports the following types of memory cards: ◗ CompactFlash (CF) memory card (Type2) and MicroDrive™ (3.
P6000-7000Basics.book Page 18 We dnesday, April 23, 2008 2:25 PM Caution: Never remove a memory card while the memory card access light is flashing, or files may be lost or damaged. Make sure you insert memory cards in the correct orientation, or the card and viewer may be damaged. Do not put labels or stickers on memory cards. The sticker may peel off, preventing the card from being ejected and damaging the viewer. Using the CF Card Slot Insert the memory card into the slot with the label facing forward.
P6000-7000Basics.book Page 19 We dnesday, April 23, 2008 2:25 PM To remove a card from the CF Card slot, first make sure the memory card access light is off. Then press the eject button and pull out the card. If the button is not sticking out, press it once to pop it out, then press it again to eject the card. Note: If you are using a CompactFlash adapter, remove the adapter from the viewer; do not remove only the memory card.
P6000-7000Basics.book Page 20 We dnesday, April 23, 2008 2:25 PM Using the SD Card Slot Insert an SD, SD HC, MultiMediaCard, or MMCplus card into the slot as shown below. Insert it fully into the viewer. Memory card access light To remove a card from the SD Card slot, first make sure the memory card access light is off. Then press in on the top of the card. When the card pops out, pull it out of the slot.
P6000-7000Basics.book Page 21 We dnesday, April 23, 2008 2:25 PM Copying Files from a Memory Card After you insert a memory card (as described on page 18 or 20), you can copy all of the files on the card to Backup Files or copy selected files to the My Photos or My Videos folder on the viewer. Copying All files 1 If the Memory Card menu doesn’t open automatically, use the 4-way ring or jog dial to highlight Memory Card on the Home screen, then press OK.
P6000-7000Basics.book Page 22 We dnesday, April 23, 2008 2:25 PM Note: The folder is named according to the date, for example, 03292008M.001. You can change the date format by selecting Settings > Date and Time on the Home screen (see page 11). Folders are numbered in the order they are copied. When the backup is complete, you see thumbnail images of the copied photos.
P6000-7000Basics.book Page 23 We dnesday, April 23, 2008 2:25 PM 2 Select Browse CF Memory Card or Browse SD Memory Card, then press OK. You see your photos displayed. 3 Press the Menu button to display the pop-up menu. 4 Select Copy/Move, then press OK. 5 Select Select and Copy Files, then press OK.
P6000-7000Basics.book Page 24 We dnesday, April 23, 2008 2:25 PM 6 Use the 4-way ring or jog dial to highlight each photo you want to copy and press to select it. The selected items are displayed with red check marks. Tip: To select all files and folders, press Menu and choose Select All. 7 When you are finished selecting photos, press OK. 8 Use the 4-way ring to select My Photos or My Videos, then press right on the 4-way ring.
P6000-7000Basics.book Page 25 We dnesday, April 23, 2008 2:25 PM Deleting Files After Copying You can have files automatically deleted after you copy them to the viewer. 1 On the Home screen, use the 4-way ring or jog dial to select Settings and press OK. 2 Select Backup Settings and press OK. 3 Select Process After Backup and press OK. 4 Choose one of the following settings: ◗ Verify backed up data if you want the viewer to verify that the files were copied successfully. ◗ Verify & del. orig.
P6000-7000Basics.book Page 26 We dnesday, April 23, 2008 2:25 PM Supported File Formats The P-6000/P-7000 supports these image formats: Image files Extension Details JPEG .jpg .jpeg Minimum size: 320 × 240 pixels Maximum size: 31 megapixels Maximum image aspect ratio: 3:1 Non-progressive JPEG files only RAW .arw .cr2 .crw .dng .erf .mrw .nef .orf .pef .raf JPEG data stored in the header of RAW files is displayed. The P-6000/P-7000 supports .avi, .mov, .mp4, and .m4v format video files.
P6000-7000Basics.book Page 27 We dnesday, April 23, 2008 2:25 PM Viewing Photos and Videos Follow the instructions in this section to view photos, create slide shows, and play videos on your P-6000/ P-7000. To share your images, slide shows, and videos with a larger audience, you can connect the viewer to a TV or projector (see page 34). Viewing Photos You can display images at full-screen, zoom in, or show several types of photographic information.
P6000-7000Basics.book Page 28 We dnesday, April 23, 2008 2:25 PM You see a screen like this: 2 Select the image you want to view, then press OK. The selected image is enlarged to fill the screen. Zooming an Image When viewing an image at full-screen, you can zoom in or pan around to see details. ◗ To zoom in, press the + (plus) button. Keep pressing it to zoom in up to 400%. ◗ To zoom out, press the – (minus) button. Continue pressing it to zoom all the way out.
P6000-7000Basics.
P6000-7000Basics.book Page 30 We dnesday, April 23, 2008 2:25 PM Displaying Image Information To view information about an image shown at fullscreen, press the Display button. Press Display again to view additional information and a histogram like the following: Press Display a third time to view the over- or underexposure preview, which highlights areas at both ends of the brightness range. See the on-screen User’s Guide for more information.
P6000-7000Basics.book Page 31 We dnesday, April 23, 2008 2:25 PM 3 To view rated photos, select Backup Files or My Photos on the Home screen and press OK. 4 Press Menu, select Rating Filter Display, and press OK. 5 Select the rating level you want to view, and press OK. The rated photos appear on the screen. Use the Epson Link2 software to move images and their ratings to your computer for use with certain applications (see your on-screen User’s Guide for details).
P6000-7000Basics.book Page 32 We dnesday, April 23, 2008 2:25 PM 3 Select Slide Show and press OK. The slide show starts. To stop the slide show, press the Back button. Slide Show Settings You can select transition effects, timing, and background music for the slide show. To change the settings, select Settings on the Home screen, press OK, then select Slide Show. ◗ Effects: Choose one of four slide transition effects, Enhanced Photo Display, or None.
P6000-7000Basics.book Page 33 We dnesday, April 23, 2008 2:25 PM 2 Highlight the video file you want to play, then press OK. The video starts playing. Note: To set the video screen size, press Menu and select Play at Full Screen or Play at Original Size from Play Settings in the pop-up menu. Setting Play at Full Screen displays the image by adjusting the longest side to the LCD display without changing the aspect ratio.
P6000-7000Basics.book Page 34 We dnesday, April 23, 2008 2:25 PM The viewer remembers where you stopped. When you resume, playback starts 3 seconds before the stop point (for videos longer than 1 minute). If you want to restart playback from the beginning, press Menu, select Play Settings from the pop-up menu, and select Play from Beginning. ◗ To view information about the video, press Display. You see a progress bar on the video.
P6000-7000Basics.book Page 35 We dnesday, April 23, 2008 2:25 PM 1 Connect the cable’s three RCA plugs to the video and audio IN jacks on your TV or projector. 2 Connect the cable’s mini-plug to the A/V Out jack on the side of the viewer. The viewer’s LCD screen turns off. 3 Set the TV or projector to display video input from the viewer. Now you can use all of the viewer’s controls to show photos, videos, and slide shows on your TV or projector.
P6000-7000Basics.book Page 36 We dnesday, April 23, 2008 2:25 PM Using the Viewer with USB Devices You can connect a flash memory drive or other USB device to your P-6000/P-7000 and copy files to or from the device.
P6000-7000Basics.book Page 37 We dnesday, April 23, 2008 2:25 PM Connecting a USB Device Before you connect a USB device, connect the AC adapter to the viewer and plug it in. If your USB device has an AC adapter, use it to prevent the possible loss of files during transfer. 1 Open the connector cover on the side of the viewer. 2 Plug the device into the Host USB connector on the side of the viewer.
P6000-7000Basics.book Page 38 We dnesday, April 23, 2008 2:25 PM Copying Files to the Viewer After you connect a USB device, you can copy all the files to the viewer, or select individual files to copy. 1 On the Home screen, use the 4-way ring or jog dial to highlight USB Device, then press OK. 2 Select Connect to USB Device, then press OK.
P6000-7000Basics.book Page 39 We dnesday, April 23, 2008 2:25 PM The folder is named according to the date, for example, 03292008M.001. You can change the date format by selecting Settings > Date and Time on the Home screen (see page 11). Folders are numbered in the order they are copied. ◗ If you connected a device that does not contain a DCIM folder in the root folder of the device, or to copy selected files, select Browse USB Device in the USB Device menu, then press OK. You see your photos displayed.
P6000-7000Basics.book Page 40 We dnesday, April 23, 2008 2:25 PM Backing Up All Files to a USB Device This process may take some time, depending on the volume of data in the viewer. 1 Follow the instructions on page 37 to connect the USB device. 2 On the Home screen, use the 4-way ring or jog dial to highlight USB Device, then press OK. 3 In the USB Device menu, select Connect to USB Device, then press OK. 4 Select Copy all Backup Files, then press OK.
P6000-7000Basics.book Page 41 We dnesday, April 23, 2008 2:25 PM Copying Selected Files to a USB Device You can select individual files or folders to copy. 1 Follow the instructions on page 37 to connect the USB device. 2 Highlight the file or folder you want to copy. 3 Press the Menu button. 4 Select Copy/Move, then press OK. 5 Select Select and Copy Files, then press OK.
P6000-7000Basics.book Page 42 We dnesday, April 23, 2008 2:25 PM 6 Use the 4-way ring or jog dial to highlight each photo you want to copy, then press to select it. The selected items are displayed with red check marks. Tip: To select all files and folders, press Menu and choose Select All. 7 When you are finished selecting photos, press OK. 8 Select USB Device, then press right on the 4-way ring to select it. 9 Do one of the following: ◗ ◗ Use the 4-way ring to select a folder, then press OK.
P6000-7000Basics.book Page 43 We dnesday, April 23, 2008 2:25 PM Playing Music You can copy audio files from your computer and play them on the P-6000/P-7000. You can create playlists using your computer and the Epson Link2 software, or using the viewer itself. See your on-screen User’s Guide for instructions on creating a playlist and adjusting audio equalizer settings. Copying Music Files from Your Computer The viewer can store up to 10,000 audio files.
P6000-7000Basics.book Page 44 We dnesday, April 23, 2008 2:25 PM 3 Use the included USB cable to connect the viewer to your computer. Larger end Smaller end 4 Make sure the viewer is on the Home screen, then press the button to connect to your computer. The LCD screen turns off. 5 Double-click the Epson Link2 icon on your desktop to open the program. 6 Click My Music, then locate the audio files you want to copy from your computer.
P6000-7000Basics.book Page 45 We dnesday, April 23, 2008 2:25 PM 8 When the transfer is complete, disconnect the viewer from your computer: ◗ Windows: Right-click the or icon in the lower right corner of your screen and select Safely Remove Hardware or Unplug or Eject Hardware. Then remove the USB cable. ◗ Macintosh: Drag and drop the viewer icon to the trash, then remove the USB cable. 9 If you see a message on the viewer asking you to update the music list, click OK.
P6000-7000Basics.book Page 46 We dnesday, April 23, 2008 2:25 PM 1 Select My Music on the Home screen using the 4-way ring or jog dial, then press OK. 2 Select Music List, then press OK. If you don’t see the songs you transferred to the viewer, select Update Music List and press OK. Note: To continue playing from a previously played track, select Resume, then press OK. 3 Select a category to start playback, then press right on the 4-way ring.
P6000-7000Basics.book Page 47 We dnesday, April 23, 2008 2:25 PM ◗ Genre - Genre name - Artist name - Album name - Track name ◗ All - Track name ◗ Playlist - Playlist name - Track name ◗ Update Music List (to update audio files after transferring them from your computer) 4 Select the track you want using the 4-way ring, then press OK. Controlling Audio Playback You can do the following while listening to music or audio files: ◗ To play or pause music, press OK.
P6000-7000Basics.book Page 48 We dnesday, April 23, 2008 2:25 PM ◗ To skip back or forward, press left or right on the 4-way ring. Press and hold to rewind or fast-forward. ◗ To return to the previous screen (without stopping the audio), press Back. (If you return to the main My Music screen, audio playback stops.) ◗ To display information about the audio file such as code, bit rate, and sampling rate, press Display.
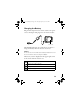
P6000-7000Basics.book Page 49 We dnesday, April 23, 2008 2:25 PM Managing Your Files You can copy the files you’ve backed up from memory cards or USB drives to your own folders for special purposes, such as portfolios. You can also back up files from the viewer to your computer. Copying and Moving Files to a Folder 1 Open a folder to a thumbnail view, as shown below, and highlight the file or folder you want to copy or move. Highlight a file 2 Press the Menu button, then select Copy/Move.
P6000-7000Basics.book Page 50 We dnesday, April 23, 2008 2:25 PM 3 Do one of the following: ◗ To copy files to another folder, select Select and Copy Files, then press OK. ◗ To move files to another folder, select Select and Move Files, then press OK. Note: To copy or move a single file, select Copy this File or Move this File, then continue with step 5. 4 Use the 4-way ring or jog dial to highlight each additional item you want to copy or move, then press to select it.
P6000-7000Basics.book Page 51 We dnesday, April 23, 2008 2:25 PM 6 Use the 4-way ring to select a folder to copy or move the items to. Then do one of the following: ◗ To copy or move the items into the selected folder, press OK. Your items are copied or moved. ◗ To copy or move the items into a new subfolder within the selected folder, highlight Create New Folder and press OK. Then see the next section to enter a name for the new folder and copy or move the items.
P6000-7000Basics.book Page 52 We dnesday, April 23, 2008 2:25 PM Creating a New Folder 1 To copy items to a new folder, follow steps 1 through 6 in the previous section. When you select Create New Folder and press OK, the on-screen keyboard appears with the current date entered as the default name for the folder. You can either keep the name or enter a new one. 2 To keep the current name, use the 4-way ring or jog dial to highlight Done and press OK. Your files are copied to the new folder.
P6000-7000Basics.book Page 53 We dnesday, April 23, 2008 2:25 PM Note: You can rename a folder by highlighting it, pressing the Menu button, and selecting Edit > Rename. Folders in Backup Files can’t be renamed. Deleting Files or Folders 1 Highlight the file or folder you want to delete. 2 Press the Menu button, then select Delete. 3 If you’re viewing files on the thumbnail screen, use the 4-way ring or jog dial to highlight each additional item you want to delete and press to select it.
P6000-7000Basics.book Page 54 We dnesday, April 23, 2008 2:25 PM Backing Up Files to Your Computer You can automatically copy all the files from the viewer’s Backup Files folder to your computer. 1 Connect the AC adapter to your viewer (see page 9). 2 Turn on the viewer and your computer. 3 Use the included USB cable to connect the viewer to your computer. Larger end Smaller end 4 Make sure the viewer is on the Home screen, then press the button to connect to your computer.
P6000-7000Basics.book Page 55 We dnesday, April 23, 2008 2:25 PM Note: Although your computer may recognize the viewer as a removable drive, it is best to transfer files using the Epson Link2 software. 5 Double-click the Epson Link2 icon on your desktop to open the program. 6 If you see a message that Epson Link2 has found files in your viewer’s Backup Files folder, click Yes to copy the files. Note: Only files that haven’t already been copied will be transferred.
P6000-7000Basics.book Page 56 We dnesday, April 23, 2008 2:25 PM Solving Problems Check this list of common problems and possible solutions. For more troubleshooting tips, check the P-6000/P-7000 User’s Guide on your computer. (See page 13 for instructions on installing and viewing the guide.) Operating Problems The power doesn’t turn on. ◗ The battery may need recharging. Connect the AC adapter as shown on page 9. ◗ The battery may need to be replaced. See page 58.
P6000-7000Basics.book Page 57 We dnesday, April 23, 2008 2:25 PM ◗ The viewer may need to be reset. Use the end of a paper clip to gently press the Reset button next to the viewer’s USB ports. Viewing Problems The LCD screen is dark. ◗ The screen may have turned off automatically to save power, or the viewer may have shut down. Press any button to turn the screen back on, or press down on the power switch to turn the viewer on.
P6000-7000Basics.book Page 58 We dnesday, April 23, 2008 2:25 PM Replacing the Battery You can purchase a replacement lithium-ion battery (B32B818262) from an Epson authorized reseller. To find the nearest reseller, call 800-GO-EPSON (800-463-7766). Or you can purchase online at www.epsonstore.com (U.S. sales) or www.epson.ca (Canadian sales). Where To Get Help Epson provides these technical support services: Internet Support Visit Epson’s support website at epson.
P6000-7000Basics.book Page 59 We dnesday, April 23, 2008 2:25 PM Speak to a Support Representative Before you call Epson for support, please have the following information ready: ◗ Product name (Epson P-6000 or P-7000) ◗ Product serial number (located on the bottom of the viewer) ◗ Proof of purchase (such as a store receipt) and date of purchase ◗ Computer configuration ◗ Description of the problem Then call: ◗ U.S.: (562) 276-4303, 6 AM to 6 PM, Pacific Time, Monday through Friday.
P6000-7000Basics.book Page 60 We dnesday, April 23, 2008 2:25 PM Appendix Important Safety Instructions Additional safety information for the P-6000/P-7000 can be found in the on-screen User’s Guide. See page 13 for instructions on installing and viewing the guide. Battery Safety Instructions Warning: There is a risk of explosion if the battery is replaced by the incorrect type. Use a new battery of the specified type only. Dispose of used batteries according to the instructions.
P6000-7000Basics.book Page 61 We dnesday, April 23, 2008 2:25 PM ◗ Do not charge the battery near open flame or in very hot locations. ◗ Keep batteries away from heat sources. ◗ Do not leave the battery in a vehicle to prevent the battery from overheating. ◗ Do not insert objects into any openings as they may touch dangerous voltage points or short-circuit components. ◗ Prevent the battery from coming into contact with metal objects that could short-circuit it, such as coins or keys.
P6000-7000Basics.book Page 62 We dnesday, April 23, 2008 2:25 PM Disposing of the Battery Before disposing of the battery, make sure you discharge it completely. For users in North America: This mark indicates that the battery will be recycled by the RBRC. When you are ready to dispose of the battery, contact the RBRC at (800) 822-8837. Warning: Be sure to securely cover the end of the battery with tape to prevent combustion or explosion when disposing of it.
P6000-7000Basics.book Page 63 We dnesday, April 23, 2008 2:25 PM FCC Compliance Statement For United States Users This equipment has been tested and found to comply with the limits for a class B digital device, pursuant to Part 15 of the FCC Rules. These limits are designed to provide reasonable protection against harmful interference in a residential installation.
P6000-7000Basics.book Page 64 We dnesday, April 23, 2008 2:25 PM For Canadian Users This Class B digital apparatus complies with Canadian ICES-003. Cet appareil numérique de la classe B est conforme à la norme NMB-003 du Canada. Declaration of Conformity According to 47CFR, Part 2 and 15 for Class B Personal Computers and Peripherals; and/or CPU Boards and Power Supplies used with Class B Personal Computers: We: Epson America, Inc.
P6000-7000Basics.book Page 65 We dnesday, April 23, 2008 2:25 PM Epson America, Inc. Limited Warranty What Is Covered: Epson America, Inc. (“Epson”) warrants to the first retail purchaser that the Epson product enclosed with this limited warranty statement, if purchased and used in the United States or Canada, will be free from defects in workmanship and materials for a period of one (1) year from the date of original purchase. For warranty service, you must provide proof of the date of original purchase.
P6000-7000Basics.book Page 66 We dnesday, April 23, 2008 2:25 PM What This Warranty Does Not Cover: This warranty covers only normal use in the United States and Canada. This warranty is not transferable. This warranty does not cover damage to the Epson product caused by parts or supplies not manufactured, distributed or certified by Epson. This warranty does not cover third party parts, components or peripheral devices added to the Epson product after its shipment from Epson.
P6000-7000Basics.book Page 67 We dnesday, April 23, 2008 2:25 PM SPECIAL, INCIDENTAL OR CONSEQUENTIAL DAMAGES, RESULTING FROM THE USE OR INABILITY TO USE THE EPSON PRODUCT, OR FOR LOST DATA OR LOST SOFTWARE WHETHER RESULTING FROM BREACH OF WARRANTY OR ANY OTHER LEGAL THEORY. In Canada, warranties include both warranties and conditions.
P6000-7000Basics.
P6000-7000Basics.
P6000-7000Basics.
P6000-7000Basics.
P6000-7000Basics.