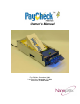
Owner’s Manual First Edition: December 2002 Last Revision: November 27, 2009 Document #720005-0000
Owner’s Manual Legal Notices Disclaimer Information in this document is subject to change without notice. Consult your Nanoptix Inc. sales representative for information that is applicable and current. Nanoptix Inc. reserves the right to improve products as new technology, components, software, and firmware become available. No part of this document may be reproduced or transmitted in any form or by any means, electronic or mechanical, for any purpose without the express written permission of Nanoptix Inc.
Owner’s Manual Information to the User This equipment must be installed and used in strict accordance with the manufacturer's instructions. However, there is no guarantee that interference to radio communications will not occur in a particular commercial installation. If this equipment does cause interference, which can be determined by turning the equipment off and on, the user is encouraged to contact Nanoptix Inc. immediately. Nanoptix Inc.
Owner’s Manual Table of Contents 1. About the Printer ..................................................................... 1 1.1 Description of Printer ...................................................................................1 1.2 General specifications..................................................................................2 1.3 Printer Controls.............................................................................................3 Printer Reset (Service use only)..............
Owner’s Manual Figures FIGURE 1: NANOPTIX PAYCHECK PRINTER ......................................................................................... 1 FIGURE 2: PRINTER RESET ................................................................................................................ 3 FIGURE 3: PAPER FEED BUTTON ........................................................................................................ 3 FIGURE 4: DIP SWITCH .................................................................
Owner’s Manual Tables TABLE 1: SPECIFICATION ................................................................................................................... 2 TABLE 2: TROUBLESHOOTING WITH LED............................................................................................ 9 TABLE 3: TROUBLESHOOTING PRINTING PROBLEMS ........................................................................... 9 TABLE 4: PRINTER DOES NOT WORK ....................................................................
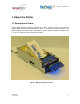
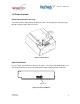
Owner’s Manual 1. About the Printer 1.1 Description of Printer The Nanoptix PayCheck 4 printer, also known as Triton, is extremely fast, quiet, and very reliable. With thermal printing technology, there is no ribbon cassette to change, and paper loading is extremely simple. The printer is small enough to fit almost anywhere and is easy to use with the ticket exiting from the front.
Owner’s Manual 1.
Owner’s Manual 1.3 Printer Controls Printer Reset (Service use only) To reset the printer, simply unplug and plug the cable. Once plugged in, the printer goes through a startup routine and resets itself. Figure 2: Printer Reset Paper Feed Button Use the Paper Feed Button to advance the paper. The paper will automatically feed. Tear off the form that has been fed and the printer will be ready to print on a full form.
Owner’s Manual Firmware Selector DIP switches Remove the ticket tray to access the firmware selector DIP switches. Various firmware and settings configurations are available by selecting the 16 different DIP switch combinations.
Owner’s Manual LED The LED on the main controller board shows the printer status. Please refer to section 1.6 for LED status and troubleshooting with LED. An external LED can be connected through the front 3-pin Molex connector. The pin-out is described in section 2.3.
Owner’s Manual 1.4 Mounting The Paycheck ™ 4 must be mounted using the 4 threaded mounting fasteners or the 4 through-holes located under the printer (see Appendix A – Bottom View). Care must be taken so the fasteners do not damage the flex cable during installation or operation. The printer can be installed up to 90 degrees from horizontal (paper exit facing up), provided the proper paper tray is installed. For angles of 45-90 degrees, a specially designed paper tray must be used to avoid paper jams.
Owner’s Manual 1.5 Changing Paper Change the paper when the paper is low or out. Caution: Do not operate the printer or host computer if the printer runs out of paper. The printer will not operate without paper, but it may continue to accept data from the host computer. Because the printer cannot print any transactions, the data may be lost. Load a stack of tickets into the printer.
Owner’s Manual 1.6 Testing the Printer Run this test to check the printer. The test prints and cuts a resident test ticket. Verify this ticket to judge the printing quality. Model: PAYCHECK 4 Firmware: PAY-2.51E User Version: S R.2.4.
Owner’s Manual 1.7 Troubleshooting the Printer The printer is simple and generally trouble-free, but from time to time problems may occur. Follow these procedures to determine the cause and resolution of any problems the printer may be having. If the procedures in this section do not correct the problem, contact a service representative.
Owner’s Manual Printer Does Not Work Problem Possible Causes Printer not plugged in. Printer Does Not Function When Turned On. Tray not fully closed. The power supply voltage is higher than 26.8V. What to Do Check that printer cables is properly connected on both ends. Check that the host or power supply is getting power. Close the tray. Adjust the power supply output voltage to 24V +/5%.
Owner’s Manual 2. Media and Supplies Guide 2.1 Media Specifications The printer requires qualified thermal paper with the following specifications: 2.1.1 – Ticket dimensions shall be 65mm +/- 1mm (2.56 in +/- .040in) x 156mm +/-1 mm (6.14in +/- 0.040in) 2.1.2 – Paper stock shall be furnished in bulk stacks of 200, 400, 600 or 800 tickets. 2.1.3 – Tickets shall be attached (chained) to one another at 156mm intervals and supplied in “fan-folded” format 2.1.
Owner’s Manual Figure 9: Thermal Paper Specifications 720005-0000 November 2009 12
Owner’s Manual Figure 10: Ticket Stack and Banding Example 720005-0000 November 2009 13
Owner’s Manual 2.3 Ordering Miscellaneous Supplies Power Supply and Power Cord Contact your sales representative to order the power supply listed in the table. Part 14-Pin Molex Power Supply (24VDC, 2.5A max.
Owner’s Manual Ordering Bezels Contact your sales representative to order the bezels listed in the table.
Owner’s Manual Communication Cables Pin-Out The tables below detail the connection pin-out for the Universal Interface (14-pin Molex) on the printer side.
Owner’s Manual APPENDIX A: Mechanical Drawings Figure 11: Mechanical Dimensions – Paycheck 4 Printer Right Side View Figure 12: Mechanical Dimensions – Paycheck 4 Printer Bottom View 720005-0000 November 2009 17
Owner’s Manual Figure 13: Mechanical Dimensions – Paycheck 4 Printer Front View Figure 14: Mechanical Dimensions – Paycheck 4 Printer Top View 720005-0000 November 2009 18
Owner’s Manual Figure 15: Mechanical Dimensions – Paycheck 4 Printer Left Side View 720005-0000 November 2009 19
Owner’s Manual Nanoptix Contact Information Nanoptix Inc. 699 Champlain St. Dieppe NB, Canada E1A 1P6 Toll Free (North America): 888-983-3030 Tel: 506-384-3388 Fax: 506-384-3588 E-mail: info@nanoptix.com Web site: www.nanoptix.