Epson Connect Guide NPD4706-00 EN
Epson Connect Guide Contents Contents Notes on Transferring or Disposing of the Printer. . . . . . . . . . . . . . . . . . . . . . . . . . . . . . . 40 Epson Connect and Other Mobile Solutions What Is Epson Connect?. . . . . . . . . . . . . . . . . . . . . 3 User Page. . . . . . . . . . . . . . . . . . . . . . . . . . . . . . 4 Email Print. . . . . . . . . . . . . . . . . . . . . . . . . . . . . 5 Scan to Cloud. . . . . . . . . . . . . . . . . . . . . . . . . . . 6 Epson iPrint (3.x). . . . . . . . . . .
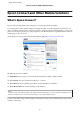
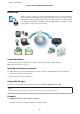
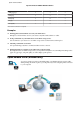
Epson Connect Guide Epson Connect and Other Mobile Solutions Epson Connect and Other Mobile Solutions What Is Epson Connect? Epson Connect provides mobile services that allow you to print and scan from anywhere. You can print photos and documents using your smart phone, tablet, or mobile computer from your home, your office, or anywhere in the world. If you send scanned data to an Epson Connect compatible printer, you can use the printer as a color fax.
Epson Connect Guide Epson Connect and Other Mobile Solutions User Page On the User Page, you can manage your account and printer information, and configure print settings or email notifications. Access the User Page from your smartphone, tablet, or computer connected to the Internet. Access the Epson Connect User Page Sign-In page from the following URL: https://www.epsonconnect.
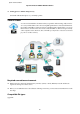
Epson Connect Guide Epson Connect and Other Mobile Solutions Email Print When you register your Epson Connect compatible printer and your account to the Epson Connect service, an email address is assigned to your printer. Now you can print to anyone with an Epson printer, anywhere in the world, from your mobile device or computer. Print your emails and attached Microsoft Office documents, PDFs, and photos whether you’re next to the printer or on the other side of the world.
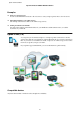
Epson Connect Guide Epson Connect and Other Mobile Solutions ❏ Sending photos to families living far away Send emails with attached photos to your family’s printer. Scan to Cloud You can send scanned files to destinations that you specified on the User Page. All you need to do is scan your files with a Scan to Cloud compatible printer that is connected to the Internet. By sending scanned files to an Epson Connect compatible printer’s email address, you can use this service as a color fax service.
Epson Connect Guide Epson Connect and Other Mobile Solutions Examples ❏ Using as a color fax service You can use the Email Print and Scan to Cloud services to turn your Epson printer into a color fax service. ❏ Uploading handouts to your online storage Scan and upload handouts as PDFs to the online storage services. ❏ Sending documents to the Kindle Scan and send documents to the Email address for your Kindle Personal Document Service, to read the documents on your Kindle. Epson iPrint (3.
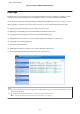
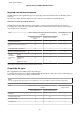
Epson Connect Guide Epson Connect and Other Mobile Solutions Required connection environment Available functions and compatible file types vary depending on the network environment to which the printer is connected. The following outlines the relationship between the connection environment and available functions. Network environment and available functions Available functions may differ depending on the printer’s operating environment and the device being used.
Epson Connect Guide Epson Connect and Other Mobile Solutions JPEG (jpg, jpeg) Y Y Y PNG (png) Y Y Y BMP (bmp) Y N Y GIF (gif) Y N Y TIFF (tif, tiff) Y N Y * The Internet connection is required. Examples ❏ Printing photos and documents saved on your mobile device Print photos and documents saved on your device at any time without drivers or cables.
Epson Connect Guide Epson Connect and Other Mobile Solutions Compatible devices Windows computers Required connection environment ❏ Printers that are connected to the Internet by a wireless (Wi-Fi) or wired (Ethernet) network and that are registered to the Epson Connect service. ❏ Devices that can connect to the Internet. Compatible file types Applications with printing functions such as Word, Excel, and PowerPoint.
Epson Connect Guide Epson Connect and Other Mobile Solutions Compatible devices Any device that can connect to the Internet and sign in to the Google website using a Google account, such as computers, smartphones, or tablets. Required connection environment ❏ Printers that are connected to the Internet by a wireless (Wi-Fi) or wired (Ethernet) network and that are registered to the Google Cloud Print service. ❏ Devices that can connect to the Internet.
Epson Connect Guide Epson Connect and Other Mobile Solutions AirPrint AirPrint makes it simple to print your emails, photos, web pages, and documents straight from your iPad, iPhone, or iPod touch. You do not need to download any software, install any drivers, or connect any cables. With just a few taps, you can go from viewing something on screen to holding a printed copy. For more details about AirPrint, see the Apple website.
Epson Connect Guide Setting up the Services Setting up with the printer software disc Setting up the Services Create your Epson Connect account and register your printer to the Epson Connect service. To use the Epson Connect services and other mobile services, you need to first register your printer. Before starting setup, check that your computer is connected to the Internet with a Wi-Fi or Ethernet network.
Epson Connect Guide Setting up the Services H For Windows A Select Mobile Print Services Setup from the installer’s main menu. Note: If you do not perform setup straight after the printer’s initial setup, follow the steps below. Follow the on-screen instructions to enter your account information. For more details on registering information, see “Creating your Epson Connect account ” on page 15.
Epson Connect Guide Setting up the Services G Click Register, when the user account registration screen is displayed. B Enter your account information. C When you have finished entering your account information, click Register. !Caution: If you do not finish registering a user account, you cannot use the Epson Connect service. If your printer supports the Scan to Cloud service, go to “3. Creating a Destination List for the Scan to Cloud service” on page 16.
Epson Connect Guide Setting up the Services Time Zone For more information on using Remote Print: & Epson iPrint: See “Using Epson iPrint over the Internet (Remote Print)” on page 30. & Epson Connect Remote Driver (Windows only): See “Epson Remote Driver (Windows only)” on page 31 Select the time zone in which the printer is located. Select to receive the date of print and scan logs. The time displayed is for Daylight Saving Time (summer time).
Epson Connect Guide Setting up the Services B Follow the on-screen instructions to launch the installer, and then connect your printer to the network. Continuously refer to the next section “Registering an additional printer”, and create your Epson Connect account and register your printer. Registering an additional printer You can perform the following procedure if you want to add a printer registered to the Epson Connect service.
Epson Connect Guide Setting up the Services 1. Basic printer setup First, connect your printer to the network so that it can be used from a computer. Follow the instructions in the “Start Here” setup guide to perform your printer’s initial setup and network setup. E Click Register, when the user account registration screen is displayed. F Follow the on-screen instructions to enter your account information. 2.
Epson Connect Guide Setting up the Services Install the ink cartridges Setup on the printer’s control panel Connect to the network Download and install Epson iPrint A Turn on the printer. B Open Web Config for the printer. C Tap Firmware Update, and then follow the instructions to update the printer’s firmware. D Tap Epson Connect Services. E The printer registration screen is displayed. To display Web Config, see “To open Web Config” on page 17 2.
Epson Connect Guide Setting up the Services F G The License Agreement is displayed. Tap Epson Connect Member Service Terms and Conditions, and read the information displayed. Select Accept, and then tap Next. The process for registering your printer to the Epson Connect service starts. 20 H Load paper into your printer, and then tap OK when the following screen is displayed. I Tap Register, when the user account registration screen is displayed.
Epson Connect Guide Setting up the Services J 4. Setting the Remote Print service Enter your account information, then tap Register. Before you can use the remote printing function, you need to enable Remote Print on the User Page. For more information on making settings, see “4. Setting the Remote Print service” on page 16. For more information about details that need to be filled in, see “Creating your Epson Connect account ” on page 15.
Epson Connect Guide Setting up the Services Registering a printer After creating your Google account, use Web Config to register your printer to Google Cloud Print. Sign in to Google using your account. A Navigate to google.com on your device, then click or tap Sign in. B Enter the email address and password, and then click or tap Sign in. C Open Web Config on your printer. & See “To open Web Config” on page 17.
Epson Connect Guide Using the Services Using the Services User Page functions Epson Connect Services ❏ Displaying the registered printer(s) list for Email Print This section explains how to use the Epson Connect services. Available services may differ depending on the model being used. See your regional Epson’s website to check which services are available for your printer. To view Epson’s website, select your country/region, and then click Go at the bottom-right of the Epson Connect portal website.
Epson Connect Guide Using the Services A ❏ Short Message Services (SMS) unique to mobile phone providers are not supported. Create an email and attach the photos or documents you want to print. Cancelling print jobs Note: ❏ Text in the body of the email will print separately from the attachment. ❏ B You can cancel printing after sending a print job. You can set whether or not to print the body of the email in Print Settings on the User Page.
Epson Connect Guide Using the Services B Select Print Log in Email Print from the menu on the left. C The print job is displayed. Click or tap Cancel in the Status column. D When the Status changes to Cancel, the print job has been canceled. D Click or tap Add Address or Add address from Print Log. Note: ❏ Your email address (username) is listed by default.
Epson Connect Guide Using the Services Depending on the model, the Scan to Cloud service may not supported. See your regional Epson website to check if the Scan to Cloud service is available for your printer. Change Print Settings When you select print settings, all emails are printed according to your settings. When multiple printers have been registered, you can select print settings for each printer.
Epson Connect Guide Using the Services C Select Scan to Cloud from the Scan mode menu. D Select the destination where you want to send your data. Checking the Scan Log You can check your scan jobs on the User Page. A Sign in to the User Page. Note: If multiple printers have been registered, select the printer you want to configure from the printer list. E Press Settings (or OK). F Make the scan settings you want to use. Available settings may differ depending on the model being used.
Epson Connect Guide Using the Services Installing Epson iPrint Download and install Epson iPrint from the App Store or from Google Play. This app is free and you can find it by searching for “Epson iPrint”. H Tap (iOS) or press the Menu button and Scan Settings (Android). I Check that the name of the printer you selected in step 5 is displayed. If it is displayed, tap Done and Home (iOS) or press Done and the Back button (Android).
Epson Connect Guide Using the Services Tap to delete a displayed photo. or Tap orientation. D to rotate the paper Tap (iOS), or press the Menu button and tap Print Settings (Android). A Tap Online Storage. B Tap Sign In at the top-right and sign in with your account. Select the print settings you want, and then tap Done. E Your files are displayed. Tap Print. Saved Documents Print documents stored in the document folder on your device. A Tap Saved Documents.
Epson Connect Guide Using the Services Scan Enable Remote Print in Epson iPrint Scan files to your device from a printer that supports Epson iPrint. You can even send scanned files by email or upload to an online storage service. You need to enable the Remote Print functions in Epson iPrint. A A Launch Epson iPrint. Place the original in the printer. B B Tap Epson Connect on the Home menu. Tap Scan. C C Tap Manage Remote Printers.
Epson Connect Guide Using the Services C D Select and display photos or documents that you want to print from each menu on the Home screen. Epson Remote Driver (Windows only) Note: For more information on the printing method, see each section in “Using Epson iPrint in a local Wi-Fi network” on page 28. By using Epson Remote Driver you can print files on a remote printer over the Internet from a computer connected to the network.
Epson Connect Guide Using the Services E Enter the printer’s email address. Settings for email notifications Note: ❏ You can check the printer’s email address using one of the following methods. - On the information sheet printed when you completed the setup for Epson Connect. - On the Printer List on the User Page. Email notifications are automatically sent to the printer’s owner or the sender of the email under the following conditions.
Epson Connect Guide Using the Services Sending email notifications to the sender of the email Note: ❏ The strings of Google website in this section may be changed. You can change email notification settings for the sender of the email in Approved Senders List on the User Page. ❏ For more information about Google Cloud Print, see the Google website. Printing from a computer The following is an example of using Google Cloud Print to print from Google Chrome.
Epson Connect Guide Using the Services E Click C at the top right, and then select Print. The print screen is displayed. Enter the email address and password, and then tap Sign in. Your ID (email address) is displayed in the same location as the Sign in. Note: Smartphones may not display your ID. D F Select Print with Google Cloud Print as the Destination. Select Gmail from the top of the screen.
Epson Connect Guide Using the Services F Click or tap Printers. B Tap G A list of the printers registered to Google Cloud Print are displayed. C Tap Print. D Tap Printer, and then select the printer. Sharing the printer A Select the printer you want to share. B Click or tap Share. C A list of users with access to the printer is displayed. Note: Once the printer has been detected, you do not need to set the printer the next time you connect to the same network.
Epson Connect Guide Using the Services D A Tap OK. Sign in to the User Page. Note: If multiple printers have been registered, select the printer you want to configure from the printer list. Suspending Services You can suspend services when you want (for example, when you want to prevent print jobs from being interrupted for the Email Print service). B Select Print Settings in Remote Print from the menu on the left. C Clear Enable Remote Print. D Click or tap Apply.
Epson Connect Guide Using the Services A Turn on the printer and check that it is connected to the network. E Select Yes, when the confirmation message is displayed. F The finish message is displayed. The Epson Connect or Google Cloud Print service is now suspended. When the printer is connected to the network, a network icon is displayed on the LCD screen. For more information about the network icon, see the documentation provided with the printer.
Epson Connect Guide Using the Services From the printer’s control panel Deleting your registered printers To delete a printer from the printer’s control panel, select Restore Default Settings for each service. You can delete your registered printers from the Epson Connect services by using Epson Connect Printer Setup from a computer or by initializing the services from the printer’s control panel. Note: ❏ The screen displays may differ from your actual printer, but the instructions are the same.
Epson Connect Guide Using the Services D E From Web Config Select Restore Default Settings. You can also delete a registered printer from Web Config. Select Yes when the confirmation message is displayed. A Open Web Config on the printer. & See “To open Web Config” on page 17. B Click or tap Epson Connect Services or Google Cloud Print Services. C Click or tap Delete. D Click or tap OK when the confirmation message is displayed. E The complete screen is displayed.
Epson Connect Guide Using the Services Notes on Transferring or Disposing of the Printer Private information may be registered to the printer, and the printer itself has a unique email address assigned to it by the Epson Connect service. When transferring or disposing of the printer, we suggest that you delete all private information. Private information on the printer Network setup information and telephone numbers (for fax capable models) are registered to the printer itself.
Epson Connect Guide Troubleshooting Troubleshooting Email is not received Restrictions ❏ Email rejected because sender not registered to the Approved Senders List: The email sender’s email address is not on the Approved Senders List. Register the sender’s email address to the Approved Senders List, and then re-send the email. For more information on the Approved Senders List, see “Enabling and editing the Approved Senders List” on page 25.
Epson Connect Guide Troubleshooting ❏ The printer owner has suspended the Email Print service: The printer owner has suspended the Email Print service for the printer. When you enable Email Notifications on the User Page, the server notifies the sender of the email when this error occurs. ❏ The print job was deleted: The print job was deleted from the Print Log by the printer’s owner.
Epson Connect Guide Troubleshooting Scan to Cloud Epson iPrint (3.x) Cannot scan The printer is not found in the local network ❏ The Destination List is not set: Before you can use the Scan to Cloud service, you need to create a Destination List on the Epson Connect User Page. ❏ The printer or the wireless router are off: Check that the printer and the wireless router are on and connected to the network.
Epson Connect Guide Troubleshooting ❏ The printer is connected to a dedicated Ipv6 network: You cannot use this function on a network that is only for IPv6. ❏ The printer is connected to a dedicated Ipv6 network: You cannot use this function on a network that is only for IPv6. If the network supports IPv4 and IPv6, this function connects using IPv4. If the network supports IPv4 and IPv6, this function connects using IPv4.
Epson Connect Guide Troubleshooting ❏ The printer is connected to a dedicated Ipv6 network: You cannot use this function on a network that is only for IPv6. Select Firmware Update from Web Config, and then check that the printer is using the latest firmware version. The printer does not appear in the list If the network supports IPv4 and IPv6, this function connects using IPv4. ❏ The printer is not registered. You need to register the printer to the Google Cloud Print service in advance.
Epson Connect Guide Appendix Copyrights Appendix ❏ Microsoft , Windows , and Windows Vista are registered trademarks of the Microsoft Corporation. ® System Requirements ® ® ❏ Apple, Mac OS, and Macintosh are trademarks of Apple Inc., registered in the U.S. and other countries. AirPrint and the AirPrint logo are trademarks of Apple Inc. The Epson Connect service is available under the following conditions. Operating system ❏ Wi-Fi is a registered trademark or trademark of the Wi-Fi Alliance.