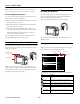
Epson P-3000/P-5000 Viewer Parts SD card slot CompactFlash card slot Memory card access light CF card slot Host USB connector (for camera, flash drive, etc.) eject button Device USB connector A/V Out connector (for computer) Headphone connector Rubber cover Power switch with Hold function .
Epson P-3000/P-5000 Interface Specifications USB connector Two high-speed USB 2.0 (Mass Storage Class) interfaces: Standard A, Mini-B General CPU TMS320DM320 A/V Out connector Quadrupole mini pin jack (3.5 mm) LCD 4.0 inches, Epson Photo Fine Ultra TFT LCD; 640 × 480 pixels; 16,770,000 colors Headphone Out connector Quadrupole mini pin jack (3.5 mm) Memory 64MB SDRAM; 4MB flash ROM CF Card slot HDD 2.5 inch HDD 40GB (P-3000); 80GB (P-5000) One slot (Type I/Type II, 3.
Epson P-3000/P-5000 4. Push the latch down. The battery pops out. Installing/Replacing the Battery Follow these steps to install or replace the Lithium ion battery: 1. Turn the viewer upside down and slide the battery cover to the right to open it. 5. Pull out the battery. Then close the battery cover. BAT T. 2. If you need to remove the battery, follow the instructions below, then return here to step 3. 3. Insert the battery into the compartment in the direction of the arrow on the battery.
Epson P-3000/P-5000 Note: The battery may become hot when the viewer is operated during charging. Charging will stop until the battery cools down. Locking the Buttons Conserving Battery Power You can lock the buttons on the viewer. This allows you to place it in a purse or backpack and use it with headphones without accidentally pressing the buttons. To conserve battery power and protect the LCD screen, the viewer has three power-saving features. To lock the buttons, slide the power switch to Hold.
Epson P-3000/P-5000 Icon Using the CF Card Slot Function My Videos View folders and play videos that you have copied into the Videos folder. See page 10. My Photos View folders and files that you have copied into the Photos folder. See page 8. Backup Files View folders and files backed up from memory cards or USB devices. Memory Card View files on memory cards or copy the files to the viewer. See page 6. USB Device Copy files to or from a USB device. See page 13.
Epson P-3000/P-5000 To remove a card from the Copying All Files SD Card slot, first make sure 1. Insert the memory card. the memory card access light is off. Then press the top of the card to make it pop up. Pull the card out of the slot. If the Memory Card Menu doesn’t open automatically, select Memory Card in the Home screen, then press OK.
Epson P-3000/P-5000 4. Press the Menu button to display the pop-up menu. Folder is set as screen saver 5. Select Backup, then press OK. Small white check boxes appear on each thumbnail image. My Photos Private folder PV 01002000 Check box 2006.1217 2006.1205 2006.1201 Vista.JPG ❏ By default, unsupported files are not displayed. 6. Use the 4-way ring to highlight each photo you want to copy, then press the button to select it. The selected items are displayed with red check marks.
Epson P-3000/P-5000 Using the Pop-up Menu 3. Select the folder containing the images you want to view, then press OK. You see a screen like this: Press the Menu button at any time to display a menu of the options currently available. These options vary, depending on what you are doing with the viewer. The following table summarizes the menu functions: Audio Track Setting Selects the audio track for DivX videos that have multiple tracks. Copy/Move Copies or moves files or folders.
Epson P-3000/P-5000 3. To view the over- and under-exposure preview, press Display a third time: Viewing Videos The viewer supports video files in resolutions ranging from 320 × 240 pixels to 720 × 576 pixels, with file sizes up to 2GB. Supported video formats File format Video codec Audio codec Detail .avi MPEG-4 (Advanced Simple Profile) AAC, G.711, PCM, ADPCM 30 fps: 720 × 480 25 fps: 720 × 576 8 Mbps (peak) 4 Mbps (avg.) Motion JPEG G.
Epson P-3000/P-5000 Playing Videos 2. Connect the mini-plug on the other end to the A/V Out connector on the side of the viewer. The LCD screen turns off. You can transfer video files directly from memory cards as described on page 6. Or you can copy and convert video files from your computer, as described on page 13. 1. Use the 4-way ring to select Backup Files or My Videos, then press OK. 2. Select the folder containing the video you want to play, then press OK. 3.
Epson P-3000/P-5000 Supported Audio Formats 5. Click My Music on the screen, then locate the audio files you want to copy from your computer. The viewer can store up to 10,000 audio files. It supports the following audio formats without copyright protection and with a maximum file size of 100MB: Audio file extensions Audio codec Details .m4a AAC (MPEG4) .mp3 MP3 (MPEG 1/2/2.5 Layer 3) Maximum bit rate: 320 kbps (48 kHz, 16 bit Stereo) .
Epson P-3000/P-5000 Backing Up Files to Your Computer 4. Select the desired track using the 4-way ring, then press OK. You can back up files to your computer automatically or manually. 1. Double-click the open the program. Epson Link2 icon on your desktop to 00001/00568 You can do the following while listening to music or audio files. ❏ To play or pause music, press OK. ❏ To adjust the volume, press or . ❏ To skip back or forward, press left or right on the 4-way ring.
Epson P-3000/P-5000 Copying Files From Your Computer to the Viewer Connecting a USB Device Before you connect a USB device, connect the AC adapter to the viewer and plug it in if possible. If your USB device has an AC adapter, use it to prevent the possible loss of files during transfer. You can copy photos, videos, and music from your computer to the viewer. For instructions on copying music, see page 10.
Epson P-3000/P-5000 3. Press the Menu button. 3. Press the Menu button to display the pop-up menu. 4. Select Backup, then press OK. Small white check boxes appear on each thumbnail image. My Photos/2006.1205 Copy/Move Edit Rate EPV2014.JPG EPV2171.JPG EPV2242.JPG Sort Photo Print Wallpaper and Icon Settings Slide Show EPV2273.JPG EPV2279.JPG EPV2283.JPG Settings Return to HOME Delete 5. Use the 4-way ring to highlight each file you want to copy, then press the button to select it.