® Auto Take-up Reel Unit User’s Guide English . . . . . .
All rights reserved. No part of this publication may be reproduced, stored in a retrieval system, or transmitted in any form or by any means, electronic, mechanical, photocopying, recording, or otherwise, without the prior written permission of SEIKO EPSON CORPORATION. The information contained herein is designed only for use with this EPSON product. EPSON is not responsible for any use of this information as applied to other products.
English Safety Instructions For United Kingdom users Use of options Important safety instructions Read all of these instructions and save them for later reference. Follow all warnings and instructions marked on the unit. ❏ Do not place the unit near a radiator or heat source. ❏ Unplug the printer before cleaning. Clean with a damp cloth only. Do not spill liquid on the unit. ❏ Except as specifically explained in this guide, do not attempt to service the unit yourself.
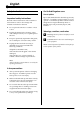
Checking the Package Contents Make sure that all the items shown below are included and not damaged. Remove all protective materials packed with this unit before you set it up and turn on the power. Save all packaging and protective materials in case you need to transport the printer later. Drive unit (with control box) Movable unit Installing the Auto Take-Up Reel Unit c Caution: Use only the provided screws when installing the auto take-up reel unit.
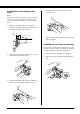
Installing the drive unit Installing the movable unit 1. Attach the drive unit on the horizontal strut as shown below. 1. Turn the lock lever to the left to release it. 2. Tighten the two screws to attach the drive unit to the printer securely. 2. While holding the movable unit, attach the movable unit stopper on the bottom of the movable unit. Snap the two protrusions of the stopper into the movable unit, so the stopper does not fall off. 3.
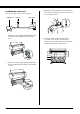
Installing the sensor unit The sensor components are shown below. Light detector Connector Light emitter 1. Set the sensor unit’s light emitter in the bottom of the drive unit, and then secure it with a screw. 2. Set the sensor unit’s light detector in the base unit’s bottom left side, and then secure it with a screw. 4 3. Plug the connector of the sensor unit cable into the socket located at the top rear of the control box on the drive unit. 4. Fasten the cable using the cable clamps provided.
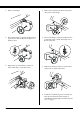
Installing the 3-inch take-up reel core 4. Turn the lock lever to the front to lock the movable unit. Note: If you want to install a 2-inch take-up reel core instead, see the next section for instructions. Also you can reuse the core from a used paper roll. See your Online Guide. 1. Make sure that the lock lever is released (turned to the left). Slide the movable unit to the left end of the horizontal strut. The installation of the 3-inch auto take-up reel unit is complete.
3. Remove the flange. 6. Remove the fastener from the movable unit. Next, remove the flange. 4. Reverse the flange so that the smaller knob is positioned on the outside, then replace it on the drive unit. 7. Reverse the flange so that the smaller knob is positioned on the outside, then replace it on the movable unit. 5. Replace the cap and fastener, which you removed in step 2, on the drive unit. 8. Replace the fastener, which you removed in step 6, back on the movable unit. 9.
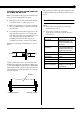
Using the core from a used paper roll as a take-up reel core The installation of the Auto Take-up Reel Unit is complete. When you use the unit, see the Reference Guide. Before you install a used paper roll as the take-up reel core, note and check the following: ❏ If the paper roll core is deformed or damaged, it cannot be used as a take-up reel core. Specifications ❏ Make sure that there is no looseness between the core and the flanges on the drive unit and movable unit.
8
Printed in Japan 00.