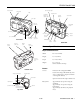
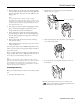
EPSON PhotoPC 800 shutter button camera status light camera dial flash display panel viewfinder and photo capture light camera dial lock camera dial timer light video out connector hand strap holder viewfinder lens cover switch lens AC adapter connector interface connector front view memory card cover tripod socket microphone + button LCD screen − button MENU button ISO button battery cover W.B.
EPSON PhotoPC 800 Technical Environmental Product type 2.14 megapixel CCD (charged coupled device) still frame auto focus camera CCD 0.5 inch color area CCD (2.
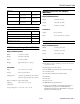
EPSON PhotoPC 800 Flash range: Sensitivity setting Normal distance 2× zoom Std. (ISO 100) 1.6 to 11.2 ft (0.5 to 3.4 m) 1.6 to 11.2 ft (0.5 to 3.4 m) Med. (ISO 200) 1.6 to 16.1 ft (0.5 to 4.9 m) 1.6 to 16.1 ft (0.5 to 4.9 m) High (ISO 400) 1.6 to 22.6 ft (0.5 to 6.9 m) 1.6 to 22.6 ft (0.5 to 6.9 m) Optional Universal AC Adapter (B867062) Physical Dimensions Width 1.7 inches (43 mm) Height 1.22 inches (31 mm) Depth 4.
EPSON PhotoPC 800 Minimum System Requirements Using Batteries To transfer images to your computer and edit them, make sure your system meets these minimum requirements: Your EPSON PhotoPC 800 comes with a charger (Model EU-38) and four rechargeable NiMH batteries (Model EU24) that can be recharged hundreds of times. While you use two batteries in your camera, you can keep a replacement set of batteries charged and ready to take along.
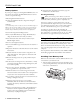
EPSON PhotoPC 800 2. Hold the battery cover lock button down and slide the battery cover out to open it. 3. Plug the charger into an electrical outlet. The charger light turns red, indicating that the charger is working. When the batteries are charged, after about two and a half hours, the light goes off. Note The charger light flashes to indicate changes in battery temperature and voltage.
EPSON PhotoPC 800 ❏ Battery life varies depending on the battery type, the manufacturer, and other factors. Battery Options If you forget to charge your rechargeable NiMH batteries or if they need to be replaced, the EPSON PhotoPC 800 camera can also accept the following: Checking the Battery When your battery power is almost out, the low battery icon appears on the status display panel. The icon flashes when your battery power is completely out.
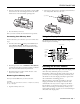
EPSON PhotoPC 800 2. Insert the card all the way into the memory card slot. Make sure the front of the card is facing the front of the camera, and the arrow on the card’s label is pointing down. 2. Press the eject button next to the memory card and remove the card by hand. Then close the cover. eject button 3. Close the memory card cover. Next, you need to format the card. Follow the steps below. Using the Display Panel Formatting Your Memory Card You should format your card before you use it.
EPSON PhotoPC 800 In quick shot mode, the number of photos taken and temporarily saved in the camera is displayed in brackets. Note Slow synchronized flash is available only in the Program or Manual user modes. See page 9 for information about changing the user mode. In Program or Manual mode, the exposure value appears on the left and the shutter speed appears on the right when you hold the shutter button down halfway. After you take a flash picture, the icon blinks until the flash is fully recharged.
EPSON PhotoPC 800 HyPict Use this setting to play back your photos so that you can delete them or add audio recordings to them. Produces color or black and white images at 1984 × 1488 pixels (interpolated) with moderate compression. Your pictures include excellent detail, and the CompactFlash card holds approximately 10 pictures. These images are best for enlarging for 8 × 10-inch prints. Use to print directly from your camera to an EPSON ink jet printer.
EPSON PhotoPC 800 2. Open the lens cover, then turn the camera dial to to see the View screen. Depending on your user mode (see page page 9), you’ll see a preview of your picture with the following photo options: Follow these steps to choose the camera mode: 1. Push the camera dial lock in and turn the dial to see the SETUP menu. . You set user mode View screen for Full Auto mode 2. Press the + button to cycle through the three modes.
EPSON PhotoPC 800 converted, and uploaded. You can create and show a presentation without printing overhead transparencies or slides, and without a laptop computer. 4. If you’re using the Full Auto user mode, you’re ready to take your picture. Go to step 5.
EPSON PhotoPC 800 You can use the camera’s slide show feature to play your images automatically, or play them one at time using the navigation buttons. You can use all of the camera’s other playback features to show your presentation. Using the USB Cable Follow these steps to connect your camera using the USB cable: 1. Plug the cable connector on the USB cable into the USB port on your computer, or into a port on a USB hub.
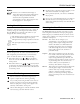
EPSON PhotoPC 800 2. Line up the serial connector on the cable with one of the serial ports on your computer, and insert the connector. Then tighten the screws. Note If you’re sharing a serial port that you use for another device, make sure AppleTalk™ is turned off. Your Macintosh may not recognize the camera if AppleTalk is on. Also, if you have problems connecting to the printer port, use the modem port instead. 3. Open the connector cover on the side of the camera.
EPSON PhotoPC 800 ❏ To clean the lens, first blow off any loose dust or dirt. Then breathe on the lens and wipe off all moisture with a soft, lint-free cloth or lens cleaning tissue. To avoid scratching the lens, don’t press too hard. Selecting a Print Format To go to the Direct Print main menu, do the following: 1. Turn the camera dial to . ❏ If necessary, clean the battery contacts with a dry cloth. 2. Press the top button (next to DirectPrint).