
User guide


EPSON PhotoPC 800
10 -
EPSON PhotoPC 800 6/99
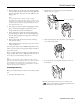
Follow these steps to choose the camera mode:
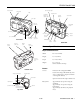
1. Push the camera dial lock in and turn the dial to . You
see the SETUP menu.
2. Press the + button to cycle through the three modes.
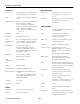
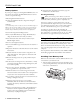
Using the Camera SETUP Menu
You can use the Camera SETUP menu to turn audio
recording on or off, set the automatic power off feature, adjust
the brightness of the LCD screen, set the alert beep, and create
a user-defined white balance.
To go to the Camera SETUP menu, turn the camera dial to
to go to the Setup menu (pictured above). Then press the
MENU
button (under
Camera SETUP
).
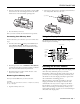
Taking Pictures With the LCD Screen
Once you’ve made any changes to the Setup and Camera
SETUP menus, you’re ready to take pictures with the LCD
screen. Follow these steps:
1. Make sure you’re at least 20 inches away from your subject.
(If you want to get closer, use macro mode.)
2. Open the lens cover, then turn the camera dial to to see
the View screen. Depending on your user mode (see page
page 9), you’ll see a preview of your picture with the
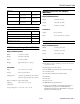
following photo options:
3. Make any changes you want to settings on the View screen
by pressing the button next to or below that setting.
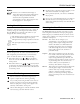
set user mode
set
automatic
power off
set LCD
brightness
create a
user-
defined
white
balance
set alert beep
t
urn audio recording on and off
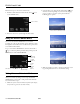
View screen for Full Auto mode
View screen for Program mode
View screen for Manual mode