EPSON ® Personal Document Station @ Printed on recycled paper with at least 10% post-consumer content
A Note Concerning Responsible Use of Copyrighted Materials Like photocopiers, scanners can be misused by improper copying of copyrighted material. Although Section 107 of the U.S. Copyright Act of 1976 (Title 17, United States Code), the “fair use” doctrine, permits limited copying in certain circumstances, those circumstances may not be as broad as some people assume.
Introduction This package contains everything you need for professional quality document scanning and processing: EPSON ® Personal Document Station™ (ES-300GS) scanner, which scans in 8 bit monochrome grayscale at up to 400 dpi and includes a built-in document feeder and an attachable business card guide Bidirectional parallel interface card, which provides an additional parallel interface for your computer Bidirectional parallel interface cable Xerox® Desktop Document Management Suite© for Microsoft© Windo
This booklet tells you how to set up your scanner, install the software, and scan a document. For additional instructions, see the manual for the ES300GS scanner and the manuals, quick reference cards, and on-line help utilities for the Desktop Document Management Suite. System and Memory Requirements For the scanner hardware and software to work properly, your system must include the following minimum configuration: A 386-based (or higher) IBM@ compatible computer or an IBM PS/2® MS-DOS®version 5.
Installing the Parallel lnterface Card Follow the steps in this section if you need to install the bidirectional parallel interface card in your computer. You may also need to configure the card before you install it. Some computers come with a built-in bidirectional parallel interface. You do not need to install the parallel interface board if your computer has a built-in interface that you are not currently using.
Carefully remove the interface board from its packaging, holding it only by its top edges. Then place it on a flat, clean surface. Caution: Avoid touching the components or the gold contacts on the interface board; they can be damaged by static electricity. Locate jumpers J1 and J2 on the interface board, as shown below. IRO7 IRQ5 1 2 3 J2 7 GJ”- 0 000 O0 01°1 0 000 The settings are printed on the circuit board next to the jumpers.
Installing the Card Follow these steps to install the card in your computer: 1. Turn off the computer and any peripheral devices. 2. Disconnect the computer’s power cable from the electrical outlet and from the back panel. Also disconnect any other cables, including the keyboard cable. 3. Remove the cover from your computer. If you need detailed instructions, see your computer manual. 4.
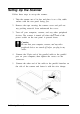
Settng Up the Scanner Follow these steps to set up the scanner: 1. Take the scanner out of its box and place it on a flat, stable surface with the rear panel facing you. 2. Remove the tape securing the scanner cover and pull out any packing material from underneath the cover. 3. Turn off your computer, scanner, and any other peripheral devices. The scanner is turned off when the 0 end of the power switch on the rear panel is pressed down.
6. Connect the scanner’s power cable to the power inlet on the rear of the scanner and plug the other end into a grounded electrical outlet. 7. Turn the scanner around and lift up the cover.
8. Turn on the scanner by pressing the end of the power switch. The green Power light on the top right side of the scanner comes on. The Ready light also flashes while the scanner warms up. 9. Turn on your monitor and all your other peripheral devices. Then turn on the computer. (Always turn on the scanner before the computer.) The scanner’s Ready light goes out when you turn on the computer and then comes on again once the computer boots.
The next screen asks you for the directory in which you want to install the program files. Accept the default directory or delete it and enter a new directory. Installation Options [nstallation Directory C:WDMS q OCR OK 640 K H File Management q Space Space Install personal Cabinet Required: Available: 640 K 52612 K Checkboxes on this screen let you exclude certain components of the program from the installation process.
10. If you selected not to install the File Management or Personal Cabinet components in step 6, skip to step 11. Otherwise, you see the Visual Recall Setup screen. Accept the default directory in which to install the program files or delete it and enter a new directory. Then choose OK. 11. The program begins copying files to your hard disk drive and prompts you to insert the rest of the diskettes. Follow the instructions on the screen. 12.
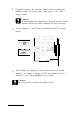
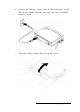
Scanning Documents Now you are ready to start scanning using the built-in document feeder. For instructions on using the attachable business card guide, see your ES3OOGS User's Guide. When scanning documents, respect the rights of the copyright holders. Don’t scan published materials without first checking the copyright status. 1. First, select a multiple page document to scan (up to 10 pages on standard bond paper). Make sure all the pages are the same size and paper weight.
3. Fan the edges of your document; then level the stack by tapping it on a flat surface. 4. Hold the document with the side to be scanned facing down and guide it into the scanner’s document feeder, as shown. 5. Adjust the paper guides to fit the width of the paper. The scanner feeds the first page into scanning position. 6. Start Windows. You see the Xerox DDMS Control Panel window, shown below, and the Paper Sensor icon on your Windows desktop.
After a few moments, the Xerox Scanning Interface dialog box appears as the active window. Note: The Xerox Scanning Interface dialog box appears automatically only after the Paper Sensor detects paper loaded in the scanner. For this first scan, do not adjust any of the other image settings available in the dialog box. Choose Scan. The scanner reads the first page, and after a moment a scanned image of the page appears in the Preview area, the large rectangle in the dialog box.
10. Click Done. You see the Xerox Image Manager window. From the Image Manager, you can save your scanned document to a file, or print, fax, or e-mail the document without saving it. See the manuals, quick reference cards, and on-line help utilities that came with the Desktop Document Management Suite to process your scanned image using the various program components.
Follow these steps to install the driver and print the README file : 1. Insert the EPSON PDS TWAIN Driver diskette in a diskette drive. 2. From the Windows Program Manager, select Run from the File menu. You see the Run dialog box. 3. In the Command Line box, type A: SETUP (or B: SETUP) and choose OK. 4. At the installation program title screen, choose OK. 5. At the next screen, confirm or correct the Windows directory and choose OK. The program installs the driver files. 6.
Call the EPSON Connection for the following: 0 Technical assistance with the installation, configuration, and operation of EPSON products 0 Assistance in locating your nearest Authorized EPSON Reseller or Customer Care Center 0 Customer relations 0 EPSON technical information library fax service 0 Product literature on current and new products. You can purchase ink cartridges, paper, parts, and accessories for EPSON products from EPSON Accessories at (800) 873-7766 (U.S. sales only).