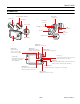
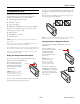
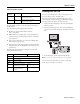
Epson P-2000 P-2000 Parts Audio/Video out connector CompactFlash® card slot SD card slot Eject button Headphone connector Power switch AC adapter connector USB connector Speaker USB connector cover Battery cover Reset button LCD Print button Displays the Print menu. Charge light Turns green when the battery is being charged. Access light Flashes orange when you turn on the P-2000 or access data. Menu button Displays the Pop-up menu.
Epson P-2000 Interface Specifications USB connector One USB 2.0 (Mass Storage Class) interface General CPU TMS320DM270 A/V Out connector Mini pin jack (3.5 mm) LCD 3.8 inches, Epson VGA TFT LCD; 640 × 480 pixels; 262,144 colors; 212 ppi Headphone Out connector M3 stereo mini pin jack (3.5 mm) Memory 64MB SDRAM; 4MB flash ROM CF Card slot HDD 2.5 inch HDD, 40GB, FAT 32 One slot (Type I/Type II, 3.3V) for CompactFlash memory card and Microdrive Dimensions (without projections) Height 3.
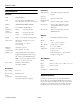
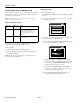
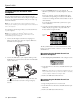
Epson P-2000 Installing/Replacing the Battery 4. Push the catch down. The battery pops out. Follow these steps to install or replace the Lithium ion battery: 1. Turn the P-2000 upside down and slide the battery cover to the left to open it. Catch 5. Pull out the battery. Then close the battery cover. 2. If you need to remove the battery, follow the instructions below, then return here to step 3. 3. Insert the battery into the compartment as shown. Make sure the gold contacts on the battery go in first.
Epson P-2000 Conserving Battery Power To conserve battery power and protect the LCD screen, the P-2000 has two power-saving features. If no button has been pressed and there has been no activity for 10 minutes, the backlight on the LCD screen is turned off. After 15 minutes, the power is turned off. Using the Home Screen Whenever you turn on the P-2000, the Home screen appears. All operations can be started from this screen.
Epson P-2000 To remove a card from the C/F Card slot, first make sure the Access light is off. Then press the eject button and pull out the card. Using Memory Cards The P-2000 has two memory card slots, one for CompactFlash cards, and one for Secure Digital cards. It supports the following types of memory cards: If the button is not sticking out, press it once to pop it out, then press it again to eject the card. ❏ CompactFlash Type I and Type II ❏ Microdrive™ (3.
Epson P-2000 Copying Files from a Memory Card Copying your files After you insert a memory card, you can browse the files and decide what you want to do with them, or simply copy all the files on the card to the P-2000. 1. Insert the memory card. Note: When the battery is low, copying may not be completed. Use the AC adapter if this happens. 2. Select Memory Card in the Home screen and press the OK button. 3. If necessary, select the memory card you want to access.
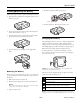
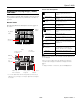
Epson P-2000 Viewing and Playing Images, Audio, and Video Screen icon descriptions After you have copied files from a memory card, you can view or play them in various ways on your P-2000 or on a TV or projector. PC_DATA folder This is one of the default albums, which you use for copying files from your computer. Battery status Indicates the amount of battery power remaining. Folders containing audio Only folders that do not include image or video files display this icon.
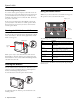
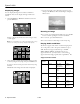
Epson P-2000 Displaying Images You can display all images in Saved Data or Albums as thumbnails. You can also display an image in full-screen format. 3. Use the 4-way ring to select the image you want to view, then press the OK button. The selected image is enlarged to fill the screen: 1. Select Saved Data or Albums in the Home screen and press the OK button. Home Saved Data Albums Memory Card Zooming an image Latest Data Settings ❏ To zoom in on an image displayed full screen, press the OK button.
Epson P-2000 Supported audio formats Viewing Files on a TV File extension Audio codec Detail .m4a .aac AAC (MPEG4) Maximum bit rate: 320 kbps (48 kHz, 16 bit Stereo) .mp3 MP3 Maximum bit rate: 320 kbps (48 kHz, 16 bit Stereo) To start playing an audio or video file, just select it and press the OK button. Note the following when playing video and audio: ❏ All videos are played with the LCD resolution (640 × 480 pixels).
Epson P-2000 Copying Files to and From Your Computer 3. Select the EPSON_PV drive on your computer. In Windows, you may have to use My Computer to select the drive. From your computer, you’ll see an Albums folder and a Cards folder (corresponding to Saved Data on the Home screen). Do not change the names of these folders or any of their subfolders. You can connect the P-2000 to your computer using the USB cable that came in the box.
Epson P-2000 4. Connect the other end of the cable to the EXT I/F connector on the printer. Direct Printing You can print your photos directly from the P-2000 to any of the following Epson printers without connecting a computer: ❏ Epson Stylus Photo R300 and R300M ❏ Epson Stylus Photo R320 ❏ Epson Stylus Photo RX600 ❏ PictureMate Note: Additional printers may be supported; check the Epson web site to get the latest information: http://support.epson.com.
Epson P-2000 4. Do one of the following: ❏ To print only the selected image, choose Print This Photo. ❏ To print all the images in the selected folder or album, select Print All Photos. ❏ To add images to be printed and select the number of copies, choose Select Photos to Print. You see this screen: Select Photos for print order Updating the Firmware and Printer Driver Epson will occasionally update the P-2000 firmware. You can download the latest version from Epson’s Support web site: http://support.