quickrefset.book Page 1 Thursday, April 20, 2000 3:36 PM Quick Reference Guide This book provides a quick reference to using your camera. It covers the camera’s basic features and includes helpful tips for taking pictures in various locations.
quickrefset.book Page 2 Thursday, April 20, 2000 3:36 PM IMPORTANT NOTICE DISCLAIMER OF WARRANTY Epson America makes no representations or warranties, either express or implied, by or with respect to anything in this manual, and shall not be liable for any implied warranties of merchantability and fitness for a particular purpose or for any indirect, special, or consequential damages. Some states do not allow the exclusion of incidental or consequential damages, so this exclusion may not apply to you.
quickrefset.
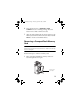
quickrefset.book Page 1 Thursday, April 20, 2000 3:36 PM Installing Batteries Your camera includes a battery charger and a set of new, uncharged batteries. See your User’s Guide for battery charging and safety instructions, then follow these steps to install the charged batteries: 1 Hold the camera upside-down. 2 Press and hold the battery cover lock down and slide the cover out to open it.
quickrefset.book Page 2 Thursday, April 20, 2000 3:36 PM 3 Insert four batteries into the compartment, positioning the + and − ends as shown below. 4 Lower the battery cover and slide it in.
quickrefset.book Page 3 Thursday, April 20, 2000 3:36 PM Camera Dial Settings To turn on the camera, remove the lens cap, then press the POWER button in the center of the dial. (Press it again to turn the camera off.) The following table describes camera dial settings. Use for video clips to capture motion, for interval mode to photograph scenes that change over time, and for continuous shooting mode to capture pictures in rapid succession. Take pictures using the LCD screen.
quickrefset.
quickrefset.book Page 5 Thursday, April 20, 2000 3:36 PM Status Display Panel Settings (Continued) Low Battery Icon Indicates that the camera batteries are low. Monochrome Indicator*** Indicates that the camera is set to monochrome (black and white) mode. Sensitivity Settings** White Balance Settings** AUTO Adjusts white balance automatically. Standard (ISO 100) High (ISO 200) Super High (ISO 400) Exposure Settings** Changes the automatic exposure setting from −2.0 to +2.0 EV in increments of 0.
quickrefset.book Page 6 Thursday, April 20, 2000 3:36 PM Formatting Your CompactFlash Memory Card To take photos, a CompactFlash™ memory card must be in your camera and formatted. Your camera comes with a preinstalled 16MB memory card that you must format before you take pictures. Follow these steps: 1 Press down the POWER button to turn on the camera and turn the camera dial to . 2 If you haven’t set the clock yet, you see the clock setting screen with the year highlighted in red.
quickrefset.book Page 7 Thursday, April 20, 2000 3:36 PM 6 Press the button next to MEMORY CARD FORMAT. You see a warning message. Press the button next to Yes to format the card. 7 After the card is formatted, the camera returns to the Memory Card Format menu. Press the button under BACK to return to the SETUP menu. Removing a CompactFlash Memory Card CAUTION Never remove the card while the camera is on. Data in the card may be lost or damaged.
quickrefset.book Page 8 Thursday, April 20, 2000 3:36 PM 2 Push the eject button in to release the card. Then pull the card out and close the cover. eject button Installing a CompactFlash Memory Card You can purchase additional CompactFlash memory cards (Type I, 4MB to 192MB) from leading suppliers. See your User’s Guide for more information. Follow these steps to install a memory card: 1 Make sure the camera is turned off. (Press the POWER button to turn the camera off, if it is on.
quickrefset.book Page 9 Thursday, April 20, 2000 3:36 PM 2 Place your finger behind the memory card cover latch and pull the cover open. memory card cover latch 3 Insert the card all the way into the memory card slot. Make sure the front of the card is facing the same direction as the front of the camera, and the arrow on the card’s label is pointing in. As you insert the card, the eject button pops up. 4 Close the memory card cover.
quickrefset.book Page 10 Thursday, April 20, 2000 3:36 PM If you install a new memory card, make sure you format it before you start taking pictures. See page 6 for instructions. Taking Pictures If you prefer, you can take pictures using the viewfinder. Or, you can take pictures with the LCD screen to see a preview of how your image will appear.
quickrefset.book Page 11 Thursday, April 20, 2000 3:36 PM Taking Pictures With the Viewfinder Use the camera’s viewfinder to capture an image as you would with any point-and-shoot auto-focus camera. viewfinder status display panel control buttons shutter button photo capture light telephoto button wide angle button menu button Make sure the lens cap is not on the camera, then follow these steps: 1 Make sure you are at least 20 inches (50 cm) away from your subject.
quickrefset.book Page 12 Thursday, April 20, 2000 3:36 PM NOTE To change the programmed subject setting (when the user mode is set to Program), or make changes to exposure, white balance, or other advanced settings, press the MENU button to see the Viewfinder menu. (See your User’s Guide for details.) 4 Look straight through the viewfinder and center your subject within the cross-hairs. 5 Push the T (telephoto) button to zoom in on your subject, or the W (wide angle) button to zoom out.
quickrefset.book Page 13 Thursday, April 20, 2000 3:36 PM Taking Pictures With the LCD Screen The LCD screen lets you see a live preview of what the camera’s lens sees at any moment. control buttons shutter button photo capture light microphone telephoto button wide angle button LCD screen Make sure the lens cap is not on the camera, then follow these steps to take a picture using the LCD screen: 1 Make sure you are at least 20 inches (50 cm) away from your subject. NOTE You can get as close as 2.
quickrefset.book Page 14 Thursday, April 20, 2000 3:36 PM 2 Press down the POWER button and turn the camera to see a live preview with the View menu dial to settings. This example shows how the LCD screen looks in Program user mode. The screen looks different in Manual or Full Auto mode. (See the inside back cover to change the user mode.) NOTE If the camera is idle for more than the designated power off interval, it turns off automatically.
quickrefset.book Page 15 Thursday, April 20, 2000 3:36 PM 5 Center your subject on the screen, then press the shutter button halfway down to lock the auto focus and exposure. You see a green circle on the screen when the camera locks the settings. 6 Press the shutter button the rest of the way down to take the picture. 7 Hold the camera still until the shutter snaps. Then release the shutter button. If the confirmation setting is on, you see a confirmation screen after a few seconds.
quickrefset.book Page 16 Thursday, April 20, 2000 3:36 PM ◗ Press the button next to Rec Sound to record a voice message or other sound. You see a countdown on the screen. During this time, you can record a message into the camera’s microphone. ◗ Press the button next to to instantly play back your images. (Press the button under BACK to return to the View menu.) For more detailed instructions on using the confirmation screen, see your User’s Guide.
quickrefset.book Page 17 Thursday, April 20, 2000 3:36 PM Follow these steps: 1 Press down the camera’s POWER button to turn on the camera, and turn the camera dial to . You see the playback screen displaying the last picture you took: 2 Press the button next to the right arrow to display the earliest picture taken. You can continue pressing the same button to view your pictures in order. Or, press the button next to the left arrow to move backward through your pictures.
quickrefset.book Page 18 Thursday, April 20, 2000 3:36 PM 3 You see a confirmation screen. Press the button next to Yes to delete the image. You can also delete multiple photos or lock and unlock photos for deletion; see your User’s Guide. Capturing Video Clips Make sure the lens cap is not on the camera, then follow these steps to capture 25-second video clips: 1 Press the POWER button down to turn on your camera and turn the camera dial to .
quickrefset.book Page 19 Thursday, April 20, 2000 3:36 PM 3 Push the T (telephoto) button to zoom in on your subject, or the W (wide angle) button to zoom out. You see a display with green zoom steps and the current zoom position in yellow. Make sure you are zoomed to the position you want; you can’t change the zoom setting once you’ve started recording. 4 Press the shutter button to begin recording your video clip. If you want to stop the recording, press the shutter button again.
quickrefset.book Page 20 Thursday, April 20, 2000 3:36 PM Playing Back Video Clips Follow these steps to play back your video clips: 1 Press the POWER button to turn on your camera and turn the camera dial to . You see the last picture you took on the LCD screen. (If you haven’t taken any photos, you see a gray screen with the following message: There is no image.) 2 Press the button under Menu Change. 3 Press the button next to Video Clip. The camera displays Please wait...
quickrefset.book Page 21 Thursday, April 20, 2000 3:36 PM For detailed playback information, see your User’s Guide. Deleting Video Clips Follow these steps to delete a video clip: 1 Follow steps 1 through 4 under “Playing Back Video Clips,” to select a video clip for deletion. 2 Press the button next to Delete. 3 You see a confirmation screen. Press the button next to Yes to delete the video clip. Press the button next to No if you don’t want to delete it.
quickrefset.book Page 22 Thursday, April 20, 2000 3:36 PM If you are taking pictures in bright sunlight: ◗ Reduce the automatic exposure setting. ◗ Use a fast shutter speed or narrow aperture setting. ◗ Use an optional filter with the PhotoPC 3000Z’s included lens adapter to cut down on excessive light and protect the camera’s lens. If you are taking pictures when it is cloudy, you might want to adjust your camera settings as follows: ◗ Increase the automatic exposure setting.
quickrefset.book Page 23 Thursday, April 20, 2000 3:36 PM ◗ Adjust exposure settings for different effects. ◗ Take shots at different times of the sunset to capture the changing colors. (Try interval shooting mode.) Under low light conditions, it is often difficult to capture a good shot of the background as well as your subject. Try the following: ◗ Increase the automatic exposure setting. ◗ Use a wide aperture or slow shutter speed. ◗ Use a higher sensitivity or ISO equivalent.
quickrefset.book Page 24 Thursday, April 20, 2000 3:36 PM ◗ Try to get on the same level as your subject; shots are more interesting if they are taken from the subject’s perspective. Action shots can be tricky. To get the best results: ◗ Use a fast shutter speed. ◗ Pick a good location where you can capture a shot at any moment. ◗ In Program mode, try the Sports setting. For all your pictures: ◗ Don’t forget about your optical zoom, black and white, Macro mode, and other specialized settings.
To change a setting, press the button under or next to the setting. Using the LCD Setup and View Screens 1 Press the POWER button to turn the camera on. Turn the camera dial to to go to the Setup menu, then press the button next to the current mode setting to cycle through the modes: Program, Manual, and Full Auto.