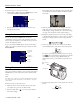
EPSON PhotoPC 3100Z camera dial flash timer light hot shoe shutter button diopter dial neck strap holder viewfinder USB port Video/audio out port lens front view photo capture light camera status light status display panel AC adapter port camera control buttons viewfinder neck strap holder microphone speaker memory card cover print button LCD screen MENU button zoom controls back view battery cover tripod socket battery cover lock shutter button image quality button camera dial flash
EPSON PhotoPC 3100Z Camera Specifications USB cable Small size, B-Type connector (camera) Standard, A-Type connector (computer) Physical Dimensions Internal ROM 2MB flash (program memory) Width 4.3 inches (108 mm) Removable memory card Height 3.5 inches (89 mm) Depth 2.6 inches (65 mm) Weight 12.
EPSON PhotoPC 3100Z Sensitivity Equivalent to ISO 100/200/400 Exposure control Programmed auto exposure Photo Processing Time and File Size Exposure value adjustment: –2 to +2 EV, in 0.2 increments (manual mode) or 0.
EPSON PhotoPC 3100Z Technical Minimum System Requirements Input 100 to 240 V, 50 to 60 Hz Output DC 1.2 V, 490 mA × 4 To transfer images to your computer and edit them, make sure your system meets these minimum requirements: Charging time 4 hours maximum (initial charge) 2.
EPSON PhotoPC 3100Z When the battery power is almost out, a low battery icon appears on the camera’s status display panel. Be sure to replace all four batteries at the same time. Installing Batteries The EPSON PhotoPC 3100Z accepts these battery types: ❏ Single-use AA lithium or alkaline batteries Battery Handling ❏ Rechargeable NiMH or NiCd batteries WARNING To avoid the danger of fire or explosion, do not mix different types of batteries.
EPSON PhotoPC 3100Z Removing and Inserting the Memory Card Using Your CompactFlash Memory Card If you install a new memory card, make sure you format it before you start taking pictures. See the previous section for instructions. Your camera comes with a preinstalled 16MB CompactFlash memory card that needs to be formatted before you can use it. This card stores your photographs until you transfer them to a computer. Follow these steps to remove and insert the memory card: 1.
EPSON PhotoPC 3100Z Adjusting the Viewfinder Focus Checking the Picture Counter You can adjust the viewfinder’s focus using the diopter. This is useful if you wear glasses and want to remove them to take pictures with the viewfinder. To adjust the focus, simply look through the viewfinder and move the diopter dial up or down until you have a clear view. The large number in the lower right of the status display panel shows how many additional pictures you can take.
EPSON PhotoPC 3100Z Flash Off The flash is disabled, even when lighting is inadequate. Use this setting for special effects, where flash photography is prohibited, or for macro mode close-ups. Red-eye Reduction Use this setting to eliminate the red-eye effect (the reddish reflection of the flash off of your subjects pupils). Slow Synchronized Flash Produces color or black and white images at 640 × 480 pixels.
EPSON PhotoPC 3100Z Use the Shot Setup menu to switch between these JPEG and Tiff image types. Follow these steps: Camera Dial Settings 1. Turn the camera dial to and press the POWER button to turn on the camera. You see the SETUP menu. Use for video clips, continuous shooting, interval shooting, or stitching mode. 2. Press the button next to Shot Setup to go to the Shot Setup menu. Lets you take pictures using the LCD screen.
EPSON PhotoPC 3100Z This example shows how the LCD screen looks in Program user mode. The screen looks different for Manual or Full Auto mode. Follow these steps to choose the user mode: and press the POWER button to turn 1. Turn the dial to on the camera. You see the SETUP menu: user mode 2. Press the button next to the current user mode to cycle through the three modes. 3. Make any changes you want to the settings on the View menu.
EPSON PhotoPC 3100Z If you’ve turned on the Confirmation setting in the Shot Setup menu, your photographed image appears briefly in a confirmation screen. Follow these steps: 1. Make sure your camera and connected video equipment are turned off. 2. Open the camera’s connector cover and connect the black end of the video cable to the AV Out port, as shown below: While the confirmation screen is visible, you can do the following: ❏ Press the button next to Delete if you don’t want to keep the picture.
EPSON PhotoPC 3100Z Getting Pictures into Your Computer Maintenance When you’re finished taking pictures, you can connect the camera to your USB-enabled Windows 98, Windows 2000, Windows Me, or Macintosh system and transfer the images. If you have the optional universal AC adapter, you can extend battery life by using it when you connect the camera to your computer. Cleaning the Camera ❏ Use a clean, dry cloth to wipe the camera free of dust. ❏ Don’t use harsh or abrasive cleaners.
EPSON PhotoPC 3100Z Camera Warranty 1 year limited warranty Box Contents ❏ PhotoPC 3100Z camera, lens cap and strap, soft case, neck strap ❏ Quick Reference Guide and User’s Guide ❏ 4 AA alkaline batteries ❏ USB cable ❏ Video (AV) cable ❏ 16MB EPSON CompactFlash memory card (preinstalled) ❏ Lens adapter for optional lenses and filters ❏ Software on CD-ROM: Sierra Imaging Image Expert™ (includes QuickTime and Adobe Acrobat Reader), Panorama Stitcher, and EPSON File Converter, USB Storage Driver Related