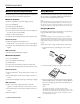
EPSON PhotoPC 850Z diopter viewfinder and photo capture lights camera dial shutter button timer light camera status light flash zoom control neck strap holder microphone status display panel neck strap holder video out connector top left button (unlabeled) speaker + button − button viewfinder AC adapter connector lens bottom left button (unlabeled) MENU button interface connector ISO button W.B.
EPSON PhotoPC 850Z Technical Product type Safety 2.1 megapixel CCD (charged coupled device) still frame auto/manual focus camera Zoom 3× optical zoom (equivalent to a 35 to 105mm lens on a 35mm camera) CCD 0.5 inch color area CCD (2.
EPSON PhotoPC 850Z Aperture F2.0-F11 (wide) F2.8-F11 (tele) Optional Universal AC Adapter (B867081) Flash Automatic luminance control flash Optional external flash (attaches to hot shoe on camera) Physical Dimensions Flash modes Forced flash, automatic, flash off, slow synchronized flash mode (with leading and trailing modes), red-eye reduction flash mode Width 1.7 inches (43 mm) Height 1.22 inches (31 mm) Depth 4.
EPSON PhotoPC 850Z Minimum System Requirements Using Batteries To transfer images to your computer and edit them, make sure your system meets these minimum requirements: Your EPSON PhotoPC 850Z comes with a charger (Model EU-38) and four rechargeable NiMH batteries (Model EU24) that can be recharged hundreds of times. Windows Systems Note New batteries need to be fully charged three times before you use them.
EPSON PhotoPC 850Z 3. Insert four batteries into the compartment, positioning the + and − ends as shown below. 4. Now charge your batteries again by unplugging the battery power cord and then plugging it in again. The second charge should take about two and a half hours. 5. Charge the batteries a third time. After the charger light goes off, unplug the charger. To avoid overcharging, don’t leave the charger plugged in for long periods of time after the light goes off. 6.
EPSON PhotoPC 850Z ❏ Replace all four batteries at the same time. Do not mix old and new batteries. Installing and Formatting the CompactFlash Card ❏ Batteries that have not been used for a long time do not charge well. However, with regular use, the batteries will return to normal. Make sure your camera dial is set to the Off position. Then follow these steps to install your CompactFlash card and format it: ❏ Batteries discharge at least 2% per day, whether they are used or not. 1.
EPSON PhotoPC 850Z 7. When you’re finished, press the bottom left button (next to SET). You see the SETUP menu. Adjusting the Viewfinder Focus 8. Press the bottom right button (below Memory SETUP). The Memory Card Format menu appears: You can adjust the viewfinder’s focus using the diopter dial. This is especially useful if you wear glasses and want to take pictures with the viewfinder. Follow these steps: 9. Press the top left button (next to MEMORY CARD FORMAT). You see a warning message.
EPSON PhotoPC 850Z When the memory card is full, the number on the status display panel reads 0, the status light on the back of the camera flashes orange, and you can no longer use the shutter button. Before you can take any more pictures, you need to delete some of the images on the memory card. Use this setting to eliminate the red-eye effect (the reddish reflection of the flash off of your subjects pupils) that flash photography often results in.
EPSON PhotoPC 850Z Fine Camera Dial Settings Produces color or black and white images at 1600 × 1200 pixels, with moderate compression. Your pictures include ample detail, and the CompactFlash card holds approximately 24 pictures. Use for continuous or interval shooting. Lets you capture a complex motion, such as a golf swing. Lets you take pictures using the LCD screen.
EPSON PhotoPC 850Z The example shows how the LCD screen looks in Full Auto user mode. The screen looks different for Program or Manual mode. shutter speed and aperture, choose a spot or matrix metering system, and focus the camera to three feet, eight feet, or infinity. Follow these steps to choose the camera mode: 1. Push the camera dial lock in and turn the dial to see the SETUP menu: . You Note The LCD screen uses up battery power quickly.
EPSON PhotoPC 850Z Using the Camera for Presentations Playing Back Pictures on TV You can connect your camera to a multimedia projector and show not just photos, but also text and graphics. The EPSON Photo File Uploader3 lets you transfer images from your computer to your camera’s memory card. Anything you can display on your computer screen can be captured, converted, and uploaded. You can create and show a presentation without printing overhead transparencies or slides, and without a laptop computer.
EPSON PhotoPC 850Z Using the USB Cable 2. Line up the serial connector on the cable with one of the serial ports on your computer, and insert the connector. Then tighten the screws. Follow these steps to connect your camera using the USB cable: 1. Plug the cable connector on the USB cable into the USB port on your computer, or into a port on a USB hub. 3. Open the connector cover on the side of the camera. Carefully insert the connector on the other end of the cable into the camera’s interface port. .
EPSON PhotoPC 850Z The Direct Print main menu offers several formats in which you can print your pictures, as described in the table below. 2. Locate the modem port or printer port on the back of your Macintosh. You can use either port to connect the camera. Note If you’re sharing a serial port that you use for another device, make sure AppleTalk™ is turned off. Your Macintosh may not recognize the camera if AppleTalk is on. If you have problems connecting to the printer port, use the modem port instead.
EPSON PhotoPC 850Z Storing the Camera ❏ When you’re not using the camera, make sure the camera dial is set to Off. ❏ When the camera is not used for long periods of time, remove the batteries and store them at a low temperature in a dry location. This prevents camera damage from battery leaks or corrosion.