
User's Manual


Using Your Camera for Presentations
13-11
A
B
13
NOTE
◗
If you’re running OS 8.0 or later, you can capture just the
active window. Press the
Command
,
Shift
, and
4
keys at
the same time, then click the window you want to capture,
or drag the cursor around that portion of the screen you want
to capture.
◗
If you’re running OS 7.5x, the entire desktop is captured, not
just the active window. Make your document window as
large as possible before you capture it. If you set your
application to “slide show” mode (or the equivalent), you
can capture just the image, without other screen elements.
4
When you’re finished, close your application.
To upload your screen shots to the camera, click the EPSON
Photo File Uploader3 window to make it active, then follow
the uploading instructions starting with step 3 on page 13-5.
Projecting Your Presentation
You can display the uploaded images and sounds on a
multimedia projector, television, or other video output
device. Use the video cable that came with your camera.
NOTE
Using the optional AC adapter is highly recommended when you
project your presentation. See page A-2 for instructions and
ordering information.
Follow these steps:
1
Make sure your camera and TV or video projector are
turned off.
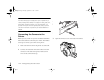
2
Open the camera’s connector cover and connect the
black end of the video cable to the
AV Out
port, as
shown below:
Vega.book Page 11 Monday, September 13, 1999 11:36 AM