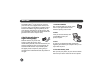
Snap Print Enjoy PM 225 *412504900* *412504900* CPD-27532R1 Printed in XXXXXX Basics
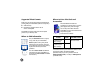
Need a New Print Pack? Getting to Know PictureMate Paper support (load photo paper here) The PictureMate 200 Series Print Pack has everything you need to print in one box: photo paper and a photo cartridge. Edge guides The following Print Packs and accessories are available: Screen Memory card light Memory card slots Output tray (catches printed photos) Handle Power inlet Optional battery cover Cartridge release lever EXT.
Contents Welcome! . . . . . . . . . . . . . . . . . . . . . . . . . . . . . . . . . . . . . . . . . . . . . . . . . . . . . . . . . . . . . . . . . . . . . . . . . 2 Prepare to Print . . . . . . . . . . . . . . . . . . . . . . . . . . . . . . . . . . . . . . . . . . . . . . . . . . . . . . . . . . . . . . . . . . . . 6 Choose Photos and Print . . . . . . . . . . . . . . . . . . . . . . . . . . . . . . . . . . . . . . . . . . . . . . . . . . . . . . . . . . . 10 Do More With Your Photos . . . . . . . . . . .
Welcome! PictureMate CharmTM is your easy-to-use, personal photo lab. Just insert a digital camera memory card and you’re ready to print brilliant, long-lasting photos. Because PictureMate® is light and portable, you can print whenever and wherever you take pictures. Plus, your PictureMate prints will be as brilliant and vibrant generations from now as they are today. A Quick Introduction to Digital Photography 1.
Special Features Printing with your PictureMate becomes even easier with these special features: From PictureMate’s photo viewer screen, you can view your photos and press Print to print the ones you want. Or you can select to print all photos. (See page 10.) If your camera supports DPOF (Digital Print Order Format), you can select which photos to print while the memory card is still in your camera. When you insert the card into PictureMate, you just have to press OK and Print.
Supported Photo Formats Make sure your photos meet these requirements for printing with your PictureMate (without a computer): ● JPEG files only ● Resolutions ranging from 80 × 80 to 9200 × 9200 pixels PictureMate recognizes and prints the first 9,990 photos on your memory card. Where to Get a Print Pack and Accessories The PictureMate Print Pack has everything you need to print in one box: photo paper and a photo cartridge.
PictureMate Buttons Start printing Turn PictureMate on or off Change the number of photos displayed Display optional settings menu Stop printing or cancel settings Move through photos and menu options 5
Prepare to Print Before you print with PictureMate, you need to: ● Insert your memory card (below) ● Load paper (see page 6) 2 Raise and adjust the photo viewer screen. 3 Press the corner of the output tray to open it. When you finish printing, you can remove your memory card (see page 8). Inserting Your Memory Card 1 6 Move the handle to the back. Then open the top cover.
4 Press the P On button to turn on PictureMate. 5 Insert the memory card into the correct slot, as shown on the right. Insert just one card at a time. Top slot: SDTM (Secure Digital) and SDHCTM (High Capacity) miniSDTM * and miniSDHC* microSD* and microSDHC* Sony Memory Stick® ** Memory Stick DuoTM * Memory Stick Micro* Memory Stick PROTM Memory Stick PRO DuoTM * Memory Stick PRO-HG DuoTM * MagicGateTM Memory Stick** MagicGate Memory Stick DuoTM * Note: PictureMate can’t read multiple cards at once.
Removing Your Memory Card Loading Paper When you are ready to remove a memory card, first make sure the memory card light is not flashing. Caution: Don’t load plain paper; this may damage PictureMate. 1 Move the handle to the back. Then open the top cover and raise the photo viewer screen. 2 Press the corner of the output tray to open it. Caution: Do not remove a card while the memory card light is flashing; you may lose photos on your card.
3 Slide the edge guides outward. Note: Load a maximum of 20 sheets at a time. Load your paper glossy or whiter side up to prevent smearing. 6 Store any unused paper in the original package and keep it flat in a dry area to prevent curling. Note: When you need more paper, order a PictureMate Print Pack. See page 29 for more information. 4 Create a stack of up to 20 sheets of paper and separate the sheets slightly by fanning them.
Choose Photos and Print After you insert your camera’s memory card, PictureMate displays your photos on the photo viewer screen (shown at right). Note: You can adjust the angle of the photo viewer screen by raising or lowering the top of the screen. Be sure to lower the screen before closing the printer lid.
You see the number 1 on the photo, indicating that one copy will be printed: Note: If your memory card has more than 1000 photos, PictureMate divides them into groups of 999. You can select the group you want to view and print. See the online User’s Guide for more information. Press the Display button to switch between one photo displayed with or without text, one photo with a “filmstrip” of 5 additional photos, or 6 photos.
The preview screen shows the layout, number of sheets, and other settings you have chosen, for example: Automatic fix icon Printing All Photos You can print all the photos on your camera’s memory card, and select the number of copies to print of each photo. 1 After inserting a card, press Menu. Total number of sheets Note: For more information about print settings, see page 16. 6 Press l or r to review your selected photos. If you change your mind, press the Stop/Clear button.
6 If you want to change the layout or edit your photos, press Menu. See page 16 for instructions. 7 Make sure you have enough paper loaded, then press Print to start printing. Note: If you are printing more than 20 photos, you will need to reload paper while printing. Load a maximum of 20 sheets at a time. When you see a message that paper is out, load more paper and press OK to continue printing. If you need to cancel printing, press Stop/Clear.
Printing Camera-Selected DPOF Photos If your camera supports DPOF (Digital Print Order Format), you can use it to pre-select which photos and how many copies you want to print. See your camera’s manual to choose photos for printing with DPOF, then insert your memory card in PictureMate. PictureMate automatically reads your pre-selected photos and displays a message. 1 Select Yes, then press OK. 2 If you want to change any print settings from the defaults, press Menu. See page 16 for instructions.
Storing and Displaying Your PictureMate Photos Photos printed on PictureMate photo paper are beautiful and long-lasting. Follow these guidelines to make sure they will look great for generations. Displaying Your Photos ● To ensure photos will last as long as possible, display them under glass or in photo albums. ● Keep photos out of the sun to help prevent fading. Storing Unused Paper Caring for Your Photos ● To avoid scratches or smudging, do not rub the printed side of the photo.
Do More With Your Photos By pressing the Menu button, you can: Getting Help ● Choose from a variety of layouts (see page 17) ● Print a proof sheet (see page 18) You can learn how to improve print quality or handle memory cards, paper, or photo cartridges. ● Remove red eyes from your photos (see page 18) 1 Press ● Fix photos that are too light or dark (see page 18) 2 Press l or r to highlight Help, then press OK.
Choosing a Layout Note: For the fastest printing, select Border. By default, your photos are printed at the full 4 × 6 size, without borders. If you want to print pictures with white borders or place several small photos on one sheet of paper, you can use the Layout menu to change the layout. When you print without borders, your images are automatically expanded and cropped around the edges. This may cause part of your image to be cut off.
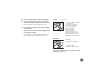
Printing a Proof Sheet 2 Press You can print small thumbnail images of all the photos on your memory card, 20 images per page. 3 Press l or r to highlight Setup, then press OK. 4 Press l or r to highlight Advanced Settings, then press OK. Menu. 1 After inserting a card, press 2 Press l or r to highlight Utility, then press OK. 5 3 Press l or r to highlight Print Proof Sheet, then press OK. Press l or r to highlight Fix Red-Eye, then press OK. 6 Press l or r to highlight On, then press OK.
If you select Fix Photo, you see a list of 4 enhance modes: Note: These settings affect only your printed pictures. They do not change your original image files. 1 After inserting a card, press 2 Press l or r to highlight Basic Print Settings, then press OK. 3 Press l or r to highlight Enhance, then press OK. 4 Press l or r to select one of the following options: 5 Menu. ● Fix Photo: This setting improves your photos’ colors and increases contrast and sharpness.
Adjusting Borderless Expansion When you print borderless pictures, your images are automatically expanded and cropped. If your pictures are cut off around the edges, you can adjust the amount of expansion and cropping. Printing Photos in Black-and-White or Sepia You can print pictures in black-and-white or in a sepia tone (like an old-fashioned photo) even when the originals are in color. Your original images are not changed. 1 Press 2 Press l or r to highlight Setup, then press OK.
5 Press l or r to select B & W or Sepia, then press OK. You can see the effect on your photo. Adding Camera Text If your camera allows you to add text to your photos, you can print the pictures along with the text. This setting is available for borderless photos only. 1 Select the photos that have text added by your camera. 2 Press 3 Press l or r to highlight Setup, then press OK. 4 Press l or r to highlight Advanced Settings, then press OK.
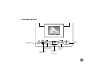
Print From an External Device PictureMate can print photos stored on a: ● PictBridge-enabled digital camera (this page) ● Bluetooth-enabled device (requires an optional Bluetooth Photo Print adapter; see the online User’s Guide for information). 4 Connect your camera’s USB cable to your camera and the EXT. I/F port on the back of PictureMate. 5 Use your camera’s controls to select and print photos on PictureMate. (See your camera manual for instructions.
Print From a Computer To use PictureMate with your computer, you must first: ● ● Install the PictureMate software on your computer from the PictureMate CD as described here. Connect PictureMate to your computer with a USB cable. If you don’t have a USB cable, you can buy one from your local computer dealer or from Epson. Installing Software and Connecting PictureMate DO NOT connect PictureMate to your computer before installing the software. REMOVE your memory card from PictureMate before you begin.
Note: If you see a Found New Hardware screen, click Cancel and disconnect PictureMate from your computer. 2 Insert the PictureMate CD. 3 With Windows 8, Windows7, and Windows Vista, if you see the AutoPlay window, click the option Run SETUP.exe. When you see the User Account Control screen, click Continue. 24 4 When you see this screen, click Install. 5 Read the license agreement and click Accept. The software starts installing.
After a moment, you see this screen: Your PictureMate software is installed. Note: If you see a screen like this one, remove your memory card and click the X in the corner to close it. 6 Connect the USB cable to any open USB port on your computer. Then connect the other end to the USB port on the back of PictureMate. Note: PictureMate is automatically set as your default printer. If you have another printer, you can change this setting in the Windows Control Panel.
8 When you see a message that installation is complete, click Exit. 9 Follow the on-screen instructions to register PictureMate. 4 When you see this screen, click Install. 5 Read the license agreement and click Accept. 6 Follow the on-screen instructions to install the software. 10 When you’re done, remove the CD. Now you can print photos from your computer on PictureMate (see the online User’s Guide for detailed instructions).
After a few minutes, you see this screen: If you’re using Mac OS X 10.5.x or later, skip to step 10. If you’re using Mac OS X 10.3.9 or 10.4.11, continue with the next step. 7 8 When you see this screen, click Add Printer. 9 Follow the steps on the right side of the screen to add PictureMate. Connect the USB cable to any open USB port on your Macintosh. Then connect the other end to the USB port on the back of PictureMate.
Now you can print photos from your Macintosh on PictureMate (see the online User’s Guide for detailed instructions).
Replace Print Pack When PictureMate needs a new Print Pack, you will see a message on the photo viewer screen. The Print Pack contains a new photo cartridge and photo paper. When you need a new Print Pack, see these sections: ● Buy a PictureMate Print Pack (to the right) ● Replace the photo cartridge (see page 30) If you want to check the status of your photo cartridge, see page 32.
Replacing the Photo Cartridge 3 Make sure you have a new PictureMate Print Pack before you remove the old photo cartridge. Once you remove the cartridge, you must install the new one right away. Slide the cartridge lever left, to the Release position. Caution: Before you replace the cartridge, read the “Photo Cartridge Safety Instructions” on page 50. 1 Make sure PictureMate is on but not printing. 2 Open the cartridge door on the back of PictureMate.
Warning: Keep photo cartridges out of the reach of children and do not drink the ink. 6 Slide the cartridge straight into the slot, label side up, until it clicks into place. If ink gets on your hands, wash them thoroughly with soap and water. If ink gets in your eyes, flush them thoroughly with water. If discomfort or vision problems continue after flushing, see a doctor immediately. Caution: Do not attempt to refill the photo cartridge.
Caution: If the cartridge is not inserted correctly, PictureMate will not be able to print. 8 Close the cartridge door all the way. Checking Photo Cartridge Status You can check the status of your Print Pack at any time. 1 Press 2 Press l or r to highlight Maintenance, then press OK. 3 Highlight view the photo cartridge status and press OK. You see the status displayed on the photo viewer screen: Menu. The gray square represents the ink level 4 32 Press OK to exit.
Take PictureMate With You PictureMate’s handle makes it easy to carry short distances. If you have the optional battery, you can use PictureMate just about anywhere, even if an electrical outlet is not available. 4 Lower the screen, then close the paper support and output tray. 5 Unplug the power adapter and any connected USB cable or device. Place the power cable and adapter in the PictureMate accessory box. 6 Pack PictureMate in the box that it came in or the optional carrying case.
Using the Optional Battery To buy the optional battery, check with your PictureMate retailer or go to www.MyPictureMate.com. See page 47 for more information on purchasing PictureMate supplies and accessories. With a fully charged battery, you can print about 100 photos. Note: See the online User’s Guide for detailed instructions on installing and using the optional rechargeable battery.
Set PictureMate Preferences You can change the way PictureMate works by using the Setup menu.
3 Press l or r to highlight Display Settings, then press OK. 4 Press l or r to highlight Print Preview, then press OK. 5 Press l or r to choose Off or On, then press OK. Changing PictureMate’s Language You can change the language on PictureMate’s screen to French, Portuguese, or Spanish. 1 Press 2 Press l or r to highlight Setup, then press OK. 3 Press l or r to highlight Language, then press OK.
3 Press l or r to highlight Restore Defaults, then press OK. You see this message: 4 Press l or r to select Yes or No, then press OK. 5 Press OK to exit.
Printer Care and Troubleshooting If you have problems with your PictureMate, or you want to improve print quality, read these sections: ● Cleaning the print head (on the right) ● Aligning the print head (on page 40) ● Cleaning Inside PictureMate (on page 41) ● Cleaning Outside PictureMate (on page 42) ● Printing and operation problems (on page 42) ● Software installation problems (on page 44) ● Print quality problems (on page 44) ● Problems with paper feeding (on page 45) ● Miscellaneous pr
You see a confirmation screen: 5 Select Yes, then press OK to clean the print head. Cleaning takes about 60 seconds. PictureMate makes some noise and you see an Auto Cleaning message. When cleaning is complete, PictureMate prompts you to load paper and print a nozzle check pattern. 6 Press PictureMate prints a nozzle check pattern and displays this screen: 7 Check the pattern to see if there are any gaps or missing lines. OK Print.
● If the pattern is OK, select Yes and press OK to finish. 3 Press l or r to highlight Maintenance, then press OK. ● If the pattern has gaps or missing lines, select No and press OK to clean the print head again. You may need to clean it two times before the nozzles are clean. 4 Press l or r to select Head Alignment, then press OK. You see a confirmation screen: 5 Press If you don’t see any improvement after cleaning two times, see “Print Quality Problems” on page 44.
You see the Head Alignment screen: Cleaning Inside PictureMate To make sure your pictures look their best, you may need to use a “cleaning sheet” to clean inside the printer. Typically, this is done only if you notice lines of ink smearing on the front and back of your prints. Load several sheets of PictureMate paper. 1 Press Menu. 2 Look at the printed squares to determine which one is the most even, with no streaks or white lines. (You may need to use a magnifying glass.
Cleaning Outside PictureMate Printing and Operation Problems To keep PictureMate working at its best, you should clean it several times a year. Follow these steps: The On light and photo viewer screen don’t turn on. 1 Turn off PictureMate, unplug the power cable, and disconnect the power adapter and any USB cable or device. 2 Remove all paper, then use a soft brush to clean any dust or dirt from the paper feeder and output tray. 3 Clean the PictureMate exterior with a soft, damp cloth.
PictureMate makes an unexpected noise after you install a photo cartridge. Your memory card does not work correctly. ● Insert only one card at a time. The first time you install the photo cartridge, PictureMate charges its print head for about three and a half minutes. Wait until charging finishes before you turn it off, or it may charge improperly and use more ink the next time you turn it on. ● Make sure you are using a compatible memory card. See page 6.
Printing is too slow. ● It takes a few moments for PictureMate to process your images before printing them. ● If PictureMate is in a hot or sunny location, move it to a cooler place and try printing again. For faster printing, try these tips: ● Don’t print more than 40 pictures at a time. ● Photos with borders print faster than borderless photos. ● Turn off special features such as color effects and red-eye reduction.
● You may need to clean inside PictureMate. See page 41. ● Colors may change slightly after your print dries. Wait for 24 hours and check your photo again. ● Make sure your paper isn’t damp or curled, or loaded face down (load it glossy or whiter side up). If it’s damp or curled, load a new stack of paper. ● Turn on the Fix Photo or P.I.M. setting. See page 18. ● Remove each photo from the output tray after printing. Let each photo sit for a minute before handling it.
If paper loads incorrectly or jams frequently: Miscellaneous Printout Problems ● Use new paper loaded with the glossy or whiter side up, and separate the sheets slightly. PictureMate prints blank pages. ● Load a maximum of 20 sheets. The print head may need cleaning. See page 38. ● Make sure your paper is beneath the arrow on the edge guides. The borders or layout are incorrect. ● Don’t load plain paper; this may damage PictureMate.
Where to Get Help Then call: ● U.S.: (562) 276-7282, 6 AM to 6 PM, Pacific Time, Monday through Friday. ● Canada: (905) 709-2567, 6 AM to 6 PM, Pacific Time, Monday through Friday. Epson Technical Support Epson provides these technical support services: Internet Support Visit Epson’s support website at epson.com/support and select your product for solutions to common problems. You can download drivers and documentation, get FAQs and troubleshooting advice, or e-mail Epson with your questions.
Notices Important Safety Instructions Before using your PictureMate, read the following safety instructions to make sure you use it safely and effectively (see the online User’s Guide for additional safety instructions). ● Be sure to follow all warnings and instructions marked on the printer. ● If you use the printer in places where the use of printers is restricted, such as in airplanes or hospitals, follow all instructions in those places. ● Do not insert objects through the slots in the printer.
● Avoid places subject to dust, shock, or vibration. ● Leave enough room around the printer to allow for sufficient ventilation. ● Place the AC adapter near a wall outlet where the plug can be easily unplugged. ● Do not place or store the printer, the AC adapter, or the optional battery outdoors. ● Do not block or cover the vents and openings in the printer. ● Power supply cords should be placed to avoid abrasions, cuts, fraying, crimping, and kinking.
WARNING: The cords included with this product contain chemicals, including lead, known to the State of California to cause birth defects or other reproductive harm. Wash hands after handling. (This notice is provided in accordance with Proposition 65 in Cal. Health & Safety Code §25249.5 and following.) Photo Cartridge Safety Instructions ● Keep photo cartridges out of the reach of children and do not drink the ink. ● Do not shake the photo cartridge after removing it from the bag; this can cause leakage.
Photo Viewer Screen Safety Instructions ● The screen contains a few small bright or dark spots. These are normal and do not mean that the screen is damaged in any way. ● Only use a dry, soft cloth to clean the screen. Do not use liquid or chemical cleansers. ● If the screen is damaged, contact your dealer. If the liquid crystal solution gets on your hands, wash them thoroughly with soap and water. If the liquid crystal solution gets into your eyes, flush them immediately with water.
reprinting. This warranty does not cover damage to the Epson product caused by parts or supplies not manufactured, distributed or certified by Epson. This warranty does not cover ribbons, ink cartridges or third party parts, components, or peripheral devices added to the Epson product after its shipment from Epson, e.g., dealer or user-added boards or components.
Our estimate of the number of photos you can print with a PictureMate Print Pack is based on test printing with a range of 20 different color photos. Actual yields will vary based on images printed, print settings, paper type, frequency of use and temperature. For example, printing many copies of the same photo, or printing many black and white or sepia photos, may result in fewer photos per PictureMate Photo Cartridge.
Please follow this refund procedure: d) Remaining paper which was included in the PictureMate printer box 1 Customer claim status inquiries: (800) 305-7305. Refund Procedure 2 Print out the PictureMate Print Pack Satisfaction Guarantee Form, found on the web page below, or request this form to be mailed to you by calling (562) 276-1347 for U.S.A. and Puerto Rico or (905) 709-8676 for Canadian residents. www.mypicturemate.
FCC Compliance Statement For United States Users This equipment has been tested and found to comply with the limits for a Class B digital device, pursuant to Part 15 of the FCC Rules. These limits are designed to provide reasonable protection against harmful interference in a residential installation. This equipment generates, uses, and can radiate radio frequency energy and, if not installed and used in accordance with the instructions, may cause harmful interference to radio or television reception.
Seiko Epson Corporation shall not be liable for any damages or problems arising from the use of any options or any consumable products other than those designated as Original Epson Products or Epson Approved Products by Seiko Epson Corporation. DPOF is a trademark of CANON INC., Eastman Kodak Company, Fuji Photo Film Co., Ltd., and Matsushita Electric Industrial Co., Ltd. The Bluetooth word mark and logos are owned by Bluetooth SIG, Inc., and licensed to Seiko Epson Corporation.
Index A Accessories, 4, 29, 33, 47 Adapter, memory card, 7 Aligning print head, 40, 41 Auto Cleaning, 38 to 40, 44 Auto shutoff, 11, 42 B Banding, fixing, 38 to 40, 44 Battery, 34 Black-and-white printing, 20 Blank pages, 46 Blank screen, 11, 42 Blurry prints, 44 to 45 Border layout, 17 problems, 46 Borderless layout, 17 problems, 46 Borderless expansion, 20 Button Menu, 16 On, 23, 26, 33, 42, 48 C Cable power, 33 USB, 22, 23, 25, 27 Camera printing from, 22 printing text from, 21 selected photos (DPOF),
Cleaning PictureMate, 42 print head, 38 to 40, 44 Color effects, 20 problems, 45 Computer connecting to PictureMate, 27 installing software on, 23, 28 software installation problems, 44 Copies, number of control panel, 12 Copies, number of, control panel, 11 Customizing PictureMate, 35 to 37 Cut-off photos, fixing, 20 E D Gaps in image, 38 to 40, 45 Grainy prints, 44 Date, printing photos by, 13 Default settings, 37 Display preferences, 10 Displaying prints, 15 DPOF (Digital Print Order Format), 14 58
I M Image, quality problems, 44 Incorrect colors, 45 margins, 20, 46 Ink, see Photo cartridge Instructions, control panel, 16 Internet support, 47 Macintosh, installing software for, 26 to 28 Maintenance, 38, 41 Manuals, 4, 25 Margins incorrect, 20, 46 selecting, 17 Memory card adapters, 7 compatibility, 7 light, 7 to 8 problems, 43 removing, 8, 23 Menu button, 16 Missing colors, 45 J Jammed paper, 45 to 46 L Layout problems, 46 settings, 17 Lever, cartridge, 30, 31 License agreement, 24 Lights memory
O On button, 23, 26, 33, 42, 48 On light, 42, 48 Output tray, 33 P Paper buying, 4, 29 feeding problems, 45 to 46 jam, 45 to 46 loading, 8, 46 output tray, 33 storing, 15 support, 8, 33 60 Photo choosing, 10, 14 correction, 18 displaying, 15 DPOF, 14 fixing, 18 fixing cut off, 20 paper, 29 quality problems, 44 remove red eye, 18 slideshow, 14 storing, 15 viewing, 10, 14 Photo cartridge buying, 4, 29 door, 30 to 32 information, 52 to 54 release lever, 30, 31 safety instructions, 50 status, 32
Photo viewer screen adjusting angle, 10 blank, 11, 42 display options, 10 instructions on, 16 problems, 42 safety instructions, 51 using, 10, 41 PictBridge camera, 22 PIM (PRINT Image Matching), 19 Power battery, 34 problems, 42 saving, 11 turning off, 33, 48 turning on, 23, 26, 42 Power cable, 33 Preferences, setting, 35 to 37 Previewing printing, 11 to 14 Print preview, 11 to 14 speed, increasing, 44 Print head aligning, 40, 41 cleaning, 38 to 40, 44 PRINT Image Matching, 19 Print Pack buying, 4, 29 info
Problems border or layout, 46 color, 45 memory card, 43 paper feeding, 45 to 46 paper jam, 45 to 46 photo viewer screen, 42 power, 42 print quality, 44 printing, 42 to 44 slow printing, 44 software installation, 44 Proof Sheet layout, 17 Q Quality problems, 44 R Red-eye reduction, 18 Release lever, 31 Replacing photo cartridge, 29 Resetting preferences, 35 to 37 62 S Safety instructions, 48 Saving power, 11 Screen adjusting angle, 10 blank, 11, 42 display options, 10 instructions on, 16 problems, 42 saf
Support, technical, 47 T Technical support, 47 Troubleshooting, 38, 46 Turning printer on or off, 23, 26, 33, 42, 48 U USB cable, 22, 23, 25, 27 User’s Guide, 4, 25 W Wallet-size photos, 17 Warranty, 51 to 52 Where to get help, 47 Windows, installing software for, 23 to 26 63
Need a New Print Pack? Getting to Know PictureMate Paper support (load photo paper here) The PictureMate 200 Series Print Pack has everything you need to print in one box: photo paper and a photo cartridge. Edge guides The following Print Packs and accessories are available: Screen Memory card light Memory card slots Output tray (catches printed photos) Handle Power inlet Optional battery cover Cartridge release lever EXT.
Snap Print Enjoy PM 225 *412504900* *412504900* CPD-27532R1 Printed in XXXXXX Basics