® ® EPSON PowerLite 7850p Multimedia Projector ® Macintosh Supplement System Requirements Installing the Software Setting Up Your Macintosh Connecting to the Projector CPD-17267
EPSON is a registered trademark and EasyMP is a trademark of SEIKO EPSON CORPORATION. PowerLite is a registered trademark of Epson America, Inc. General Notice: Other product names used herein are for identification purposes only and may be trademarks of their respective owners. EPSON disclaims any and all rights in those marks. © 2003 by Epson America, Inc.
Introduction Your EPSON PowerLite 7850p projector now lets you project wirelessly from an Apple® Macintosh® computer equipped with an AirPort® or AirPort Extreme (802.11b or 802.11g) wireless network interface.
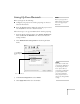
Installing the Software 1. Insert the NS Connection for Macintosh software CD-ROM in your drive. If necessary, double-click the EPSON CD-ROM icon. 2. Double-click the EMP NS Connection.pkg icon. The following screen displays: 3. Click Continue. You see the software license agreement. 4. Click Continue, then Agree. 5. Select the destination drive, then click Continue. You see the following installation window: 6. Click Install. When installation is complete, close the installation window.
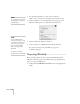
Setting Up Your Macintosh Before you begin, do the following: ■ Configure your projector for wireless projecting; see the User’s Guide for instructions. ■ Insert the EPSON wireless (802.11b) card in the projector and start EasyMP.™ See the User’s Guide for details. note Don’t set your projector to Channel ad hoc mode. This mode is not supported for Macintosh. Follow these steps to set up your Macintosh for wireless projecting: 1. From the Apple pull-down menu, select System Preferences.
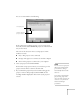
note See your Apple documentation for instructions on setting up your Macintosh. 5. For optimal performance, set your screen resolution to 1024 × 768 or lower with a color depth of thousands of colors. 6. Click the AirPort icon on the Application bar at the top of the Macintosh desktop. You see a pull-down menu like this: note Use either ESSID ad hoc (computer-to-computer) mode or Access Point (infrastructure) mode when you set up your projector. Channel ad hoc mode is not supported for Macintosh.
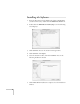
You see a screen similar to the following: Select projector This box indicates projector status If the connection is working properly, you see your projector listed. If you have additional EPSON projectors on the network, they are also listed. The color of the status icon next to each projector’s name indicates its status: ■ Gray—The projector is not connected ■ Orange—The projector is connected to another computer ■ Green—The projector is connected to your computer 2.
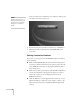
Once the connection is established, your computer’s desktop and a floating control bar are projected: note Position your pointer over a button for a description of its function. For more detailed descriptions, see the User’s Guide. 4. If necessary, drag the control bar out of the way, or minimize it. 5. When done with your presentation, click Disconnect on the control bar.
■ Make sure AirPort is turned on. Click the AirPort icon on the Application bar and select AirPort: On if necessary. If you don’t see the AirPort icon, follow the instructions beginning on page 5 to enable AirPort. ■ If possible, move your projector, Macintosh, and base station (if you’re using one) closer together. ■ If you’re using Access Point (infrastructure) mode and you’re connecting to the wrong network, you may be experiencing signal interference from another network.