
Technical information


PowerRIP Manual
Creating A PowerRIP Printer
After launching PowerRIP for the first time, you must create a PowerRIP printer.
Follow these steps:
1.
Click on File at the top of the screen.
2.
Hold down mouse button and select New Printer menu command. You will
see a listing of EPSON printers supported by this version of PowerRIP For
this example we will
use the Stylus Pro.. .
but you should select your particu-
lar EPSON printer from this menu.
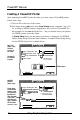
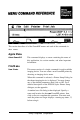
A
Printer Setup dialog for the printer you choose is displayed. All EPSON
Printer Setup dialogs have the same elements. A sample Printer Setup dialog
for the EPSON Stylus Pro is shown below.
Serial Port
Sample tatup
Customize
according to
your needs
See
page
22
for definition
al options
3
Purge printed jobs after
1
41
hours
v
3
Ltmtt
post-print queue to
D
lobs
] OPI Image Substitutions
0
Black Background
]
Faster Copies
q
callala
CoplFs
( Cancel
]
AppleTalk/
Ethertalk
Sample setup
Printer Name
Use the EPSON
Namer to name
your printer and
type that exact
name here.
1
If the Printer
Name does not
agree, PowerRIP
will not find the
networked printer.
$J
Purge printed jobs after
1
41
hours
~1
g
Ltmtt post-print queue to
D
Jobe
]
OPI Image
Substltutlons
q
Black
Background
]
Faster Copies
p c~~1Is:e
C3318i
Printer
Neme:
lStulus Pro
I
[ Cancel ]
-Select port
16
Birmy
Graphics Corporation