
Technical information


PowerRIP Manual
Install PowerRIP
1.
If you have an anti-virus utility, temporarily disable it. You do this by holding
down the Shift key while you restart your Macintosh.
2.
Insert Disk 1 and double click on the PowerRIP installer.
3.
Click on Continue.
4.
Click on Install for default installation.
5.
Click on InstaIl to install in the PowerRIP
3.1
folder on your hard disk.
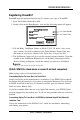
6.
Follow the screen prompts for inserting Disk 2 through Disk
4,
and then
Disk 1 again. You will get the following message.
lnrtallatlon
was successful. Choose Cult if
you
ere
flnlshed
nr
Ccdlnue
to perform
further
lnstallatlonr.
7.
Click on Quit, eject Disk
1,
and reboot your Macintosh.
Note: If your EPSON Stylus is connected to the serial port and you are run-
ning System 7.5.1, or earlier, it is suggested that you update your serial driver.
See page
12, item
10
for details.
Launching PowerRIP
1.
Open the PowerRIP
3.1
f
o
Id
er
on your hard drive and double click on the
PowerRIP icon to launch the application and open the PowerRIP Control
Panel.
2.
Under File, select a New Printer and select the model of your EPSON Stylus
printer. If you have installed EPSON’S optional
AppleTalk/Ethertalk
card,
select the model designated (AppleTalk). See the screen examples
on pages 35
and 36 for sample Stylus Setup and naming printer queue folders.
3.
To select the proper PPD (PostScript Printer Description), open the Chooser
(under
&)
and click on the PSPrinter icon. The printer you named (printer
queue) will be displayed in the right column. Highlight the printer name and
make AppleTalk
Active (button on bottom of Chooser window). Click on
Setup...,then on More Choices. Do not click on Auto Setup. On next menu
click on Select PPD. Scroll down, if necessary, to PPDs for Stylus printers
(Stylus
Color.PPD
through Stylus
Pro.PPD
Highlight the one that corre-
sponds to your Stylus and click on
Select, then click OK on the next menu.
Close the Chooser by clicking on the upper left box.
4
Birmy
Graphics Corporation