PowerRIP 2000 User’s Guide Professional Proofing Software for Ink Jet Printers © 2001 iProof Systems, Inc. All Rights Reserved. Information contained in this document is subject to change without notice and does not represent a commitment on the part of iProof Systems, Inc. The software described in this document is furnished under the dealer agreement or nondisclosure agreement. The software may be used or copied only in accordance with the terms of the agreement.
Contents Introduction Chapter 1 Features . . . . . . . . . . . . . . . . . . . . . . . . . . . . . . . . . . . . . . . . . . . . . . .4 Where to Get Help . . . . . . . . . . . . . . . . . . . . . . . . . . . . . . . . . . . . . .5 Installing PowerRIP 2000 Chapter 2 Installing PowerRIP 2000 Software (Server/Stand-alone) . . . . . . . . .6 Modify, Remove or Repair PowerRIP 2000 . . . . . . . . . . . . . . . . . . . .7 Additional Local Printers . . . . . . . . . . . . . . . . . . . . . . . . . . . . . . . .
Creating TIFF Image using PageMaker . . . . . . . . . . . . . . . . . . . . . . .23 Output Tab . . . . . . . . . . . . . . . . . . . . . . . . . . . . . . . . . . . . . . . . . . . . .25 Color Tab . . . . . . . . . . . . . . . . . . . . . . . . . . . . . . . . . . . . . . . . . . . . . .26 Separation Tab . . . . . . . . . . . . . . . . . . . . . . . . . . . . . . . . . . . . . . . . . .27 Nesting Chapter 6 Overview . . . . . . . . . . . . . . . . . . . . . . . . . . . . . . . . . . . . . . . . . . . . . .
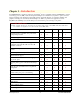
Chapter 1 - Introduction PowerRIP 2000 turns your ink jet printer into a PostScript® Level 3 compatible printer. PowerRIP 2000, a software raster image processor (RIP), reads and interprets PostScript Level 3 and allows your printer to print color raster images. PostScript is the standard for high quality graphic output. All elements of a document, including text, graphics, and images are described by the PostScript code.
iProof Systems 2401 West Eau Gallie Blvd, Suite 4 Melbourne, FL 32935 USA Telephone Support: (321) 751-2445 Fax Support: (321) 751-2449 Where to Get Help For helpful hints and troubleshooting guidelines, see Chapter 11. If you need further assistance, technical support is available from iProof Systems. When calling for technical assistance, be ready to identify your system and its configuration, the serial number of PowerRIP 2000, and a description of the problems you are encountering.
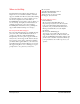
Chapter 2 - Installing PowerRIP 2000 Installing PowerRIP 2000 Software (Server/Standalone) Note: The installation procedure and dialogs displayed are predicated on the printer you are installing, revision of PowerRIP 2000, and your Operating System. Not all features are available on all printers or on all revisions of PowerRIP 2000. 6. The Please Select Version dialog will display. 1. Turn on your computer. If it is already on, check the TaskBar to make sure that you have no appli cations running.
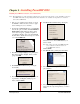
13. A dialog will display telling you the printer has been installed. Click OK. 14. A dialog will display telling you that PowerPDF has been installed. Click OK. 15. The Setup Complete dialog will display. Click Finish. You have completed the PowerRIP 2000 software installation. You must now validate your PowerRIP 2000. If you do not validate PowerRIP 2000 PowerRIP will print across the page. Continue with validating PowerRIP 2000 (page 10). If you wish to change the destination folder click Browse.
4. The Select Components dialog will display. your printer and click Continue. A dialog will display asking you if you wish to update the driver for each printer you have installed. Click Yes and/or OK. The PowerRIP Setup dialog will display. Click Finish. Remove Remove should be used to: • Remove all installed PowerRIP 2000 components (printers). • Remove a previous revision of PowerRIP 2000 before installing a new revision.
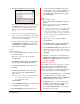
Installing PowerRIP 2000 Software (Client) 3. The Connect to Remote PowerRIP dialog will display. Highlight the Print Server you wish to print to in the Print Server portion of the dialog. Drivers for Remote Workstations Drivers for Remote Workstations gives you the ability to create PowerRIP 2000 Remote Printer Queues for workstations on the network.
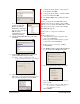
Uninstalling PowerRIP 2000 If you wish to remove a previously installed revision of PowerRIP 2000 and replace it with a new revision, you should use Uninstall. Uninstall will retain the integrity of your validation while removing the previous revisions components. 7. The PowerRIP 2000 Online Validation web page will display. Click Validate PowerRIP 2000. Go to Start>Programs>PowerRIP 2000 Epson> Uninstall. the Install Shield Wizard will display momentarily. Then the following warning will display.
Testing PowerRIP 2000 Now that PowerRIP 2000 has been installed, and validated, you can print a sample pre-made PostScript file to test the system. This test will only verify that the PowerRIP 2000 will process and send PostScript jobs to the printer. It does not test applications sending jobs to the PowerRIP 2000 queue. Follow the steps below. 3. You will get a warning message that removing validation will result in PowerRIP being printed on all further output. Click OK. 4.
x Chapter 3 - Printing to PowerRIP 2000 Click OK. Click Print. Printing to PowerRIP 2000 from most Windows applications is simple. Select the PowerRIP 2000 printer in the print dialog of your applications, select settings for resolution, paper type, etc., and click Print. The application builds the PostScript file in the directory that the PowerRIP 2000 printer specifies.
If you are going to print to a PC server from a Macintosh client you must copy the appropriate Windows PPD to the Macintosh. If you are using an NT server, Services for Mac must be installed. When PowerRIP 2000 is installed on your hard drive a folder called PPD is also installed in that folder.
Printing from a Macintosh Client to Windows NT Server 4.0 or Windows 2000 Server If the select PPD dialog does not automatically open, click on the box with the 3 dots to the right of Use PPD and then navigate to PPD folder and select the appropriate PPD. Note: For this discussion we will be using the LaserWriter driver. The same directions apply for AdobePS. Note: Do not select the SPD. 5. Click Properties. 1. Go to the Chooser and highlight LaserWriter. Click Create.
Chapter 4 - PowerRIP PDF Note: The installation procedure and dialogs displayed are predicated on the revision of PowerRIP PDF, and your Operating System. Not all features are available on all revisions of PowerRIP PDF. PowerRIP PDF is the ideal utility for creating high quality, platform independent PDFs.
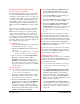
Specify Settings - Output Tab Output File Name Job Name.PDF - creates the PDF using the job name. File Name.PDF - creates the PDF using the name of the file. User Defined - When User Defined is selected User Defined File Name becomes active. You can type a file name for the PDF in this area. Prompt - A dialog will display allowing you to type a file name. Prompt If File Exits If the file or job name already exists in the PDFOut folder a Choose Another Name window will display.
Output Tab (Cont) Thumbnails Thumbnails are very small page representations that aid the user in navigating through multi-page document. Thumbnails are useful for multi-page documents such as manuals. Color Creates a color PDF. Monochrome Not available at this time. View File If you select View File the PDF will automatically be opened in Acrobat as soon as the PowerPDF finishes creating the PDF. iProof Systems, Inc.
Specify Settings - Images Tab Halftone Information - Select Preserve Halftone Information when you want to retains the halftone (screening) information - Select Use Device Dependent Color to use the PowerPDF 2000 color corrected information when creating the PDF. - Select Convert CMYK images to RGB if you want RGB images when the PDF is created. Transfer Function - Remove - will remove the curves in the file when making the PDF.
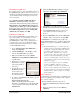
Specify Settings - Color Tab Color Mode Color Mode cannot be deselected. Monochrome not supported in this revision. Intended PDF Color Appearance SRGB-WEB - is the default RGB color space for Windows and the color standard for for the Web. NTSC-1953 - is the color standard for national TV. SWOP - The color matching standard that all printing presses and proofing systems in the United States are based upon.
Specify Settings - Fonts Subset Fonts Selected Subset Fonts if you have created a list of fonts in Always Embed These Fonts. The subset you have created will always be embedded with the PDF when it is created. Embed All Fonts Select Embed All Fonts to embed all the fonts with the PDF when it is created. Never Embed These Fonts Click Add to type the name of the font you never want embedded with the PDF. Highlight the font you want to delete from the list and click Remove.
Specify Settings - Separations Separated Files Select Make Composites to create a composite PDF from separations When you click on Edit/Define Spot Colors the Spot Color Configuration dialog will display. To define a spot color click Add Spot Color. The Add Spot Color dialog will display. Define and name the spot color. Click OK. Your new spot color is added to the Define Spot Color list. To delete a spot color from the Define Spot Color list, highlight the color and click Delete Spot Color.
Edit/Define Spot Color green, and blue phosphors are stimulated at different intensities. RGB uses 3 colors to reproduce up to 16.7 million colors on-screen. When you click Edit/Define Spot Color, the Spot Color Configuration dialog will display. This dialog gives you the ability to Add Spot Colors and/or Delete Spot Colors. You can save your spot colors in CMYK, RGB, or the LAB color mode.
Chapter 5 - PowerRIP TIFF Available in the Platinum and LF Platinum versions only. Note: Not all features are available on all revisions of PowerRIP 2000. Overview PowerRIP TIFF is ideal for creating high quality, high resolution TIFF images that are platform independent. The higher the resolution you select, the higher the quality the TIFF image becomes. But it also should be noted that the higher the resolution selected, the bigger the file, the higher the quality the TIFF becomes.
`6. Launch PowerRIP 2000. The PowerRIP 2000 Main Control Dialog will display. Go to File> Print PostScript file. 9. Select the appropriate features in the Color tab. See page 26 for descriptions of the Color tab features. The Open dialog will display. Highlight your PostScript file and click Open. 7. The Configure Document Specs dialog will display. Select TIFF File in the Printer pull down. Click Specify Settings 10. Select the appropriate features in the Separation tab.
TIFF File Setup - Output tab Output File Name Job Name.TIF - creates the TIFF using the job name. File Name.TIF - creates the TIFF using the name of the file. User Defined - When User Defined is selected User Defined File Name becomes active. You can type a file name for the TIFF in this area. Prompt - A dialog will display allowing you to type a file name. Prompt if File Exists If the file or job name already exists in the PowerRIP TIFF folder a Choose Another Name window will display.
TIFF File Setup - Color tab Color Mode Select the Color Mode that meets your needs. The available selections are CMYK Color or RGB Color. Negative Select Negative if you wish to create a negative TIFF. Mirrored Select Mirrored if you wish to create a mirrored TIFF image. Intended TIFF Color Appearance SRGB-WEB - is the default RGB color space for Windows and the color standard for Appearance for the Web. NTSC-1953 - is the color standard for national TV.
TIFF File Setup - Separation tab Separated Files Select Make Composites to create a composite TIFF from separations When you click on Edit/Define Spot Colors the Spot Color Configuration dialog will display. To define a spot color click Add Spot Color. The Add Spot Color dialog will display. Define and name the spot color. Click OK. Your new spot color is added to the Define Spot Color list. To delete a spot color from the Define Spot Color list, highlight the color and click Delete Spot Color.
Chapter 6 - Nesting Available in the Platinum and LF Platinum versions only. Note: Not all features are available on all revisions of PowerRIP 2000. The nested file can be then converted to a TIFF file using PowerRIP 2000’s PowerRIP TIFF feature for inclusion in Web pages among other uses. Overview Nesting is ideal for combining multiple images and text on a single page to reduce material cost.
Chapter 7 - Color Matching Note: Chapter 7 includes information about ColorSync and Calibration. The features discussed in Chapter7are dependent on your printer and version of PowerRIP 2000. Not all features are available on all printers or on all revisions of PowerRIP 2000. Calibration What is color and why do I have to calibrate The science of color can be very complicated if described using mathematics to describe human vision.
then the CMYK gamut. The RGB gamut consists of any combination of red, green and blue. The CMYK gamut consists of only the colors that can be produced with cyan, magenta, yellow and black. So gamut is the range of colors that can print using a particular set of inks and paper. your images from. You might want to make a number of calibration files for the different paper types and applications that you will be using.
It should be noted that deselecting use Calibration in the Folder Scanner Configuration dialog will disable the customized calibration file. Your files will then be printed with the PowerRIP 2000 default settings. If you type 30 in that box your image will print darker, more saturated. Output Calibration NOTE: It is highly recommended that a densitometer be used when calibrating the PowerRIP 2000. Though you can calibrate without a densitometer you will be relying on the human eye, light source, etc.
• Midtone • Highlight (White) This will flatten the shadows. • • Midtone • Highlight (White) Less Contrast Dot gain is the change in size of the printed dot. Dot gain is defined as an additive percentage so the increase of the dot size from 50% to 60% is called 10% gain. It should also be noted, at this point, that the ink jet printer uses a dithered (stochastic) dot. You must remember when working with Dot Gain curves the higher the number the darker your output will print.
• Cancel: Click Cancel to exit the Q-Curve 5.0 dialog. • Save As: After you have created a customized file click Save As to save the file for future use. The Save As dialog will display. Give your calibration file a name and click Save. Note: You should have created a folder on your hard drive to store your customized calibration files. It is not wise to save your calibration files in the PRPC2000 folder. If you upgrade or uninstall and reinstall you could lose your customized calibration files.
Chapter 8 - PowerRIP 2000 System Requirements Chapter 8 includes system requirements for all supported printers. RAM and Disk Space Requirements Printer Epson Series Epson Stylus Color, Color II, Color IIs, 400, 500, 600, 640, 660, 740, 760, 800, 850, 860, 900, 1160, 1500, 1520, 3000 Epson Stylus Pro, Pro XL, Pro XL+, 5000, 777, 880, 980 Disk Space RAM 48 MB minimum (64 MB recommended) Startup drive should have a minimum of 200 MB of free space for letter size pages, 280 MB free for legal size.
Chapter 9 - Properties/Features Note: The features discussed in Chapter 9 are dependent on your printer and version of PowerRIP 2000. Not all features are available on all printers or on all revisions of PowerRIP 2000. PowerRIP 2000 Printers Option Description Paper Size Paper Size should be set to match the paper you have in the printer. The default setting is Letter. Copy Count Select the number of copies you wish to print. The default is 1.
PowerRIP 2000 Printers Properties/Features (Cont) Option Description Mirror Image Mirror Image should be set to No unless you wish to print a mirror image. Negative Image Negative Image should be set to No unless you wish to print a Negative image. Paper Type Paper Type should be set to match the paper you have in the printer. PowerRIP 2000’s Color Rendering Dictionaries (CRDs) are based upon the printers special paper stocks. These CRDs produce the maximum output quality on the selected paper.
PowerRIP PDF Properties/Features Option Description PDF Color Appearance SRGB-WEB is the default color space for Windows and the color standard for the Web. NTSC -1953 is the color standard for national TV. SWOP is the color standard that all printing presses and proofing systems in the United States are based on. Select the color appearance that meets you PDF needs. SEGB-Web is the default setting. Make Separations Make Separations should be set to No unless you are creating a separation PDF.
PowerRIP PDF Properties/Features (Cont) Option Description Device Dependent Color Select Yes to use the PowerPDF 2000 color correction information when creating the PDF. No is the default setting. Preserve Halftone Info Select Yes if you want to retain the halftone (screening) information. Yes is the default setting. Create Thumbnails Select No if you do not wish to create Thumbnails. Select Color if you wish to create Thumbnails in color.
PowerRIP TIFF Properties/Features Option Description TIFF Color Appearance SRGB-WEB is the default color space for Windows and the color standard for the Web. NTSC -1953 is the color standard for national TV. SWOP is the color standard that all printing presses and proofing systems in the United States are based on. Make Separations Make Separations should be set to No unless you are creating a separation. You can create separations In Color or In Black. No is the default setting.
Chapter 10 - PowerRIP 2000 User Interface Note: The User Interface information discussed in this chapter is dependent on your printer and version of PowerRIP 2000. Not all features are available on all printers or on all revisions of PowerRIP 2000. PowerRIP 2000 Control Panel Dialog Auxiliary Control dialog) will force PowerRIP 2000 to abort its current process and flush the PostScript file back to the queue folder.
nostic in nature, and can help technical support personnel identify and correct problems you may encounter when printing PostScript files. Status Bar The Status Bar displays various messages depending on what the mouse pointer is pointed at. The Status Bar can be turned off in the View menu. Folder Settings: This portion controls which queue folder PowerRIP 2000 scans for new files, and the type of files it scans for.
• This dialog allows you to change how often PowerRIP 2000 scans the selected queue folder, and how many times PowerRIP 2000 will scan a new PostScript file before beginning to process it. • Paper tab: Note: This last feature can come in very handy when printing over a slow or busy network. If a PostScript file is incomplete when PowerRIP 2000 starts to process it, it could result in various problems. Increasing the value for this feature can prevent problems from occurring.
x • Configure PowerRIP 2000: Selecting this command opens the Configure PowerRIP dialog, which allows you to control how long printed PostScript files remain available for reprinting, and how many files are retained. It also allows you to name your log file (You can use any name you wish, but if you add the standard .txt extension to the file name, the file can be opened automatically in NotePad or another text editor.
Chapter 11 - Troubleshooting Chapter11 will explore various troubleshooting options to help you solve problems you may encounter while installing, setting up, and using PowerRIP 2000 without the need to call on Technical Support. This appendix is divided into separate sections for troubleshooting PowerRIP 2000 Installation, Testing PowerRIP 2000, Printing to PowerRIP 2000, and Printing Quality.
Problem Solution (Continued from previous page) • If you are using an automatic switchbox, see if there is a manual override to lock in a specific port. If there is, lock in the port to which your computer is connected. • If you are using an Ethernet-to-Parallel “bridge,” see if you can lock in a specific port, or connect the printer directly to the computer on which PowerRIP 2000 is installed. PowerRIP 2000 cancels jobs without user interaction or visible alerts.
Problem Solution A message about insufficient memory is printed in place of or after a job. You are running our of free disk space on the boot drive (usually C:\). Free up memory by deleting unused files and applications, and defragmenting your hard drive(s). This message sometimes occurs when printing from FreeHand. Convert any Spot colors to Process. Jobs stop printing after a certain time and the paper is ejected before printing is complete.
Glossary Several items having special meaning within the context of this manual are listed below: application Applications are the programs that run on a computer. Some common desktop publishing and graphics applications are PageMaker an Photoshop. bitmap Bitmaps are images preprocessed at a fixed resolution for a certain monitor or printer. CMYK Acronym for Cyan, Magenta, Yellow, and Black (K), the four standard process colors for printing.
Index A I Always Overwrite.....................................................16 Auto Rename ................................................................16 Rotate...................................................................38 Auxiliary Control Panel............................................40 ICC Profiles ..............................................................33 Installing Client .....................................................................7 PowerRIP 2000......................
Remove.......................................................................8 Remove Validation ...................................................10 Repair..........................................................................8 Requirements ..............................................................4 Resolution...........................................................16, 35 S Scaling ......................................................................35 Separated Files...........................